Tooltip Testing
Testing a tooltip can be difficult, since right-clicking the tooltip to map the field in Test Builder will cause the Tooltip to disappear. We need therefore to map the field manually.
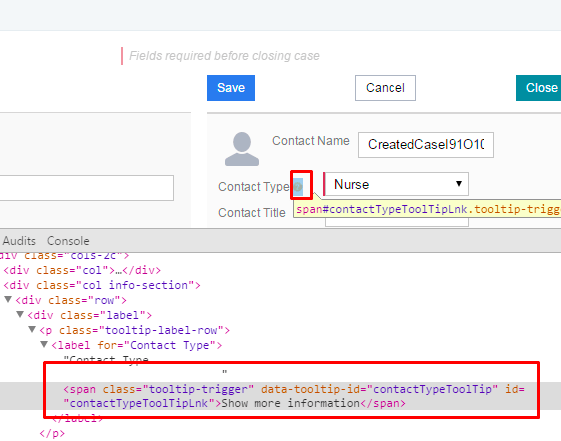
Step 1: Right-click on the field which produces the tooltip and choose Inspect (or press F12):
Step 2: In a PageObject of type LinkType(), create a WebElement for the located tooltip icon:

Step 3: In the Test Case, choose the Hover option on UI Action Test Step.
Assert tooltip
Now that the tooltip is appearing, we need to manually map the tooltip to be able to assert it.
- In Chrome, hover over a field with a tooltip and choose Inspect (or press F12)
- Move to the Elements tab of Inspect (or press Ctrl + Shift + C)
- Click the Tooltip and the element will be shown at the bottom of the screen
- Use the up and down keys on the keyboard to locate the element you would like to map. Once you find it, right-click and select Copy Xpath or Copy CSS Path to add the locator to the clipboard
- Add the new locator to the Page Object manually
- Add a UI Assert Test Step to your Test Case and add the expected test of the tooltip to be asserted

Documentation library
- Home
- Get Started with V2
- Using Provar
- Understanding Provar’s Use of AI Service for Test Automation
- Provar Automation
- Creating a New Test Project
- Import Test Project from a File
- Import Test Project from a Remote Repository
- Import Test Project from Local Repository
- Commit a Local Test Project to Source Control
- Salesforce API Testing
- Behavior-Driven Development
- Consolidating Multiple Test Execution Reports
- Creating Test Cases
- Custom Table Mapping
- Functions
- Debugging Tests
- Defining a Namespace Prefix on a Connection
- Defining Proxy Settings
- Environment Management
- Exporting Test Projects
- Exporting Test Cases into a PDF
- Japanese Language Support
- Override Auto-Retry for Test Step
- Customize Browser Driver Location
- Mapping and Executing the Lightning Article Editor in Provar
- Managing Test Steps
- Namespace Org Testing
- NitroX
- Provar Test Builder
- ProvarDX
- Refresh and Recompile
- Reintroduction of CLI license Check
- Reload Org Cache
- Reporting
- Running Tests
- Searching Provar with Find Usages
- Secrets Management and Encryption
- Setup and Teardown Test Cases
- Tags and Service Level Agreements (SLAs)
- Test Cycles
- Test Plans
- Testing Browser – Chrome Headless
- Testing Browser Options
- Tooltip Testing
- Using the Test Palette
- Using Custom APIs
- Callable Tests
- Data-Driven Testing
- Page Objects
- Block Locator Strategies
- Introduction to XPaths
- Creating an XPath
- JavaScript Locator Support
- Label Locator Strategies
- Maintaining Page Objects
- Mapping Non-Salesforce Fields
- Page Object Operations
- ProvarX™
- Refresh and Reselect Field Locators in Test Builder
- Using Java Method Annotations for Custom Objects
- Applications Testing
- Database Testing
- Document Testing
- Email Testing
- Email Testing in Automation
- Email Testing Examples
- Gmail Connection in Automation with App Password
- App Configuration for Microsoft Connection in MS Portal for OAuth 2.0
- OAuth 2.0 Microsoft Exchange Email Connection
- Support for Existing MS OAuth Email Connection
- OAuth 2.0 MS Graph Email Connection
- Create a Connection for Office 365 GCC High
- Mobile Testing
- OrchestraCMS Testing
- Salesforce CPQ Testing
- ServiceMax Testing
- Skuid Testing
- Vlocity API Testing
- Webservices Testing
- DevOps with V2
- Introduction to Provar DevOps
- Introduction to Test Scheduling
- Apache Ant
- Configuration for Sending Emails via the Automation Command Line Interface
- Continuous Integration
- AutoRABIT Salesforce DevOps in Provar Test
- Azure DevOps
- Running a Provar CI Task in Azure DevOps Pipelines
- Configuring the Automation Secrets Password in Microsoft Azure Pipelines
- Parallel Execution in Microsoft Azure Pipelines using Multiple build.xml Files
- Parallel Execution in Microsoft Azure Pipelines using Targets
- Parallel Execution in Microsoft Azure Pipelines using Test Plans
- Bitbucket Pipelines
- CircleCI
- Copado
- Docker
- Flosum
- Gearset
- GitHub Actions
- Integrating GitHub Actions CI to Run Automation CI Task
- Remote Trigger in GitHub Actions
- Parameterization using Environment Variables in GitHub Actions
- Parallel Execution in GitHub Actions using Multiple build.xml Files
- Parallel Execution in GitHub Actions using Targets
- Parallel Execution in GitHub Actions using Test Plan
- Parallel Execution in GitHub Actions using Job Matrix
- GitLab Continuous Integration
- Travis CI
- Jenkins
- Execution Environment Security Configuration
- Provar Jenkins Plugin
- Parallel Execution
- Running Provar on Linux
- Reporting
- Salesforce DX
- Git
- Version Control
- Salesforce Testing
- Recommended Practices
- Salesforce API Access Control Security Update – Impact on Provar Connections
- Salesforce Connection Best Practices
- Improve Your Metadata Performance
- Java 21 Upgrade
- Testing Best Practices
- Automation Planning
- Supported Testing Phases
- Provar Naming Standards
- Test Case Design
- Create records via API
- Avoid using static values
- Abort Unused Test Sessions/Runs
- Avoid Metadata performance issues
- Increase auto-retry waits for steps using a global variable
- Create different page objects for different pages
- The Best Ways to Change Callable Test Case Locations
- Working with the .testProject file and .secrets file
- Best practices for the .provarCaches folder
- Best practices for .pageObject files
- Testing Best Practices
- Troubleshooting with V2
- How to Use Keytool Command for Importing Certificates
- Browsers
- Configurations and Permissions
- Add Permissions to Edit Provar.ini File
- Configure Provar UI in High Resolution
- Enable Prompt to Choose Workspace
- Increase System Memory for Provar
- Refresh Org Cache Manually
- Show Hidden Provar Files on Mac
- Java Version Mismatch Error
- Unable to create test cases, test suites, etc… from the Test Project Navigation sidebar
- Connections
- DevOps with V2
- Error Messages
- Provar Manager 3.0 Install Error Resolution
- Quality Hub Test Case Upload Resolution
- Administrator has Blocked Access to Client
- JavascriptException: Javascript Error
- Resolving Failed to Create ChromeDriver Error
- Resolving Jenkins License Missing Error
- Resolving Metadata Timeout Errors
- Test Execution Fails – Firefox Not Installed
- Selenium 4 Upgrade
- Licensing and Installation
- Memory
- Test Builder
- V2 Release Notes