Activating Your License
Last Modified:
This page explains how to activate your Provar Automation license.
Developer Licenses – Trial, Floating, and Fixed Seat licenses
When you open Provar Automation for the first time, the Welcome Window will appear with the License Manager on top of it.
If the License Manager does not appear, go to Help > License Manager to open it.
From the License Manager, Click the Add button to create a new entry.
A new window will pop up to enter your license key.
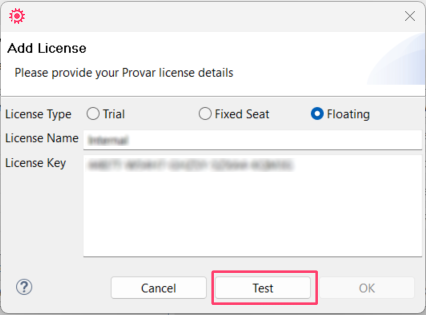
Select a radio button for your License Type. You can read more about license types or contact support@provartesting.com for assistance.
Enter a License Name for your new license, or accept the default.
Then, enter your License Key in the box provided. For Fixed Seat or Floating licenses, the key will be 25 characters. For Trial licenses, the key will be significantly more prolonged and will extend beyond the box provided.
After entering your license information make sure to click the Test button.
A successful validation will present a success message at the bottom of the screen. If your test is successful, click the OK button.
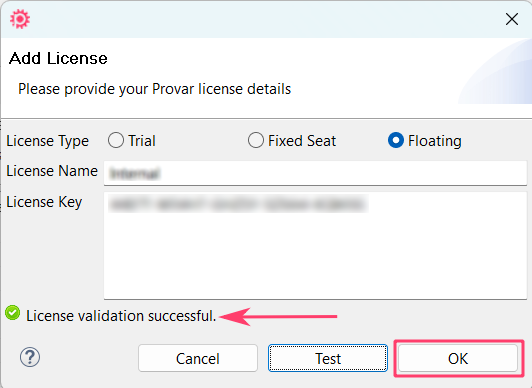
Note: If your validation is unsuccessful, check that you have entered the details correctly and try again. You may have reached the maximum number of active licenses for your organization. If the problem persists, contact your designated Provar support rep or email the team at support@provartesting.com.
On the next screen activate your license by clicking the Activate button.
Select the License Type appropriate for your License Key: Trial, Fixed Seat, or Floating. (For more information on the different types, please refer to the License Types page.)
Then, enter your License Key in the box provided. For Fixed Seat or Floating licenses, the key will be 25 characters. For Trial licenses, the key will be significantly more prolonged and will extend beyond the box provided.
Once you have entered these details, click the Test button.
If your validation is unsuccessful, check that you have entered the details correctly and try again. If the problem persists, contact your designated Provar support rep or email the team at support@provartesting.com.
If your test is successful, click the OK button.
To activate your license, click the Activate button. Your license status should go to Activated, and the bulb next to the License Name should light up ().
Click the OK button to proceed.
For more information, check out this course on University of Provar.
- Provar Automation
- System Requirements
- Browser and Driver Recommendations
- Installing Provar Automation
- Updating Provar Automation
- Licensing Provar
- Granting Org Permissions to Provar Automation
- Optimizing Org and Connection Metadata Processing in Provar
- Using Provar Automation
- Understanding Provar’s Use of AI Service for Test Automation
- Provar Automation
- Creating a New Test Project
- Import Test Project from a File
- Import Test Project from a Remote Repository
- Import Test Project from Local Repository
- Commit a Local Test Project to Source Control
- API Testing
- Behavior-Driven Development
- Consolidating Multiple Test Execution Reports
- Creating Test Cases
- Custom Table Mapping
- Functions
- Debugging Tests
- Defining a Namespace Prefix on a Connection
- Defining Proxy Settings
- Environment Management
- Exporting Test Cases into a PDF
- Exporting Test Projects
- Japanese Language Support
- Override Auto-Retry for Test Step
- Customize Browser Driver Location
- Mapping and Executing the Lightning Article Editor in Provar
- Managing Test Steps
- Namespace Org Testing
- NitroX
- Provar Test Builder
- ProvarDX
- Refresh and Recompile
- Reintroduction of CLI License Check
- Reload Org Cache
- Reporting
- Running Tests
- Searching Provar with Find Usages
- Secrets Management and Encryption
- Setup and Teardown Test Cases
- Tags and Service Level Agreements (SLAs)
- Test Cycles
- Test Data Generation
- Test Plans
- Testing Browser – Chrome Headless
- Testing Browser Options
- Tooltip Testing
- Using the Test Palette
- Using Custom APIs
- Callable Tests
- Data-Driven Testing
- Page Objects
- Block Locator Strategies
- Introduction to XPaths
- Creating an XPath
- JavaScript Locator Support
- Label Locator Strategies
- Maintaining Page Objects
- Mapping Non-Salesforce fields
- Page Object Operations
- ProvarX™
- Refresh and Reselect Field Locators in Test Builder
- Using Java Method Annotations for Custom Objects
- Applications Testing
- Provar Manager
- How to Use Provar Manager
- Provar Manager Setup
- Provar Manager Integrations
- Release Management
- Test Management
- Test Operations
- Provar Manager and Provar Automation
- Setting Up a Connection to Provar Manager
- Object Mapping Between Automation and Manager
- How to Upload Test Plans, Test Plan Folders, Test Plan Instances, and Test Cases
- Provar Manager Filters
- Uploading Callable Test Cases in Provar Manager
- Uploading Test Steps in Provar Manager
- How to Know if a File in Automation is Linked in Test Manager
- Test Execution Reporting
- Metadata Coverage with Manager
- Provar Grid
- DevOps
- Introduction to Provar DevOps
- Introduction to Test Scheduling
- Apache Ant
- Configuration for Sending Emails via the Automation Command Line Interface
- Continuous Integration
- AutoRABIT Salesforce DevOps in Provar Test
- Azure DevOps
- Running a Provar CI Task in Azure DevOps Pipelines
- Configuring the Automation secrets password in Microsoft Azure Pipelines
- Parallel Execution in Microsoft Azure Pipelines using Multiple build.xml Files
- Parallel Execution in Microsoft Azure Pipelines using Targets
- Parallel execution in Microsoft Azure Pipelines using Test Plans
- Bitbucket Pipelines
- CircleCI
- Copado
- Docker
- Flosum
- Gearset
- GitHub Actions
- Integrating GitHub Actions CI to Run Automation CI Task
- Remote Trigger in GitHub Actions
- Parameterization using Environment Variables in GitHub Actions
- Parallel Execution in GitHub Actions using Multiple build.xml Files
- Parallel Execution in GitHub Actions using Targets
- Parallel Execution in GitHub Actions using Test Plan
- Parallel Execution in GitHub Actions using Job Matrix
- GitLab Continuous Integration
- Travis CI
- Jenkins
- Execution Environment Security Configuration
- Provar Jenkins Plugin
- Parallel Execution
- Running Provar on Linux
- Reporting
- Salesforce DX
- Git
- Version Control
- Salesforce Testing
- Recommended Practices
- Salesforce Connection Best Practices
- Improve Your Metadata Performance
- Java 21 Upgrade
- Testing Best Practices
- Automation Planning
- Supported Testing Phases
- Provar Naming Standards
- Test Case Design
- Create records via API
- Avoid using static values
- Abort Unused Test Sessions/Runs
- Avoid Metadata performance issues
- Increase auto-retry waits for steps using a global variable
- Create different page objects for different pages
- The Best Ways to Change Callable Test Case Locations
- Working with the .testProject file and .secrets file
- Best practices for the .provarCaches folder
- Best practices for .pageObject files
- Troubleshooting
- How to Use Keytool Command for Importing Certificates
- Installing Provar After Upgrading to macOS Catalina
- Browsers
- Configurations and Permissions
- Connections
- DevOps
- Error Messages
- Provar Manager 3.0 Install Error Resolution
- Provar Manager Test Case Upload Resolution
- Administrator has Blocked Access to Client
- JavascriptException: Javascript Error
- macOS Big Sur Upgrade
- Resolving Failed to Create ChromeDriver Error
- Resolving Jenkins License Missing Error
- Resolving Metadata Timeout Errors
- Test Execution Fails – Firefox Not Installed
- Selenium 4 Upgrade
- Licensing, Installation and Firewalls
- Memory
- Test Builder and Test Cases
- Release Notes
- Provar AI Assistant Popup Test