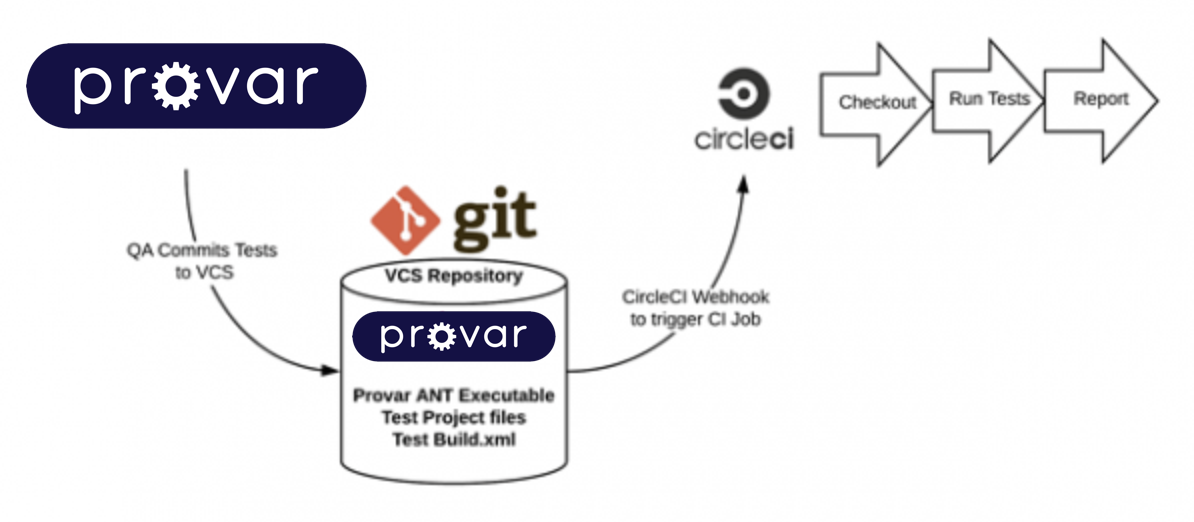
CircleCI via Docker
More and more enterprise businesses have adopted a DevOps methodology for continuous improvement to their business users, such as CircleCI via Docker. The Salesforce platform is at the forefront of this from a SaaS CRM perspective. Salesforce customers use various CI platforms, including hosted and cloud-based, to implement their Continuous Improvement and Continuous Deployment pipelines.
Most of Automation’s documentation refers to Jenkins, widely regarded as a top CI/CD tool due to its flexibility to be customized through a wide array of plugins and its ability to run locally and on the cloud. CircleCI is also a top CI tool and is extremely popular for its cloud-based solution that is easy to set up and configure.
Automation currently runs under any CI tool that can execute an ANT task, generally any CI tool that implements a command line interface. This guide will walk you through setting up a Continuous Integration Pipeline in CircleCI via Docker container. This forms the first part of Automation’s Containerization roadmap.
This guide will walk you through setting up a CircleCI Pipeline that can be run as a Continuous Integration process when changes are made to your Version Control System (VCS). We do not provide documentation on managing your application deployments, but plenty of documentation is already available for doing this with Salesforce Scratch Orgs and Sandboxes.
Similar guides have been made available for Jenkins, TFS, and Azure DevOps (VSTS); see the Further Reading section for more information.
Prerequisites in CircleCI using Docker
The following steps can be completed using a free CircleCI account. Sign-up is available here, or you can use an existing account. This guide also assumes you’ve already integrated your Provar project with a Git repository, as documented here. The details are provided below regarding which artifacts to commit to your Git repository.
Note: Currently, the CircleCI can only be used with Github or Bitbucket repositories.
Overview
We have used the following systems in the example to create a Continuous Integration pipeline.
You can adapt this for your environment; hosting your VCS repository within Azure DevOps is a more straightforward solution than the one listed below. The key steps are the setup of your project repository, customization of your Provar build.xml file, and configuration of the ANT task. We’ll cover the rest of these steps below.
VCS Repository Configuration
We’ve made public a working project you can use on GitHub, pre-configured for Azure DevOps, with the examples included in the screenshots in this guide: https://github.com/rclark-provar/cidemo.
You may wish to test configuration with this project, creating your branch, before you attempt to configure your project. The critical project structure is as follows. You can have more files, but this is the minimum required.
Repo root
|_ .circleci // The steps below will walk you through config.yaml
|_ config.yml // The YAML pipeline script that CircleCI executes
|_ DemoProject // Automation Project you wish to test using our Git plugin
|_ Results // You can move this, but note the path for test results
|_ .secrets // Do not store your .secrets file in a public repository!
|_ src
|_ pageobjects // Pageobjects locator source files
|_ tests // Parent folder for running all tests if required
|_ // Test cases you wish to execute
|_ .testproject // Automation project configuration file
|_ build.xml // ANT build.xml file to be executed in the pipeline
|_ Provar
|_ .licenses //Folder for your license files, you can have multiple
|_ urlicense.properties // Ensure your license file isn’t public
|_ ProvarHome
|_ ant // From our Provar ANT Download
|_ lib // From our Provar ANT Download
For instructions on integrating your Automation project into Git, please refer to our Git and Provar Projects guide.
Build.xml Configuration
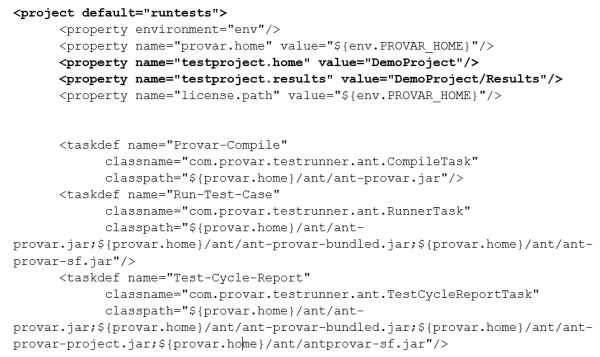
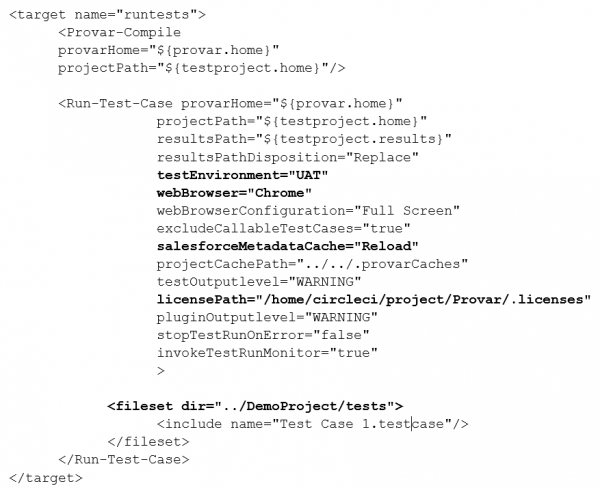
Provar helps you create a default build.xml which is excellent for running locally, but you will most likely need to adapt this for your CI server environment. The complete set of parameters is documented here. Below is an example from the DemoProject with some values called out for your attention. This sample file shows the build.xml below in plaintext.
| Setting | Notes |
|---|---|
| project default=”runtests” | The default ANT target when no target is specified |
| property name=”testproject.home” | The Automation project root in your repository |
| property name=”testproject.results” | The Automation Results directory in your repository |
| target name=”runtests” | You can, and should, have multiple targets defined in your build.xml. In our example, we had one for CircleCI and one for VSTS, but this can be for different Environments, Browsers, and test levels (Smoke, Regression, Unit Test) for different stages of your DevOps process |
| testEnvironment=”UAT” | Only specify if you’ve defined Environments in your Automation project. These are included in the .testproject file |
| webBrowser=”Chrome” | |
| salesforceMetadataCache=”Reload” | Depending on your type of pipeline, you can either Reuse metadata cached in the repository or specify to get the latest metadata every time |
| licensePath=”/home/circleci/project/Provar/.licenses.” | The license path needs to be fully qualified currently. We’re soon releasing a relative path solution to ensure you can run on multiple agents in a pool. |
| fileset dir=”../DemoProject/tests” | You can parameterize what tests to run or select a suite of tests or folders to include. This will typically vary based on the step in the DevOps process you are testing. Regression tests tend to be a complete test pack, but during a developer making a Pull Request, you’d run a smaller set of tests to verify critical areas in less time. |
CircleCI Pipeline
Follow the steps below to set up your CircleCI Pipeline. You should review the features of CircleCI before you decide how to build your pipelines and what parameters to configure.
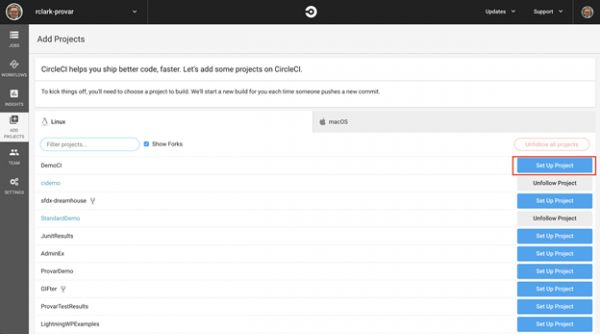
Step 1: Create a new project.
Complete the details as per your specific requirements. Projects are synonymous with VCS repositories you have already set up either in GitHub or Atlassian Bitbucket. Pick the Git repo you integrated with Automation already.
Step 2: Select VCS Repository Type.
To go further, you must create a config.yml file and add it to your repository as indicated in the prerequisite steps.
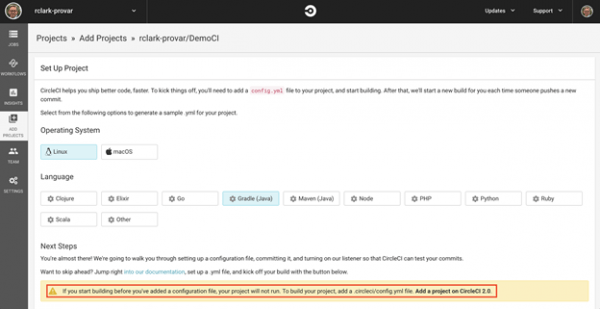
# Automation CircleCI 2.0 configuration file
#
# Check https://circleci.com/docs/2.0/language-java/ for more details
#
version: 2
jobs:
build:
docker:
# The -browsers variant sets up.
# all prerequisites for Selenium testing, nice, huh?
– image: circleci/openjdk:8-jdk-browsers
# Specify service dependencies here if necessary
# CircleCI maintains a library of pre-built images
# documented at https://circleci.com/docs/2.0/circleci-images/
# No further dependencies are required for Provar
# working_directory: ~/repo
environment:
# Customize the JVM maximum heap limit
# Set up environment variables here that don’t need to be secure
# We’ll add some additional variables in CircleCI itself for UN & PW
PROVAR_HOME: /home/circleci/project/ProvarHome
testproject.home: /home/circleci/project/DemoProject
testproject.results: /home/circleci/project/DemoProject/Results
Steps:
# Retrieve the contents of the repo
– checkout
# Download and cache dependencies
– restore_cache:
keys:
– v1-dependencies-{{ checksum “DemoProject/build.xml” }}
# fallback to using the latest cache if no exact match is found
– v1-dependencies-
# run: Automation Test Scripts under ANT
# See https://documentation.provar.com/support/devops/apache-ant-task-parameters/
# for more info on Automation ANT parameters
– run: ant -lib $PROVAR_HOME/ant -f DemoProject/build.xml
# List test results folder for display
– store_test_results:
path: /home/circleci/project/CIProject/Results
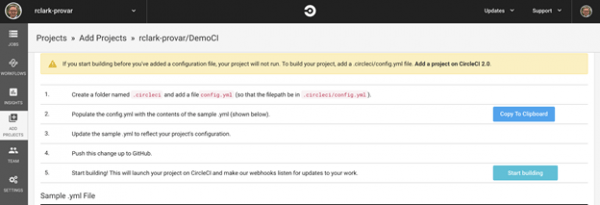
Once you’ve checked in your yaml file, click the Start Building button.
Step 3: Add missing environment variables.
Unless you included your Provar .secrets file in your Git repository, your build might fail the first time. Never fear! We can securely set the password for our test project Salesforce user using CircleCI’s environment variables.
Click the Variables sub-tab and add an entry for the PROVAR_HOME based on your Git repository structure; in our case, this is CIProject. This is a good place for other environment variables you may want to edit frequently, such as which ANT target to execute, the environment, or the test case path.
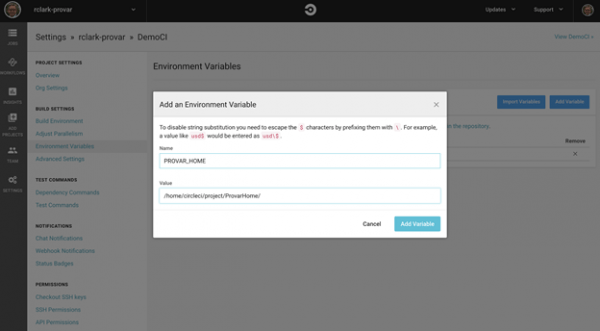
If you’re using a public repository and have authenticated connections, we recommend storing your connection usernames and passwords as either pipeline or Release Variables. Automation looks for two special environment variables when it cannot find a .secrets file for a connection:

Note that this is case-sensitive; ensure you replicate the correct format above.
Note that as of Provar v1.9.5, you can specify your encryption key for the Automation .secrets file and pass the encryption key as an environment variable to the ANT task in your config.yml file. This is also useful when you have multiple SF connections. See Automation Secrets Encryption for more information.
Step 4: Re-run the pipeline.
If all is well, your pipeline is now ready to run. Whenever you check in new tests or edit tests as part of your GitHub (or Bitbucket) repository, the pipeline will trigger a job to execute your tests. You probably don’t want to run your whole test pack every time a test changes, so consider how you configure your CircleCI Docker project only to test what’s changed.
Step 5: If all goes well.
You should get a successful job result. Likely, you won’t on the first attempt, so click into the error if you get one and review the issue. The most common causes are incorrect license file location or type, inconsistent settings in the build.xml target, or missing files from the git repository.
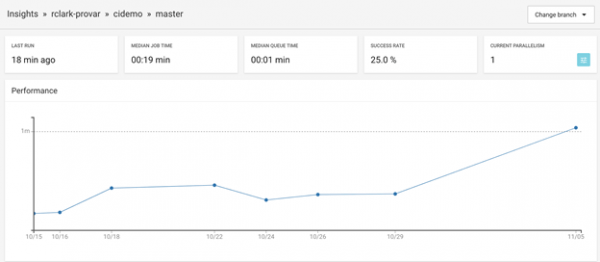
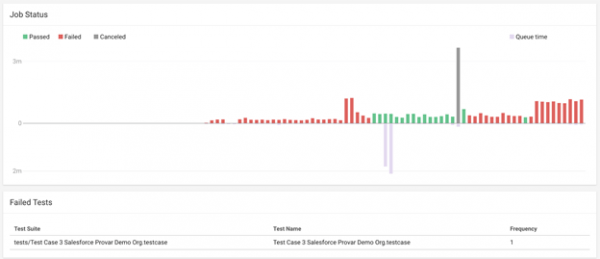
Even your failures tell a story, and drilling down into CircleCI’s test analysis can be interesting to see trends over time.

Troubleshooting CircleCI Pipeline
After configuring from the steps above, your pipeline process should work 100%. If you’ve deviated from the steps above, check carefully if your changes are consistent and in synch. (e.g., the location of build.xml, Automation Home configuration, and Automation License files and path).
The following is a summary of common symptoms and how to correct them.
| Symptom | Cause | Solution |
|---|---|---|
| No Provar license found | Ant job is started but Automation exits if no valid license key is found | Move the .license Folder to the correct position or rectify the licensePath in your build.xml |
| License incorrect format | The licensePath can be either a folder or specific file. The content of that file must be in the correct format. | Activate licenses locally using Automation and upload the .license files to your repo without editing them |
| Chrome/Firefox/IE not installed | The VSTS agent does not include browser apps | Check the Agent Pool selected is Hosted VS2017 or a Custom Build Agent which includes the required browsers |
| Results not found | The file location specified in the ANT job and build.xml do not match | Check both values and ensure they are in synch before running again. |
- Provar Automation
- Installing Provar Automation
- Updating Provar Automation
- Using Provar Automation
- API Testing
- Behavior-Driven Development
- Creating and Importing Projects
- Creating Test Cases
- Custom Table Mapping
- Functions
- Debugging Tests
- Defining a Namespace Prefix on a Connection
- Defining Proxy Settings
- Environment Management
- Exporting Test Cases into a PDF
- Exporting Test Projects
- Override Auto-Retry for Test Step
- Managing Test Steps
- Namespace Org Testing
- NitroX
- Provar Automation
- Provar Test Builder
- Refresh and Recompile
- Reintroduction of CLI License Check
- Reload Org Cache
- Reporting
- Running Tests
- Searching Provar with Find Usages
- Secrets Management and Encryption
- Setup and Teardown Test Cases
- Tags and Service Level Agreements (SLAs)
- Test Cycles
- Test Plans
- Testing Browser Options
- Tooltip Testing
- Using the Test Palette
- Using Custom APIs
- Callable Tests
- Data-Driven Testing
- Page Objects
- Block Locator Strategies
- Introduction to XPaths
- Creating an XPath
- JavaScript Locator Support
- Label Locator Strategies
- Maintaining Page Objects
- Mapping Non-Salesforce fields
- Page Object Operations
- ProvarX™
- Refresh and Reselect Field Locators in Test Builder
- Using Java Method Annotations for Custom Objects
- Applications Testing
- Provar Manager
- How to Use Provar Manager
- Provar Manager Setup
- Provar Manager Integrations
- Release Management
- Test Management
- Test Operations
- Provar Manager and Provar Automation
- Setting Up a Connection to Provar Manager
- Object Mapping Between Automation and Manager
- How to Upload Test Plans, Test Plan Folders, Test Plan Instances, and Test Cases
- Provar Manager Filters
- Uploading Callable Test Cases in Provar Manager
- Uploading Test Steps in Provar Manager
- How to Know if a File in Automation is Linked in Test Manager
- Test Execution Reporting
- Metadata Coverage with Manager
- Provar Grid
- DevOps
- Introduction to Provar DevOps
- Introduction to Test Scheduling
- Apache Ant
- Configuration for Sending Emails via the Automation Command Line Interface
- Continuous Integration
- AutoRABIT Salesforce DevOps in Provar Test
- Azure DevOps
- Running a Provar CI Task in Azure DevOps Pipelines
- Configuring the Automation secrets password in Microsoft Azure Pipelines
- Parallel Execution in Microsoft Azure Pipelines using Multiple build.xml Files
- Parallel Execution in Microsoft Azure Pipelines using Targets
- Parallel execution in Microsoft Azure Pipelines using Test Plans
- Bitbucket Pipelines
- CircleCI
- Copado
- Docker
- Flosum
- Gearset
- GitHub Actions
- Integrating GitHub Actions CI to Run Automation CI Task
- Remote Trigger in GitHub Actions
- Parameterization using Environment Variables in GitHub Actions
- Parallel Execution in GitHub Actions using Multiple build.xml Files
- Parallel Execution in GitHub Actions using Targets
- Parallel Execution in GitHub Actions using Test Plan
- Parallel Execution in GitHub Actions using Job Matrix
- GitLab Continuous Integration
- Travis CI
- Jenkins
- Execution Environment Security Configuration
- Provar Jenkins Plugin
- Parallel Execution
- Running Provar on Linux
- Reporting
- Salesforce DX
- Git
- Team Foundation Server
- Version Control
- Masking Provar Credentials on CI
- Salesforce Testing
- Best Practices
- Salesforce Connection Best Practices
- Improve Your Metadata Performance
- Testing Best Practices
- Automation Planning
- Supported Testing Phases
- Provar Naming Standards
- Test Case Design
- Create records via API
- Avoid using static values
- Abort Unused Test Sessions/Runs
- Avoid Metadata performance issues
- Increase auto-retry waits for steps using a global variable
- Create different page objects for different pages
- The Best Ways to Change Callable Test Case Locations
- Working with the .testProject file and .secrets file
- Best practices for the .provarCaches folder
- Best practices for .pageObject files
- Troubleshooting
- How to Use Keytool Command for Importing Certificates
- Browsers
- Configurations and Permissions
- Connections
- DevOps
- Error Messages
- Provar Manager 3.0 Install Error Resolution
- Provar Manager Test Case Upload Resolution
- Administrator has Blocked Access to Client
- JavascriptException: Javascript Error
- macOS Big Sur Upgrade
- Resolving Failed to Create ChromeDriver Error
- Resolving Jenkins License Missing Error
- Resolving Metadata Timeout Errors
- Test Execution Fails – Firefox Not Installed
- Selenium 4 Upgrade
- Licensing, Installation and Firewalls
- Memory
- Test Builder and Test Cases
- Release Notes
