Setting Up a Connection to Provar Manager
The Provar Manager connection establishes a connection with a Provar Manager instance. It is configured by creating a Provar Manager connection via the Connection tab. The Provar Manager connection (leveraging a normal Salesforce Connection) only requires a user login via OAuth Web Flow.
Prerequisites
There are some prerequisites for setting up a connection to Provar Manager as listed below:
- A Salesforce org with Provar Manager must be already installed.
- A Salesforce user with a Provar Manager license assigned and the Provar Manager permission set assigned too.
How to set up an OAuth Web Flow connection to Provar Manager
Step 1: Create a Connected App.
Step 2: Create a Provar Manager Connection (OAuth WebFlow).
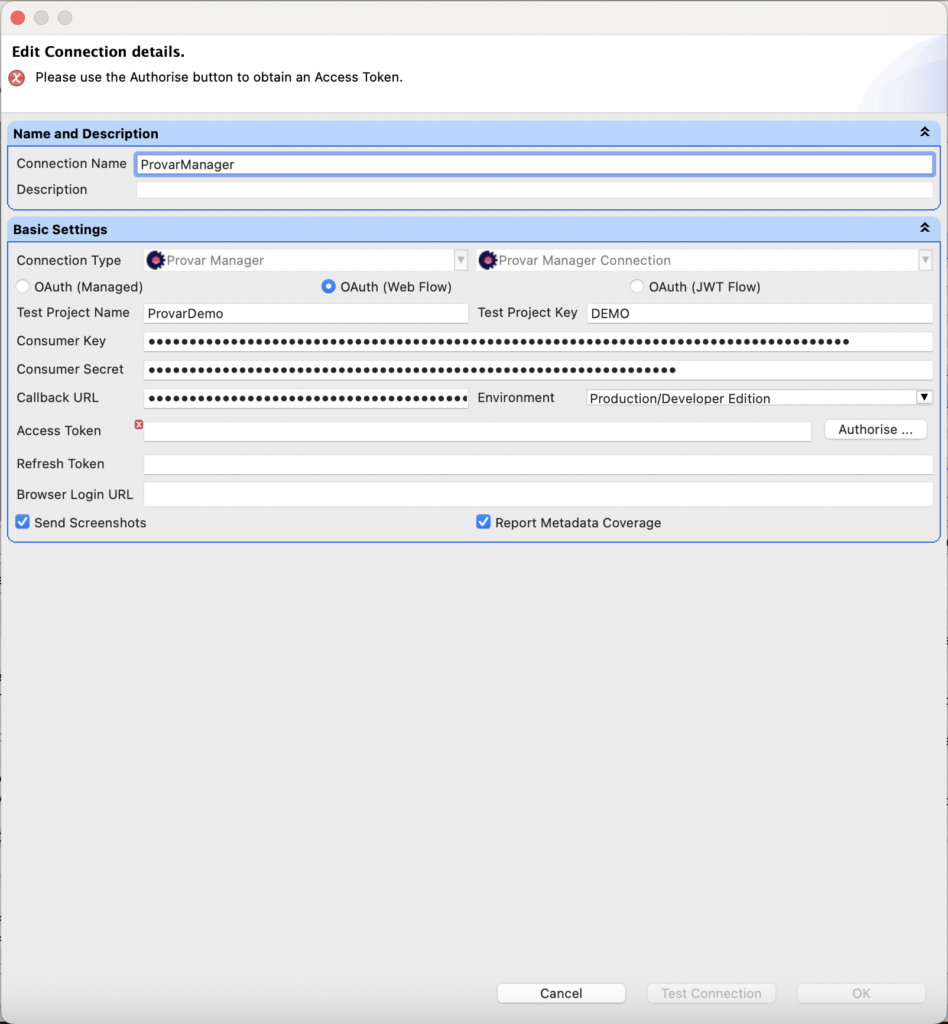
In the Test Settings, navigate to the Connections tab and click the plus (+) sign. The Add New Connection screen is displayed. Give a Connection Name and create an OAuth WebFlow Connection. In the Connection Type field, select Provar Manager then select Provar Manager Connection.
For more information, please see Salesforce OAuth (Web Flow) connection.
In the created OAuth WebFlow connection, you have to provide the details of the Consumer Key, Consumer Secret, and Callback URL that is a part of OAuth WebFlow connection.
Note: The above 3 fields are not the credentials of the user but they are the credentials of the Connected App.
Click Authorise, and it will ask for your credentials; provide your credentials, and when the authorization is successful, the Access Token and Refresh Token are populated.
Note:
- Provar Manager is only available via the Salesforce Lightning Experience.
- Only one Provar Manager connection can be set.

Above: Snapshot of creating a Provar Manager Connection.
When the Provar Manager connection is created, you can see it under the Connections tab.

Above: Screenshot of Provar Manager Connection in Provar.
Creating and linking the Test Project in Provar Manager
Once you have created the Provar Manager connection; a project is created in Provar Manager with a Test Project Name and a unique Test Project Key. For example, the project AY Test Project is created in Provar Manager which has a unique key.
If a user wants to link a Provar test project with an existing Provar Manager project then he has to provide that key (unique key) while creating the Provar Manager connection in Provar.
Note: The project was created in Provar Manager with the same name and unique key.
In Provar Manager –
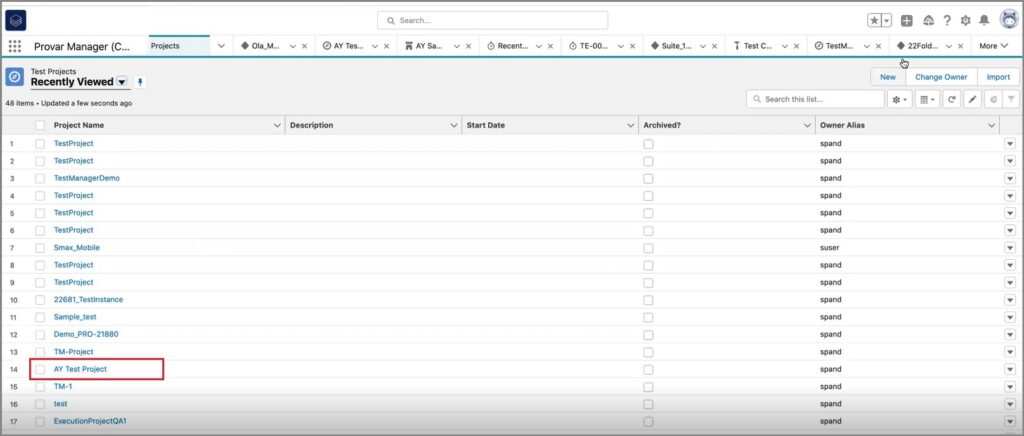
Log on to the Provar Manager. Click Environments > Test Projects. You can see the AY Test Project created in Test Manager.

Above: Snapshot of the Project created in Provar Manager.
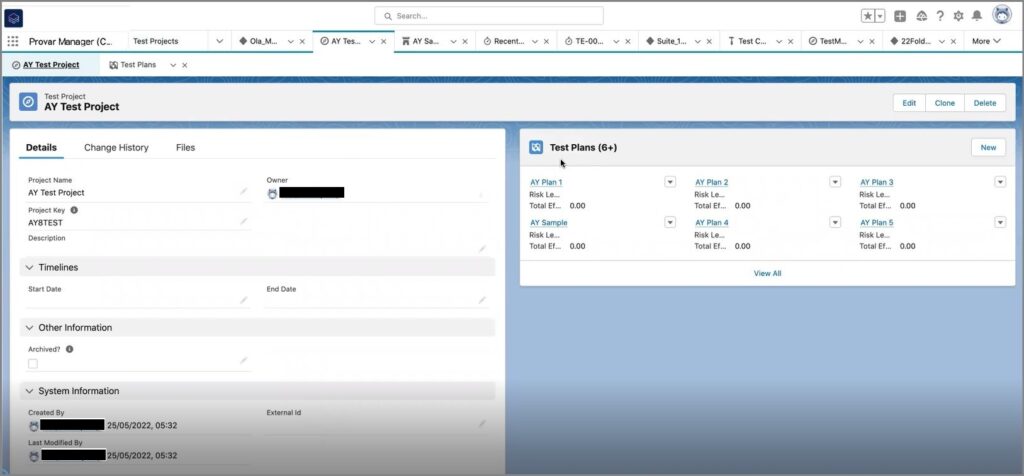
Click on the project (AY Test Project), and you can see the details of the project.
When you click on the project, you can see Test Plans inside it. When you click on Test Plans, you can see Test Suites (these are Test Plan Folders in Provar) and Test Cycles inside it.

Above: Details of the project created in Provar Manager.
Uploading screenshots
To upload screenshots, we have provided one option at the connection level. You can now select the Send Screenshots checkbox in the connection dialog box to upload screenshots.
This option is now available. If you have selected this checkbox then whatever screenshots are captured, they will all be uploaded. If it’s unchecked or de-selected, then no screenshot will be uploaded.
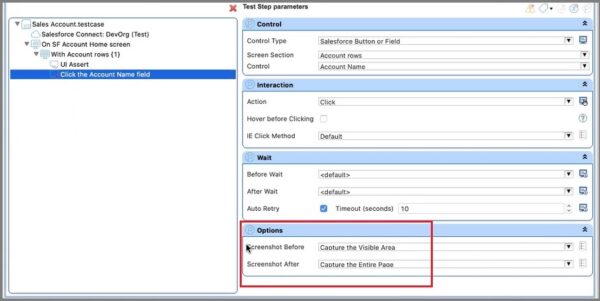
Note: The screenshot capture is allowed only in UI API’s. For example, in the UI Assert test case in the above test case example, you can see the options:
- screenshot before
- screenshot after

Note: In case of an error, a screenshot will always be created and uploaded. So, the maximum number of possible screenshots on a test step execution is 3 (before, after, and on-error). The screenshots can be identified as (before_ and after_).
Report Metadata Coverage
You can also enable Metadata reporting on the connection to Manager by checking the Report Metadata Coverage checkbox. After enabling this feature, Automation will start collecting what Salesforce metadata test cases interact with.
When uploading test cases to Manager, the metadata coverage present locally is also uploaded, allowing you to start running test cases from Manager based on metadata changes tracked in your DevOps pipeline.
When you enable that checkbox in the connection to Manager, it does three things:
- It calculates the metadata coverage (i.e. what Salesforce metadata each Manager-linked test case interacts with) when the connection is saved after checking the checkbox.
- Every time a Manager-linked test case is changed, the metadata coverage is recalculated.
- Every time a test case is uploaded to Manager, its metadata coverage is also uploaded.
QA teams can use this information in at least two ways:
- To report in Manager what Salesforce components they have test cases for.
- To trigger test runs based on particular metadata component changing during the development pipeline.
Removing a Provar Manager Connection
Removing or deleting a Provar Manager connection removes all the Provar Manager associations. Right-click on Provar Manager connection to delete and the Provar Manager connection is deleted, and the context menu Upload to PM won’t be visible in Provar.
For more information, check out this course on University of Provar.
- Provar Automation V3
- Automation V3: System Requirements
- Automation V3: Browser and Driver Recommendations
- Installing Provar Automation V3
- Updating Provar Automation V3
- Licensing Provar Automation V3
- Automation V3: Granting Org Permissions to Provar Automation
- Automation V3: Optimizing Org and Connection Metadata Processing in Provar
- Using Provar Automation V3
- Automation V3: Provar Automation
- Automation V3: Commit a Local Test Project to Source Control
- Automation V3: Creating a New Test Project
- Automation V3: Creating Custom Test Steps
- Automation V3: Provar Test Builder
- Automation V3: Reintroduction of CLI license Check
- Automation V3: Creating Test Cases
- Automation V3: Debugging Tests
- Automation V3: Environment Management
- Automation V3: Managing Test Steps
- Automation V3: Reporting
- Automation V3: Import Test Project from a File
- Automation V3: Import Test Project from Local Repository
- Automation V3: Import Test Project from a Remote Repository
- Automation V3: Running Tests
- Automation V3: Testing Browser Options
- Automation V3: Testing Browser – Chrome Headless
- Automation V3: Provar Feature Flags and Properties Configuration
- Automation V3: Defining Proxy Settings
- Automation V3: Behavior-Driven Development
- Automation V3: Customize Browser Driver Location
- Automation V3: Setup and Teardown Test Cases
- Automation V3: Japanese Language Support
- Automation V3: Reload Org Cache
- Automation V3: Using Java Method Annotations for Custom Objects
- Automation V3: Salesforce API Testing
- Automation V3: Consolidating Multiple Test Execution Reports
- Automation V3: Tags and Service Level Agreements (SLAs)
- Automation V3: Test Plans
- Automation V3: Searching Provar with Find Usages
- Automation V3: Exporting Test Projects
- Automation V3: Tooltip Testing
- Automation V3: Refresh and Recompile
- Automation V3: Secrets Management and Encryption
- Custom Table Mapping in V3
- NitroX in V3
- ProvarDX in V3
- Test Cycles in V3
- Using Custom APIs in V3
- Page Objects in V3
- Automation V3: ProvarX™
- Automation V3: Creating an XPath
- Automation V3: Mapping Non-Salesforce Fields
- Automation V3: Introduction to XPaths
- Automation V3: JavaScript Locator Support
- Automation V3: Create different page objects for different pages
- Automation V3: Maintaining Page Objects
- Automation V3: Refresh and Reselect Field Locators in Test Builder
- Callable Tests in V3
- Functions in V3
- Automation V3: TestCaseErrors
- Automation V3: TestRunErrors
- Automation V3: TestCaseSuccessful
- Automation V3: TestCaseOutCome
- Automation V3: TestCasePath
- Automation V3: StringTrim
- Automation V3: TestCaseName
- Automation V3: DateFormat
- Automation V3: Not
- Automation V3: IsSorted
- Automation V3: StringReplace
- Automation V3: StringNormalize
- Automation V3: DateParse
- Automation V3: DateAdd
- Automation V3: GetEnvironmentVariable
- Automation V3: GetSelectedEnvironment
- Automation V3: NumberFormat
- Automation V3: Using Functions
- Automation V3: UniqueId
- Automation V3: Count
- Automation V3: Round
- Using the Test Palette in V3
- Automation V3: Test Palette Introduction
- Automation V3: Read Test Step
- Automation V3: String Test Steps
- Automation V3: Generate Test Case
- Automation V3: For Each Test Step
- Automation V3: Page Object Cleaner
- Automation V3: Assert Salesforce Layout
- Automation V3: Break Test Step
- Automation V3: UI On Screen
- Automation V3: UI Handle Alert
- Automation V3: UI Assert
- Automation V3: Set Values
- Automation V3: UI With Row
- Automation V3: UI Action
- Automation V3: UI Connect
- Automation V3: Fail Test Step
- Automation V3: While Test Step
- Automation V3: Apex Execute
- Automation V3: List Compare
- Automation V3: UI Navigate
- Automation V3: UI Fill
- Automation V3: If Test Step
- Automation V3: Group Steps Test Step
- Automation V3: Set Values Test Step
- Automation V3: Apex Bulk
- Automation V3: Sleep Test Step
- Automation V3: Switch Test Step
- Automation V3: Finally Test Step
- Automation V3: Wait For Test Step
- Automation V3: Extract Salesforce Layout
- Automation V3: Assert Test Step
- Applications Testing in V3
- Automation V3: Mobile Emulation (Salesforce Mobile)
- Automation V3: Using Provar with Amazon Web Services (AWS) Device Farm
- Automation V3: PDF Testing
- Automation V3: App Configuration for Microsoft Connection in MS Portal for OAuth 2.0
- Automation V3: OAuth 2.0 Microsoft Exchange Email Connection
- Automation V3: Create a Connection for Office 365 GCC High
- Automation V3: Support for Existing MS OAuth Email Connection
- Automation V3: Gmail Connection in Automation with App Password
- Automation V3: Email Testing in Automation
- Automation V3: OAuth 2.0 MS Graph Email Connection
- Automation V3: Email Testing Examples
- Automation V3: Database Connections
- Automation V3: Web Services
- Data-Driven Testing in V3
- Provar Manager and Provar Automation V3
- Automation V3: Provar Manager – Test Execution Reporting
- Automation V3: Setting Up a Connection to Provar Manager
- Automation V3: Provar Manager Filters
- Automation V3: Importing 3rd-Party Test Projects
- Automation V3: Uploading Test Steps in Provar Manager
- Automation V3: Test Management
- Automation V3: Provar Manager Test Operations
- Automation V3: Provar Manager Test Execution
- Automation V3: Release Management
- Automation V3: Provar Manager Plugins
- Automation V3: Provar Manager Test Coverage
- Automation V3: Provar Manager Setup and User Guide
- Automation V3: Uploading 3rd-Party Test Results
- Automation V3: Uploading Existing Manual Test Cases to Provar Manager with DataLoader.Io
- Automation V3: Quality Journey, Quality Center, and Dashboards
- Automation V3: Object Mapping Between Provar Automation and Provar Manager
- Automation V3: Uploading Callable Test Cases in Provar Manager
- Automation V3: Metadata Coverage with Manager
- Provar Grid and Provar Automation V3
- DevOps with V3
- Automation V3: Setting Java Development Kit (JDK) Environment Variables
- Automation V3: Configuration on Jenkins
- Automation V3: Introduction to Provar DevOps
- Automation V3: Introduction to Test Scheduling
- Automation V3: Version Control and DevOps
- Automation V3: Setting up Continuous Integration
- Automation V3: Execution Environment Security Configuration
- Automation V3: Bitbucket Pipelines
- Automation V3: Perfecto Mobile
- Automation V3: ANT Task Parameters
- Automation V3: Provar Jenkins Plugin
- Automation V3: Running Automation Tests on Jenkins
- Automation V3: Configuring the Automation Secrets Password in Microsoft Azure Pipelines
- Automation V3: Parallel Execution in Microsoft Azure Pipelines using Test Plans
- Automation V3: Parallel Execution in Microsoft Azure Pipelines using Targets
- Automation V3: Parallel Execution in Microsoft Azure Pipelines using Multiple build.xml Files
- Automation V3: Parallel Execution in GitHub Actions using Test Plan
- Automation V3: Running Provar on Linux
- Automation V3: CircleCI Orbs
- Automation V3: CircleCI Common Build Errors
- Automation V3: CircleCI via Docker
- Automation V3: Copado Integration Introduction
- Automation V3: Copado Configuration
- Automation V3: Copado Architecture Overview
- Automation V3: Docker Runner
- Automation V3: Running Provar Tests on Docker using Docker File
- Automation V3: Docker Continuous Integration
- Automation V3: Setting up Continuous Integration with Jenkins for Docker
- Automation V3: Generating the build.xml File for Docker
- Automation V3: Flosum Configuration
- Automation V3: Flosum Integration Introduction
- Automation V3: Flosum Architecture Overview
- Automation V3: Parallel Execution in GitHub Actions using Multiple build.xml Files
- Automation V3: Parallel Execution in GitHub Actions using Targets
- Automation V3: Remote Trigger in GitHub Actions
- Automation V3: Parallel Execution in GitHub Actions using Job Matrix
- Automation V3: Gearset DevOps CI/CD via Jenkins
- Automation V3: GitLab Continuous Integration
- Automation V3: GitHub Desktop – Creating a Git Repository for Automation Projects
- Automation V3: Integrating GitHub Actions CI to Run Automation CI Task
- Automation V3: Provar Test Results Package
- Automation V3: Running a Provar CI Task in Azure DevOps Pipelines
- Automation V3: Amazon Web Service (AWS) & Jenkins Configuration
- Automation V3: ANT: Generating ANT Build File
- Automation V3: ANT Licensing
- Automation V3: Reading Data from Excel
- Automation V3: Configuration on other CI tools
- Automation V3: Setting Apache Ant Environment Variables
- Automation V3: BrowserStack Desktop
- Automation V3: Integrating with LambdaTest
- Automation V3: Sauce Labs Desktop
- Automation V3: AutoRABIT Salesforce DevOps in Provar Test
- Automation V3: Selenium Grid
- Automation V3: Working with Git
- Automation V3: Configuration for Sending Emails via the Automation Command Line Interface
- Automation V3: Parameterization using Environment Variables in GitHub Actions
- Automation V3: Slack Integration with Automation
- Automation V3: Zephyr Cloud and Server
- Automation V3: Adding a Salesforce Communities Connection
- Automation V3: Integrating with Sauce Labs Real Device
- Automation V3: Travis CI
- Automation V3: Salesforce DX Integration
- Automation V3: Variable Set Syntax
- Salesforce Testing with V3
- Automation V3: Adding a Salesforce OAuth (Web Flow) Connection
- Automation V3: Internationalization Support
- Automation V3: Salesforce Release Updates
- Automation V3: Adding a Salesforce Connection
- Automation V3: Adding a Log-on As Connection
- Automation V3: Salesforce Lightning Web Component (LWC) Locator Support
- Automation V3: Adding a Salesforce OAuth (JWT Flow) Connection
- Automation V3: Salesforce Console Testing
- Automation V3: Adding a Salesforce Portal Connection
- Automation V3: Visualforce Testing
- Automation V3: List and Table Testing
- Recommended Practices with V3
- Automation V3: Provar Naming Standards
- Automation V3: Salesforce Connection Best Practices
- Automation V3: Automation Planning
- Automation V3: Supported Testing Phases
- Automation V3: Best practices for the .provarCaches folder
- Automation V3: Best practices for .pageObject files
- Automation V3: Avoid Metadata performance issues
- Automation V3: The Best Ways to Change Callable Test Case Locations
- Automation V3: Improve Your Metadata Performance
- Automation V3: Abort Unused Test Sessions/Runs
- Automation V3: Create Records via API
- Automation V3: Test Case Design
- Automation V3: Increase auto-retry waits for steps using a global variable
- Troubleshooting with V3
- Automation V3: Resolving High Memory Usage
- Automation V3: Refresh Org Cache Manually
- Automation V3: Show Hidden Provar Files on Mac
- Automation V3: Add Permissions to Edit Provar.ini File
- Automation V3: Test Builder Does Not Launch
- Automation V3: Provar License Issue Solution
- Automation V3: How to Configure a Single Sign-On Connection
- Automation V3: Out of Memory Error During CI Execution
- Automation V3: Add Gmail Firewall Exception
- Automation V3: Add a License Firewall Exception
- Automation V3: Resolving Jenkins License Missing Error
- Automation V3: Increase System Memory for Provar
- Automation V3: Resolving Metadata Timeout Errors
- Automation V3: How to Use Keytool Command for Importing Certificates
- Automation V3: Java Version Mismatch Error
- Automation V3: Provar Manager 3.0 Install Error Resolution
- Automation V3: Test Case Does Not Run on IE Browser
- Automation V3: Test Builder Not Working Correctly
- AI with Provar Automation V3
- Provar Automation V2
- System Requirements
- Browser and Driver Recommendations
- Installing Provar Automation
- Updating Provar Automation
- Licensing Provar
- Granting Org Permissions to Provar Automation
- Optimizing Org and Connection Metadata Processing in Provar
- Using Provar Automation
- Understanding Provar’s Use of AI Service for Test Automation
- Provar Automation
- Creating a New Test Project
- Import Test Project from a File
- Import Test Project from a Remote Repository
- Import Test Project from Local Repository
- Commit a Local Test Project to Source Control
- Salesforce API Testing
- Behavior-Driven Development
- Consolidating Multiple Test Execution Reports
- Creating Test Cases
- Custom Table Mapping
- Functions
- Debugging Tests
- Defining a Namespace Prefix on a Connection
- Defining Proxy Settings
- Environment Management
- Exporting Test Cases into a PDF
- Exporting Test Projects
- Japanese Language Support
- Override Auto-Retry for Test Step
- Customize Browser Driver Location
- Mapping and Executing the Lightning Article Editor in Provar
- Managing Test Steps
- Namespace Org Testing
- NitroX
- Provar Test Builder
- ProvarDX
- Refresh and Recompile
- Reintroduction of CLI License Check
- Reload Org Cache
- Reporting
- Running Tests
- Searching Provar with Find Usages
- Secrets Management and Encryption
- Setup and Teardown Test Cases
- Tags and Service Level Agreements (SLAs)
- Test Cycles
- Test Data Generation
- Test Plans
- Testing Browser – Chrome Headless
- Testing Browser Options
- Tooltip Testing
- Using the Test Palette
- Using Custom APIs
- Callable Tests
- Data-Driven Testing
- Page Objects
- Block Locator Strategies
- Introduction to XPaths
- Creating an XPath
- JavaScript Locator Support
- Label Locator Strategies
- Maintaining Page Objects
- Mapping Non-Salesforce fields
- Page Object Operations
- ProvarX™
- Refresh and Reselect Field Locators in Test Builder
- Using Java Method Annotations for Custom Objects
- Applications Testing
- Database Testing
- Document Testing
- Email Testing
- Email Testing in Automation
- Email Testing Examples
- Gmail Connection in Automation with App Password
- App Configuration for Microsoft Connection in MS Portal for OAuth 2.0
- OAuth 2.0 Microsoft Exchange Email Connection
- Support for Existing MS OAuth Email Connection
- OAuth 2.0 MS Graph Email Connection
- Create a Connection for Office 365 GCC High
- Mobile Testing
- OrchestraCMS Testing
- Salesforce CPQ Testing
- ServiceMax Testing
- Skuid Testing
- Vlocity API Testing
- Webservices Testing
- DevOps with V2
- Introduction to Provar DevOps
- Introduction to Test Scheduling
- Apache Ant
- Configuration for Sending Emails via the Automation Command Line Interface
- Continuous Integration
- AutoRABIT Salesforce DevOps in Provar Test
- Azure DevOps
- Running a Provar CI Task in Azure DevOps Pipelines
- Configuring the Automation secrets password in Microsoft Azure Pipelines
- Parallel Execution in Microsoft Azure Pipelines using Multiple build.xml Files
- Parallel Execution in Microsoft Azure Pipelines using Targets
- Parallel execution in Microsoft Azure Pipelines using Test Plans
- Bitbucket Pipelines
- CircleCI
- Copado
- Docker
- Flosum
- Gearset
- GitHub Actions
- Integrating GitHub Actions CI to Run Automation CI Task
- Remote Trigger in GitHub Actions
- Parameterization using Environment Variables in GitHub Actions
- Parallel Execution in GitHub Actions using Multiple build.xml Files
- Parallel Execution in GitHub Actions using Targets
- Parallel Execution in GitHub Actions using Test Plan
- Parallel Execution in GitHub Actions using Job Matrix
- GitLab Continuous Integration
- Travis CI
- Jenkins
- Execution Environment Security Configuration
- Provar Jenkins Plugin
- Parallel Execution
- Running Provar on Linux
- Reporting
- Salesforce DX
- Git
- Version Control
- Salesforce Testing with V2
- Recommended Practices with V2
- Salesforce Connection Best Practices
- Improve Your Metadata Performance
- Java 21 Upgrade
- Testing Best Practices
- Automation Planning
- Supported Testing Phases
- Provar Naming Standards
- Test Case Design
- Create records via API
- Avoid using static values
- Abort Unused Test Sessions/Runs
- Avoid Metadata performance issues
- Increase auto-retry waits for steps using a global variable
- Create different page objects for different pages
- The Best Ways to Change Callable Test Case Locations
- Working with the .testProject file and .secrets file
- Best practices for the .provarCaches folder
- Best practices for .pageObject files
- Troubleshooting with V2
- How to Use Keytool Command for Importing Certificates
- Installing Provar After Upgrading to macOS Catalina
- Browsers
- Configurations and Permissions
- Add Permissions to Edit Provar.ini File
- Configure Provar UI in High Resolution
- Enable Prompt to Choose Workspace
- Increase System Memory for Provar
- Refresh Org Cache Manually
- Show Hidden Provar Files on Mac
- Java Version Mismatch Error
- Unable to test cases, test suites, etc… from the Test Project Navigation sidebar
- Connections
- DevOps with V2
- Error Messages
- Provar Manager 3.0 Install Error Resolution
- Provar Manager Test Case Upload Resolution
- Administrator has Blocked Access to Client
- JavascriptException: Javascript Error
- Resolving Failed to Create ChromeDriver Error
- Resolving Jenkins License Missing Error
- Resolving Metadata Timeout Errors
- Test Execution Fails – Firefox Not Installed
- Selenium 4 Upgrade
- Licensing, Installation and Firewalls
- Memory
- Test Builder and Test Cases
- Provar Manager
- How to Use Provar Manager
- Provar Manager Setup
- Provar Manager Integrations
- Release Management
- Test Management
- Test Operations
- Provar Manager and Provar Automation
- Setting Up a Connection to Provar Manager
- Object Mapping Between Automation and Manager
- How to Upload Test Plans, Test Plan Folders, Test Plan Instances, and Test Cases
- Provar Manager Filters
- Uploading Callable Test Cases in Provar Manager
- Uploading Test Steps in Provar Manager
- How to Know if a File in Automation is Linked in Test Manager
- Test Execution Reporting
- Metadata Coverage with Manager
- Provar Grid
- Release Notes