GitLab Continuous Integration
This support article provides step-by-step instructions to execute Automation test cases in GitLab Continuous Integration using its built-in pipeline.
Continuous Integration (CI) works to integrate code from your team in a shared repository. Developers share their new code in a merge (pull) request, which triggers a pipeline to build, test and validate the new code before merging the changes in your repository.
Continuous Delivery delivers CI-validated code to your application.
Prerequisites in GitLab Continuous Integration
- Provar ANT zip file.
- Provar project with at least one test case and associated ANT build.xml file.
- The Provar project is pushed in Gitlab as a public or private repository.
- Provar Execution Only (or Floating) license key pushed into the .license folder of the remote repository. Please only upload license keys on private repositories to avoid unlicensed usage by third parties. Unlicensed access will be tracked and can cause you to be locked out of Provar until a new license key is re-issued to you.
Steps to Create a Project in GitLab
The following steps are completed using a free as well as paid GitLab account:
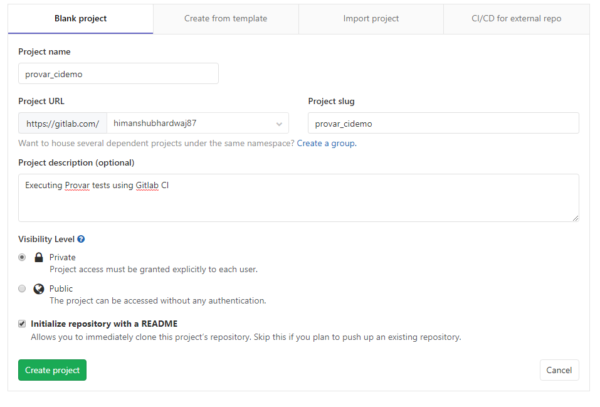
Step 1: Login into your GitLab account.
Step 2: Create a new project and mention the project name, description, and visibility level.
Step 3: Clone this new repository into your local machine.
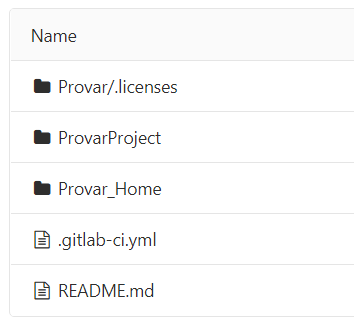
Step 4: Add three folders in this repository:
- ProvarProject: It contains provar test cases and a build.xml file to execute those tests.
- Provar: It contains .license folder.
- Provar_Home: This folder is created by extracting Provar_Ant_<Version>.zip file from the latest version of Provar, which can be downloaded from the Provar community. This folder contains ant and lib folders.
Step 5: Add .gitlab-ci.yml file in the base location of the repository.
Screenshot of folder structure:
Note: The project structure varies from user to user. The paths specified in both YML and XML files must be according to the project structure.
Steps to Create .gitlab-ci.yml File
For Gitlab CI to build your project, you will need to add .gitlab-ci.yml configuration file to the root directory of your repository.
If .gitlab-ci.yml is not in your repository or is not valid YAML, GitLab CI will ignore it.
Here is an example file:
image: "ubuntu:latest"

before_script:
 - apt-get update && apt-get install -y xvfb wget curl unzip gnupg -qq
 - if [ ! -d Provar_Home ]; then curl -O https://download.provartesting.com/latest/Provar_ANT_latest.zip && unzip Provar_ANT_latest.zip -d Provar_Home && rm Provar_ANT_latest.zip; else echo "Found Provar_Home"; fi
 - apt-get install -y openjdk-11-jdk
 - apt-get install -y ant
 - java -version
 - ant -version
 - wget -q -O - https://dl.google.com/linux/linux_signing_key.pub | apt-key add -
 - echo "deb [arch=amd64] http://dl.google.com/linux/chrome/deb/ stable main" | tee /etc/apt/sources.list.d/chrome.list
 - apt-get update -y
 - apt-cache search chrome
 - apt-get install google-chrome-stable -y
 - export DISPLAY=:99.0
 - wget -O /etc/init.d/xvfb https://gist.githubusercontent.com/axilleas/3fc13e0c90ad9f58bee903a41e8a6d48/raw/169a60010635e05eaa902c5f3b4393321f2452f0/xvfb
 - chmod 0755 /etc/init.d/xvfb
 - sh -e /etc/init.d/xvfb start

build:
  variables:
    PROVAR_HOME: "$CI_PROJECT_DIR/Provar_Home"
    PROVAR_PROJECT: "$CI_PROJECT_DIR/ProvarProject"
    LICENSE_PATH: "$CI_PROJECT_DIR/Provar/.licenses"
  script:
    - cd demo/ANT
    - xvfb-run ant -Dprovar.home=$PROVAR_HOME -Dlicense.path=$LICENSE_PATH -f build.xml OR -xvfb-run ant -f build.xml
  cache:
    paths:
      - $PROVAR_HOME/.provarCaches
      - $PROVAR_HOME
  artifacts:
   paths:
     - $CI_PROJECT_DIR/demo/ANT/Results
   reports:
     junit:
       - $CI_PROJECT_DIR/demo/ANT/Results/JUnit.xml
Just walking through the example script above:
Here, we are using the Ubuntu image and below are the pre-requisites handled in the script:
- Java 11
- ANT for test case execution
- Chrome browser, as we need to execute our UI test cases on a browser
- xvfb installation to execute test cases headlessly, so before performing the actual test script section. we are installing xvfb and running the xvfb service.
The build step contains variables like PROVAR_HOME and the script required to execute test cases using the command xvfb-run ant -Dprovar.home=$PROVAR_HOME -Dlicense.path=$LICENSE_PATH -f ProvarProject/ANT/build.xml.
Parameter Changes in build.xml
Edit the build.xml file.
- provar.home: value is ${env.PROVAR_HOME}
- testproject.home: value is Project name i.e. ProvarProject
- testproject.results: It’s where test reports are stored i.e. ProvarProject/Results
- license.path: It’s where the .license folder is located. (The path is provided in.gitlab-ci.yml.)
See the Example build.xml
<project default="runtests">
    <property name="version" value="2.313.25.0"/>
    <property environment="env"/>
    <property name="provar.home" value="${env.PROVAR_HOME}"/>
    <property name="testproject.home" value="${env.PROVAR_PROJECT}"/>
    <property name="testproject.results" value="${testproject.home}/Results"/>
    <taskdef name="Provar-Compile" classname="com.provar.testrunner.ant.CompileTask" classpath="${provar.home}/ant/ant-provar.jar"/>
    <taskdef name="Run-Test-Case" classname="com.provar.testrunner.ant.RunnerTask" classpath="${provar.home}/ant/ant-provar.jar;${provar.home}/ant/ant-provar-bundled.jar;${provar.home}/ant/ant-provar-sf.jar"/>
    <target name="runtests">
        <Provar-Compile provarHome="${provar.home}" projectPath="${testproject.home}"/>
        <Run-Test-Case provarHome="${provar.home}"
                projectPath="${testproject.home}"
                resultsPath="${testproject.results}"
                resultsPathDisposition="Increment"
                testEnvironment=""
                webBrowser="Chrome"
                webBrowserConfiguration="Full Screen"
                webBrowserProviderName="Desktop"
                webBrowserDeviceName="Full Screen"
                salesforceMetadataCache="Reload"
                projectCachePath="../.provarCaches"
                testOutputlevel="BASIC"
                pluginOutputlevel="WARNING"
                stopTestRunOnError="false"
                licensePath="${env.LICENSE_PATH}"
        >
            <fileset id="testplan" dir="${testproject.home}/plans/Test"></fileset>
            <planFeature name="PDF" type="OUTPUT" enabled="true"/>
            <planFeature name="PIECHART" type="OUTPUT" enabled="true"/>
            <planFeature name="EMAIL" type="NOTIFICATION" enabled="true"/>
        </Run-Test-Case>
    </target>
</project>
Trigger the First Build
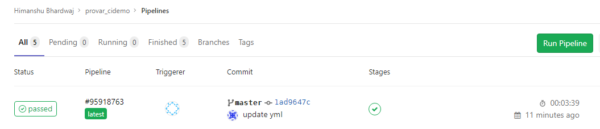
The process automatically gets triggered once you push all changes into GitLab Continuous Integration.
The execution status can be checked on CI/CD -> Pipelines.
Caching in GitLab CI/CD
GitLab CI/CD provides a caching mechanism that saves time when your jobs run. For more information, check this link.
https://docs.gitlab.com/ee/ci/caching/
.provarCaches is used to speed up a given job in subsequent pipelines. Shortly, include it in the cache, Provar will not download the metadata during each test execution, reducing execution time.
Including the Provar_Home directory in the cache will eliminate the need to download and unzip the ANT zip file between jobs.
Test Results
After successful execution, generate test reports in the location mentioned in the build.xml testproject.results parameter.
<property name=”testproject.results” value=”ProvarProject/Results”/>
Refer to this link for help customizing the reporting options in Provar.
To get the reports folder as artifacts in the GitLab pipeline, add the below code in your .gitlab-ci.yml file.
artifacts:
   paths:
     - $CI_PROJECT_DIR/demo/ANT/Results
Download artifacts from the button on the right side of the screenshot below.

If you don’t place Provar_Home in GIT, add these lines of code in the before_script tag.
- curl -O https://download.provartesting.com/latest/Provar_ANT_latest.zip
- unzip -o Provar_ANT_latest.zip -d Provar_Home
- rm Provar_ANT_latest.zip