Micro Focus Application Lifecycle Management (ALM)
Provar supports integration with the Micro Focus Application Lifecycle Management (ALM) tool. Provar supports ALM versions 12.50, 12.53, 12.6 and 15.5.
This integration allows Provar test cases to be stored in ALM (with full check-out and versioning support) and for automation results to be uploaded to ALM’s Test Lab.
This page explains how to install and configure the Provar plugin and, secondly, how to connect to your company’s ALM server and then load, save, and execute tests against it.
Set up prerequisites
- ALM should be running.
- IE (10 and above) should be installed on both the client and the server.
- The user should have Admin rights.
- .NET Framework 4.0 and above should be installed on both server and client.
- The Adobe PDF Reader plug-in must be installed in Internet Explorer on client workstations.
- On the client side, the server path should be listed on IE-trusted sites.
Installing the plugin: Server-side installation
Step 1. Unzip installation files: Unzip the Provar_ALM_{alm-version}_{version}.zip to a temporary folder. The steps below will refer to this folder as {dist-folder}.
Assuming Temp is the unzipped folder, the folder structure will be below.
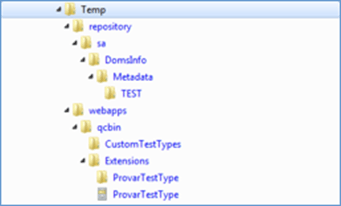
Step 2. Locate the ALM folder on the server: The default location is C:\ProgramData\HP\ALM. This will be referred to as {alm-folder} in the steps below.
Step 3. Copy the following files from {dist-folder} to the {alm-folder}.
| From | To |
|---|---|
| webapps\qcbin\CustomTestTypes\testtypes.xml | webapps\qcbin\CustomTestTypes\testtypes.xml* |
| webapps\qcbin\Extensions\ProvarTestType.cab | webapps\qcbin\Extensions\ProvarTestType.cab |
| webapps\qcbin\Extensions\ProvarTestType\* | webapps\qcbin\Extensions\ProvarTestType\* |
| repository\sa\DomsInfo\Metadata\TEST\* | repository\sa\DomsInfo\Metadata\TEST\* |
Note: The contents of CustomTestTypes\testtypes.xml must be merged if the file already exists.
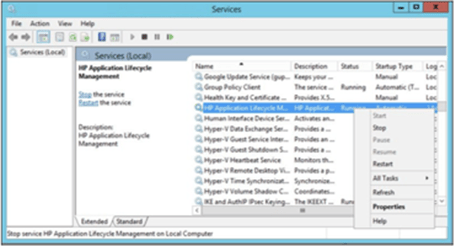
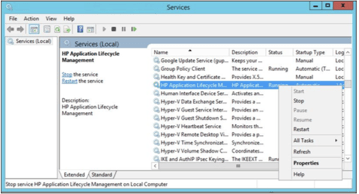
Step 4. Restart the ALM service from the services control panel entry(services.msc).
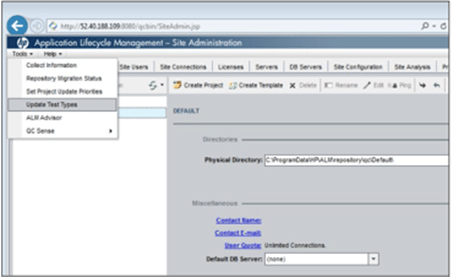
Step 5. Update the Test Types via the ALM site Admin.
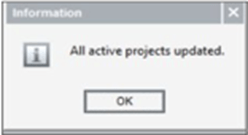
Choose YES in the confirmation dialog, and a screen is displayed as given below.
Step 6. Enable Provar for ALM Projects. Carry out the following procedure for each ALM project that Provar must be enabled for:
- Customize the provarSettings.xml from the Provar ALM Installation zip folder to suit your requirements. See Provar Customisation below for details.
- Log on to the ALM project via the ALM client (qcbin/start_a.jsp).
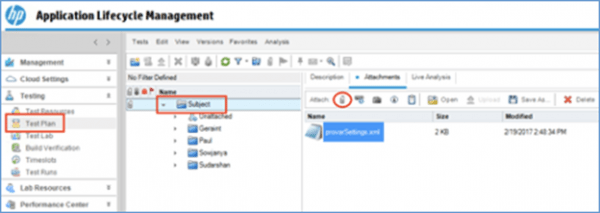
- Open the Test Plan tab via the left-hand navigation panel and select the top-level Subject node in the tree. Use the paperclip tool item on the Attachments tab to attach your customized provarSettings.xml file to the Subject node.
Client-side installation
The steps given below are for the first-time ALM client registration. Even if you want to change the ALM version, also you need to follow the steps given below.
Step 1. Clear Internet Explorer cache. On the Internet Explorer screen, click Tools > Internet options in the top right corner of the screen. The following screen is displayed.

In the Browsing history section, click Delete, and the following screen is displayed.

Select Cookies and website data check box and click Delete.
Step 2. Update ALM client: Start Internet Explorer in Run as Administrator mode.

Note: Add ALM URL to trusted sites. In the Internet Options, click the Security tab, click Trusted Sites, and then click Sites.
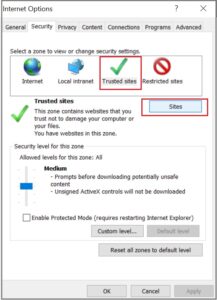

In the Add this website to the zone field, enter the ALM URL and click Add.
Note: The Required server verification(https:) for all sites in this zone…. check box must be unchecked.
Navigate to the following URL:
http:\\{alm-server}\qcbin\start_a.jsp?Common=true
This will download ALM client components from the server. A screen is displayed as shown below. Click Install.

Click Run.

Then, click Install.

The ALM installation progress is displayed.

On the next screen, click Install.

Step 3. Click the link http://{alm-server}/qcbin/addins.html and then click ALM Client Registration.

Step 4. On the next screen, click Register ALM.

A screen is displayed as given below.

Click Install.
The ALM client registration complete screen is displayed as given below. Close the browser window.

If prompted, agree to install any component published by Provar Limited.
Note: If you are a new customer and you are facing issues while connecting to ALM then double-click on “OTA64Bit.reg” file to run and connect to the new version. The “OTA64Bit.reg” file is in the Provar installation folder.

On double-clicking the “OTA64Bit.reg” file, you will see a screen as given below. Click OK.

There are 2 cases:
- Case 1: If the ALM Client registration is done before installing Provar, you can connect to ALM without running the “OTA64Bit.reg” file.
- Case 2: If the ALM Client registration is done after installing Provar, you must run the “OTA64Bit.reg” file.
In Provar –
Click the HP Connect icon 
A screen is displayed as given below. Enter the details in the (Host Name, User Name, Password, ALM Domain, ALM Project) fields to connect to ALM and click Connect.

The Connecting to ALM screen is displayed below.

The ALM connection is established, and you can disconnect by clicking Disconnect.

Provar customization
Provar’s ALM plug-in has several options and settings that can be set via the provarSettings.xml file. This file is attached to the Subject node in ALM’s Test Plan, allowing settings to be customized for each ALM Project.
A sample provarSettings.xml file is included in the .zip file and can be used as a starting point.
Provar settings
| Setting | Values | Notes |
|---|---|---|
| allowCheckedOutExecution | true false | Whether Provar should allow Tests that are not checked-in to be executed against ALM. |
| checkInAfterExport | true false | Whether newly added Tests should be checked-in in ALM. Defaults to true. |
| customField | See below | One or more {customField} child elements. These are used to specify the initial values for any mandatory custom fields that are already present in ALM. |
| disableCheckOut | true false | If true then “Check-out files” checkbox in the Download from ALM dialog is disabled in Provar. Intended for customers with ALM customisations that require checkouts to be done from inside ALM. Defaults to false. |
| disableCheckIn | true false | If true then “Check-in files” checkbox in the Upload to ALM dialog is disabled in Provar. Intended for customers with ALM customisations that require checkins to be done from inside ALM. Defaults to false. |
| executionRequirement | See below | One or more {executionRequirement} child elements. These specify requirements that Tests and/or Test Sets need to meet in ALM before test execution is allowed. |
| initialExportStatus | As per ALM’s Status field | The Status value that newly added Tests should have. Defaults to Imported. |
| testType | ProvarTestType MANUAL | The Test Type that should be used when adding tests to ALM. Defaults to ProvarTestType. |
Custom fields
Custom fields allow you to specify default values for fields in your ALM entity schema. They are required if:
- You have added mandatory custom fields to one or more entities.
- You have changed a system field from optional to mandatory.
- You would like to default the value of a field (regardless of whether it is mandatory or not).
Note: Provar does not add or modify fields in your ALM entity schema. Custom Fields support customizations that have already been made.
| Setting | Values | Notes |
|---|---|---|
| entity | Test Resource TestSet | The type of ALM entity that the field belongs to. Defaults to Test. |
| name | The internal name of the custom field which must already exist inside ALM. See REST Field Names below for details of how to derive the correct value from the ALM entity schema. | |
| initialValue | The value that Provar should populate. May contain Expressions (see below). |
The following will default the name of the TS_USER_01 field in ALM schema.

Execution requirements
| Setting | Values | Notes |
|---|---|---|
| testQuery | ALM query language expression | The query that is run against the Tests that have been selected for execution.* The Test IDs of the selected Tests are automatically appended to this query. Optional** |
| testSetQuery | ALM query language expression | The query that is run against the Test Set that the user selects.* Optional** |
| expression | Provar expression | An expression in Provar’s expression syntax that is applied to the Tests and Test Set. The following fields can be referenced: · Test.field-name · Test[‘field-name’] · TestSet.field-name · TestSet[‘field-name’] Where field-name is the REST Field Name of a Test or Test Set field. (See REST Field Names below for details.)NOTE: the [‘field-name’] syntax is required where field names contain hyphens. E.g. Test[‘user-01’] rather than Test.user-01. Optional** |
| disqualifying | true false | The message displayed to the user is that the execution is not allowed. |
| message | text | A suggested remedy is displayed to the user if the execution is not allowed. |
| remedy | text | A suggested remedy that is displayed to the user if the execution is not allowed. |
* See List Filtering in the ALM REST Guide for the query syntax.
** Either the testQuery and/or testSteQuery or the expression is required. They are mutually exclusive.
The following example will prevent execution if the Test Set has a user-01 value of ‘N’ and any of the selected Tests has a not Ready status.

The following example will only allow execution if all Tests have the same values in their TS_USER_TEMPLATE_01 and vc-version-number fields.

Expressions
The initialValue attributes in customField elements can contain Provar expressions to allow values to be calculated or sourced from related ALM Entities.
This is useful in the following situations:
- Where a value needs to be sourced from a related entity (e.g., Test or Test Set).
- Where a date needs to be included, for instance, include the execution start time in the Run name.
Expressions are enclosed in curly braces as per the normal convention in Provar. The following expression will derive the Run’s Name from the Test’s name and execution start time:

Note: Expressions are currently only supported for the Run entity. No substitutions are made for other entity types.
ExecutionItem
Exposes information about the Test execution:
| Field | Format | Description |
|---|---|---|
| startedDate | Date/Time | The time that the Test execution started. Can be formatted using the DateFormat function. |
| endedDate | Date/Time | The time that the Test execution ended. Can be formatted using the DateFormat function. |
Test, TestSet
Exposes fields from the related Test or Test Set.
| Field | Format | Description |
|---|---|---|
| Name | String | The name of the Test or Test Set. |
| * | * | Any other field from the Test or Test Set entities in ALM, including and custom fields. Must be specified in REST format (see below). If the name contains a hyphen, then the following syntax must be used: entity[‘field-name’] For example, for the TS_USER_01 custom field: Test[‘user-01’] |
DateFormat(date, format, timeZone)
| Parameter | Format | Description |
|---|---|---|
| date | Date/Time | The date/time to be formatted, or NOW for the current date/time. |
| format | String | A valid Java date format string. See https://docs.oracle.com/javase/7/docs/api/java/text/SimpleDateFormat.html. |
| cell1_3 | String | A valid Java time zone. See https://docs.oracle.com/javase/7/docs/api/java/util/TimeZone.html Defaults to GMT. |
The following example formats the Execution start date/time to the Warsaw time zone:
{DateFormat(ExecutionItem.startedDate, ‘yyyy-MM-dd_HH:mm’, ‘Europe/Warsaw’)}
REST field names
The {customField} and {executionRequirement} elements in provarSettings.xml use REST format names for ALM fields. This section outlines the procedure for determining these names fromALM.
The ALM names of the fields can be found in the Project Entities panel in ALM’s Project Customisation screen.

Given an ALM field name:
- Remove the RSC_, TS_, CY_ or RN_ prefix from the field name (depending on the entity type)
- Change all letters to lowercase and all underscores (_) to dashes (-).
For example, “RSC_USER_01” becomes “user-01”.
Uninstalling the plugin
Should you need to uninstall the Provar ALM plugin, take the following steps to uninstall on the server side.
Step 1. Delete the following:
webapps\qcbin\CustomTestTypes(delete folder)
webapps\qcbin\Extensions\ProvarTestType.cab
webapps\qcbin\Extensions\ProvarTestType(delete folder)
repository\sa\DomsInfo\Metadata\TEST\ProvarTestType.xml
Step 2. Restart ALM server.
Steps to uninstall on the client side
Step 1. Clear Internet Explorer cache. Click on IE tools on the top right corner of IE screen and select Internet options. A screen is displayed as given below.

In the Browsing history section, click Delete and the following screen is displayed.

Select Cookies and website data checkbox and click Delete.
Step 2. Update ALM client. Start Internet Explorer in Run as Administrator mode.

Navigate to the following URL:
http:\\{alm-server}\qcbin\start_a.jsp?Common=true
This will download existing ALM client components from the server and display the following when finished. Close the browser and open IE and enter the ALM server path.
Before using the plugin
ALM installation
You must have already connected to your ALM server via Internet Explorer before you can connect to it via Provar.
To do this this you will need to know:
- The web address of your ALM server.
- Your ALM user and password.
- The ALM domain and project that you will connect to.
Please speak to your ALM support person if you need help with this.
32-bit Provar installation
You need to use a 32-bit install of Provar to connect to ALM (this is because of limitations in ALM). These Provar installs can run on both 32 and 64-bit machines.
Launch your 32-bit install of Provar as usual.
Provar settings
Some settings can be configured by your ALM Administrator that enable or disable several features in Provar:
- The ability to check-in and check-out tests from inside Provar can be disabled.
- The ability to run checked-out tests against ALM from Provar.
- Preconditions that control whether Tests can be run against ALM might have been set. They might, for example, need to have a certain status.
These settings may affect the behavior described on this page.
Project setup
This section describes different ways of setting up your project in ALM. The first section describes what to do if you have a Provar project on your machine that isn’t already in ALM. The next section describes how to import an existing project.
Working with New Projects
This section describes what to do if you have a Provar project on your machine that isn’t already in ALM.
Connecting to your ALM Server
Launch Provar and choose the workspace containing the Project you’d like to add to ALM. Then, click on the blue “HP” icon towards the middle of Provar’s main toolbar.

Fill in the details on the resulting Connect to ALM dialog as follows:

- Host Name: The web address of your ALM server, up to and including “qcbin”. You can get this from the address bar in Internet Explorer.
- User Name: Your ALM user name.
- Password: Your ALM password.
- ALM Domain: The ALM domain that your project resides in.
- ALM Project: The ALM project that you want to work against.
Click Connect button and wait for the connection to be made. Then, click Close.
If successful, Download and Upload tool items will appear in toolbar together with a green dot in the HP tool item (indicating that you are connected to ALM).

Setting up folder mappings
Provar needs to know where in ALM to store your Test and Resources. This is done via the ALM Folder Mappings dialog.
Click on the Upload tool item in the main toolbar. Click on Folder Mappings.

Use the Choose buttons to select the Test Plan and Resources folders in ALM that you’d like to store your Provar Tests and Resources inside.

Adding tests and resources to ALM
Once you’ve set up your folder mappings, use the Upload tool item to open the “Upload to ALM” dialog. This shows your Provar files and allows you to upload them into ALM.

The dialog shows the following columns:
- Name: The name and location of the Provar file together with a checkbox that allows you to select it for upload.
- Provar State: The status of the file in Provar.
- ALM State: The status of the file in ALM.
- Status: Indicates whether the file is missing, changed or unchanged compared to ALM.
Tip: You can hover on the Provar and ALM State cells to see more detailed information.
To upload your tests:
Click on the checkboxes next to “resources” and “tests” to select all the files for Upload.
Click on the Upload Files button to start the Upload process.
A progress bar will display the Upload progress, after which the dialog will automatically refresh. This will show all the files as the same in Provar and ALM.
Importing an existing project
This section describes how to import a Project already added to ALM.
Launch Provar and choose a new workspace.
Choose the Import from Source Control option from Provar’s Welcome screen and then Import from HP ALM.

Fill in the details in the resulting Connect to ALM dialog as described in Connecting to your ALM Server.
Choose a name for your Project and then click Finish.
Managing Tests and Resources
Viewing-Tests-and-Resources
Provar has a specialized Test Type that shows additional information about your Tests in ALM.
For Resources:
The corresponding files are stored as attachments to the Resource:
You can use Save As Download button on the Attachments Resource View tab to view the files.

For Tests:
The Test Script tab shows the outline of the Test Case.
The .testcase, .setup and .teardown files are stored as attachments to the Test and can be viewed using the Test Script tab and downloaded using the Attachments tab.

Editing Tests and Resources
Tests and Resources are read-only in Provar while they are checked-in in ALM. You must check them out to make any changes.
If your ALM Administrator enables you to check out file directly from Provar’s Download dialog.

Once the download is complete, you should be able to change the selected Tests and/or Resources in Provar.
If the Check-out feature is disabled, then you will need to:
Check out the files using the ALM client in Internet Explorer.
Use Provar’s Download dialog to download the checked-out files. This will make them editable inside Provar.
Checking-in tests and resources
Once your changes are ready, you can use Provar’s Upload dialog to save the changes inside ALM.
If enabled, you can check-in the changes directly from Provar.

If the Check-in feature is disabled then you will need to:
First use Provar’s Upload Dialog to save the changes in ALM.
Then, check-in the changes using the ALM client in Internet Explorer.
Finally, use Provar’s Download Dialog to download check-in state into Provar.
Dealing with inconsistencies
Provar won’t allow you to upload Tests and Resources to ALM if any of the following has happened:
- The files aren’t checked-out by you (unless they are new).
- The files have been modified in ALM either by yourself or another user.
If this happens then the files will appear with a ‘Stale’ status in Provar’s Upload Dialog and the checkbox next to the files will be disabled:
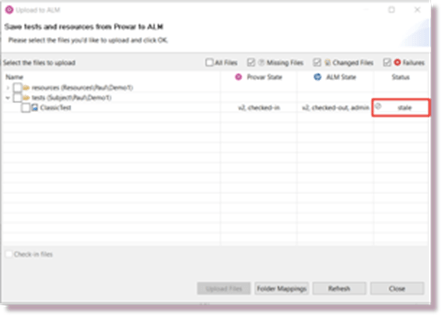
You need to use the Download Dialog to make the files consistent and then reapply your changes.
Design steps and actual results
Provar has special Test APIs to create Steps and Actual Results inside ALM.
To add steps:
Drag and drop the Design Step API onto your Test Case from the API Palette and fill in the Name, Description and Expected Result.
Add sub-steps under the Design Step to implement the step’s logic.
Where appropriate, add Actual Result sub-steps to record the actual results for the Design Step. You can use Provar expressions to include test values in the text.

When the test is executed:
- Run Steps are added to the Run inside ALM for each Design Step.
- Run Steps are marked as failed if any of their sub-steps fail. Otherwise they are successful.
- Any Actual Results are added to their containing Steps. If there is more than one Actual Result under a Step then they are combined with a new line between each one’s text.
Running Tests against ALM
To run your Tests against ALM, start by right-click one or more Tests in Provar’s Navigator view and choosing Run Under ALM.

TIP: You can select multiple tests by holding down the ctrl key on your keyboard and clicking more than one Test. You can also run all the Tests in a folder by clicking the folder.
Execution requirements
Tests need to meet certain requirements before they can be executed against ALM:
- The Tests must be present and up-to-date in ALM. If they are missing or are inconsistent, you can use the Upload Dialog to add/update them into ALM.
- Unless permitted by your ALM Administrator, Tests must be checked-in to ALM.
- Your ALM Administrator may impose additional requirements that are specific to your company.
Choosing a Test Set
The Choose Test Set wizard is shown after you click the Run Under ALM menu option. This allows you to choose the Test Set that you want to run your Tests against:
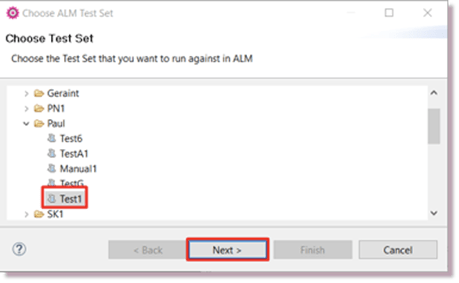
Once you have selected a Test Set, the second page of the wizard allows you to choose or create a test instance for each test:
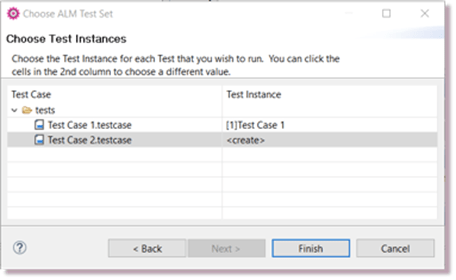
- If there are no existing Test Instances of a Test then {create} is shown in the Test Instance column. Provar will automatically create the Test Instance for you.
- If a Test Instance exists for a Test, its name is shown in the Test Instance column.
- If there is more than one Test Instance for a Test then you can click on the Test Instance column to choose which one you’d like to run against.
Test execution
When you press Finish on the Test Set Selection wizard, your Tests will start executing in Provar’s Test Runner view.
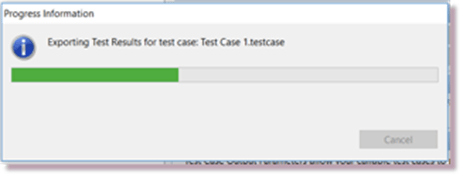
At the end of each Test the Exporting Test Results progress dialog will appear as the results are saved to ALM:
Viewing the results in ALM
Runs are visible in the Test Lab and Runs panels in ALM (as is normal).
If a Test Case contains Design Steps then these are shown in ‘Report’ tab in Runs and Test Instance panels.
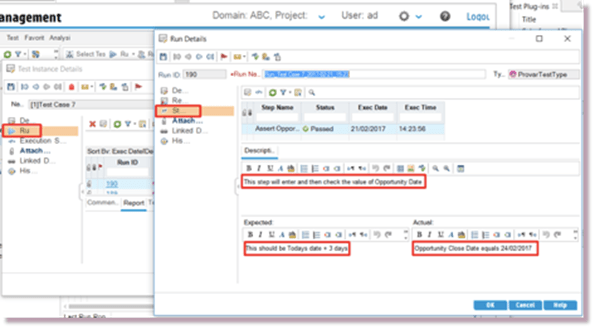
If there are no Design Steps, Provar’s full execution report is shown.
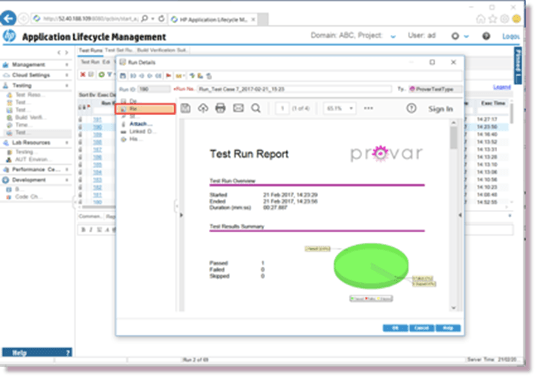
The Run Details dialog always shows:
- The full execution report in its Reports tab
- The Design Steps in the Steps tab
- The execution report can downloaded from the Attachments tab
- Home
- Get Started with V2
- Using Provar
- Understanding Provar’s Use of AI Service for Test Automation
- Provar Automation
- Creating a New Test Project
- Import Test Project from a File
- Import Test Project from a Remote Repository
- Import Test Project from Local Repository
- Commit a Local Test Project to Source Control
- Salesforce API Testing
- Behavior-Driven Development
- Consolidating Multiple Test Execution Reports
- Creating Test Cases
- Custom Table Mapping
- Functions
- Debugging Tests
- Defining a Namespace Prefix on a Connection
- Defining Proxy Settings
- Environment Management
- Exporting Test Projects
- Exporting Test Cases into a PDF
- Japanese Language Support
- Override Auto-Retry for Test Step
- Customize Browser Driver Location
- Mapping and Executing the Lightning Article Editor in Provar
- Managing Test Steps
- Namespace Org Testing
- NitroX
- Provar Test Builder
- ProvarDX
- Refresh and Recompile
- Reintroduction of CLI license Check
- Reload Org Cache
- Reporting
- Running Tests
- Searching Provar with Find Usages
- Secrets Management and Encryption
- Setup and Teardown Test Cases
- Tags and Service Level Agreements (SLAs)
- Test Cycles
- Test Plans
- Testing Browser – Chrome Headless
- Testing Browser Options
- Tooltip Testing
- Using the Test Palette
- Using Custom APIs
- Callable Tests
- Data-Driven Testing
- Page Objects
- Block Locator Strategies
- Introduction to XPaths
- Creating an XPath
- JavaScript Locator Support
- Label Locator Strategies
- Maintaining Page Objects
- Mapping Non-Salesforce Fields
- Page Object Operations
- ProvarX™
- Refresh and Reselect Field Locators in Test Builder
- Using Java Method Annotations for Custom Objects
- Applications Testing
- Database Testing
- Document Testing
- Email Testing
- Email Testing in Automation
- Email Testing Examples
- Gmail Connection in Automation with App Password
- App Configuration for Microsoft Connection in MS Portal for OAuth 2.0
- OAuth 2.0 Microsoft Exchange Email Connection
- Support for Existing MS OAuth Email Connection
- OAuth 2.0 MS Graph Email Connection
- Create a Connection for Office 365 GCC High
- Mobile Testing
- OrchestraCMS Testing
- Salesforce CPQ Testing
- ServiceMax Testing
- Skuid Testing
- Vlocity API Testing
- Webservices Testing
- DevOps with V2
- Introduction to Provar DevOps
- Introduction to Test Scheduling
- Apache Ant
- Configuration for Sending Emails via the Automation Command Line Interface
- Continuous Integration
- AutoRABIT Salesforce DevOps in Provar Test
- Azure DevOps
- Running a Provar CI Task in Azure DevOps Pipelines
- Configuring the Automation Secrets Password in Microsoft Azure Pipelines
- Parallel Execution in Microsoft Azure Pipelines using Multiple build.xml Files
- Parallel Execution in Microsoft Azure Pipelines using Targets
- Parallel Execution in Microsoft Azure Pipelines using Test Plans
- Bitbucket Pipelines
- CircleCI
- Copado
- Docker
- Flosum
- Gearset
- GitHub Actions
- Integrating GitHub Actions CI to Run Automation CI Task
- Remote Trigger in GitHub Actions
- Parameterization using Environment Variables in GitHub Actions
- Parallel Execution in GitHub Actions using Multiple build.xml Files
- Parallel Execution in GitHub Actions using Targets
- Parallel Execution in GitHub Actions using Test Plan
- Parallel Execution in GitHub Actions using Job Matrix
- GitLab Continuous Integration
- Travis CI
- Jenkins
- Execution Environment Security Configuration
- Provar Jenkins Plugin
- Parallel Execution
- Running Provar on Linux
- Reporting
- Salesforce DX
- Git
- Version Control
- Salesforce Testing
- Recommended Practices
- Salesforce API Access Control Security Update – Impact on Provar Connections
- Salesforce Connection Best Practices
- Improve Your Metadata Performance
- Java 21 Upgrade
- Testing Best Practices
- Automation Planning
- Supported Testing Phases
- Provar Naming Standards
- Test Case Design
- Create records via API
- Avoid using static values
- Abort Unused Test Sessions/Runs
- Avoid Metadata performance issues
- Increase auto-retry waits for steps using a global variable
- Create different page objects for different pages
- The Best Ways to Change Callable Test Case Locations
- Working with the .testProject file and .secrets file
- Best practices for the .provarCaches folder
- Best practices for .pageObject files
- Testing Best Practices
- Troubleshooting with V2
- How to Use Keytool Command for Importing Certificates
- Browsers
- Configurations and Permissions
- Add Permissions to Edit Provar.ini File
- Configure Provar UI in High Resolution
- Enable Prompt to Choose Workspace
- Increase System Memory for Provar
- Refresh Org Cache Manually
- Show Hidden Provar Files on Mac
- Java Version Mismatch Error
- Unable to create test cases, test suites, etc… from the Test Project Navigation sidebar
- Connections
- DevOps with V2
- Error Messages
- Provar Manager 3.0 Install Error Resolution
- Provar Manager Test Case Upload Resolution
- Administrator has Blocked Access to Client
- JavascriptException: Javascript Error
- Resolving Failed to Create ChromeDriver Error
- Resolving Jenkins License Missing Error
- Resolving Metadata Timeout Errors
- Test Execution Fails – Firefox Not Installed
- Selenium 4 Upgrade
- Licensing and Installation
- Memory
- Test Builder
- V2 Release Notes