Quality Hub JIRA Plugin - Setup and User Guide
Pre-requisites
- JIRA instance with access to create and manage API Keys
- Quality Hub (formerly Provar Manager) installation with Release Management Permissions, Provar Quality Hub Setup permissions, and Test Management Permissions
- Quality Hub 3.22.0 or later
- 3.22.0+ is required for JIRA 0.9.0+
Introduction
This guide will walk you through the installation, setup, and usage of the JIRA plugin. This plugin is required to let Quality Hub access your JIRA instance.
Once set up, you can able to perform the following tasks:
- Import JIRA Projects into Quality Hub
- Import Issues into Quality Hub
- Relating Test Cases to JIRA User Stories
- Create Bugs in JIRA from Quality Hub
- Syncing Issues between Quality Hub and JIRA
Target Audience
This document is aimed at Testers and Developers utilizing Quality Hub and JIRA as a part of their development workflows.
Generating a JIRA Token
- Open your JIRA workspace.
- On the top-right, click on your profile icon and click Account Settings.
- On the left-hand side of the screen, click Security.
- In the API token section, click Create and Manage API tokens.
- On the next screen, click Create API token to create a new API token.
- Store this API token securely because it will be the last time you see it in JIRA.
- Use the API token as the password in the Password field back in the Named Credential creation form.
For more information on how to create and manage your Jira API Tokens, visit their support page here: Manage API tokens for your Atlassian account | Atlassian Support
Installing the Quality Hub – Jira Plugin
Firstly, you need to install an extension package for the Jira Integration. All Quality Hub extensions can be installed from the Plugin Marketplace.
Navigate to Provar Quality Hub Setup > Plugins > Jira Plugin to install the package.
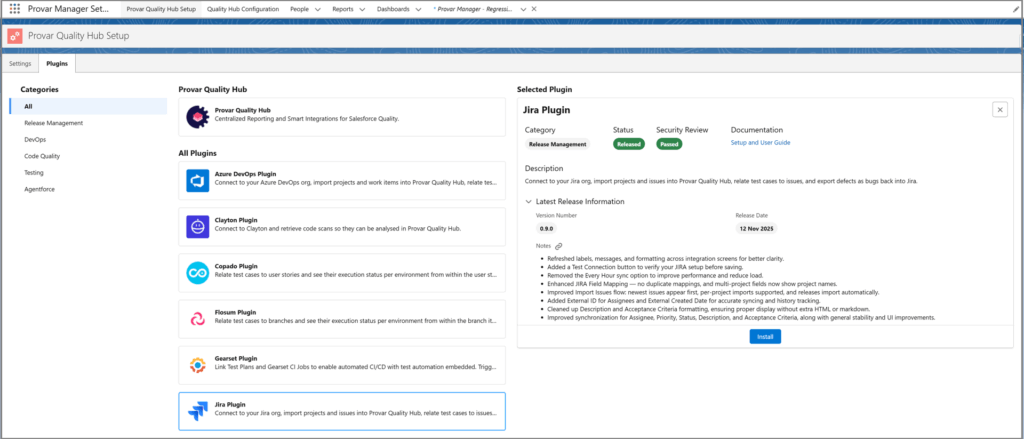
Once it’s installed you can see it under Setup > Installed Packages.

Granting Access
At this point, you don’t have to assign any licenses but you do have to assign permission sets to grant users access to it.
- Click Permission sets.
- Find the permission set named Quality Hub – JIRA plugin and click on it.
- Click Manage Assignments.
- Select the checkbox next to the name you want to assign permissions.
- Click Add Assignments. This will grant permission to use the integration.
Once permissions are granted, you will be able to see the Quality Hub – Jira plugin app in the App Launcher. This new app contains the JIRA Integration Settings tab.
Connecting to JIRA
The next step is to link Quality Hub to your instance of JIRA by following these steps:
- Click Setup > Named Credentials.
- Click New Named Credentials.
- Enter the details in the fields as given below.
- In the Label field, enter the label whatever you want to put as a label.
- In the Name field, enter the name.
- In the URL field, enter the URL that you use to access JIRA. Ensure it is a secure URL. Do not add a “/” at the end.
- In the Authentication section:
- In the Identity Type field, select Named Principal.
- In the Authentication Protocol field, select Password Authentication.
- In the Username field, enter your username.
- In the Password field, enter the API token (see Generating an API token below).
- In the Callout Options section:
- Select Generate Authorization Header checkbox.
- Click Save.
- Ensure to note down the label you used (e.g. JIRA)
Configuring the Integration
The next step is to configure the plugin to use the named credential you just created.
- Open the Quality Hub – JIRA app from the App Launcher.
- Click on the JIRA Integration Settings tab.
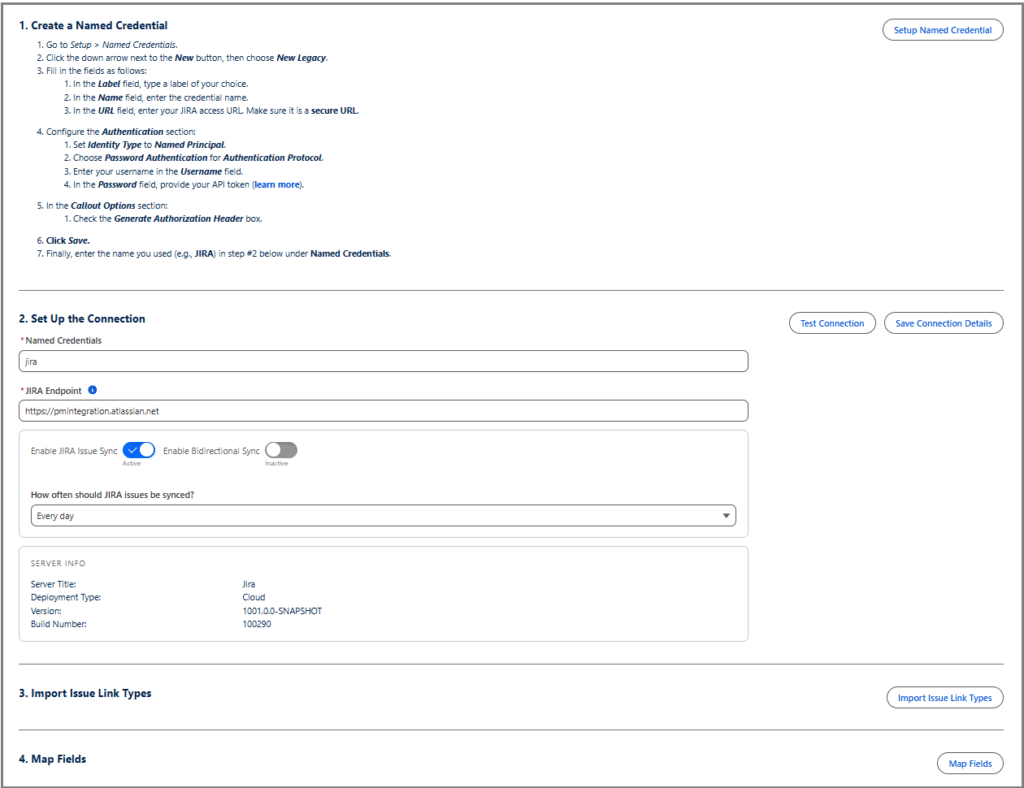
- In the Named Credentials field, enter the named credential’s name (not the label).
- In the JIRA Endpoint field, enter the endpoint or the URL that you use to access JIRA (e.g. https://mycompany.atlassian.net). Do not add a “/” at the end.
- Click Test Connection to verify whether the connection is valid.
- If you want, you can enable the Enable JIRA Issue Sync switch to keep local copies of user stories synced with JIRA.
- Additionally, you can enable Bi-directional sync for Jira issues. This will allow you to push updates back into Jira from changes made in Provar Quality Hub. This is an optional step.
- In the field How often should JIRA issues be synced, select an option based on how frequently you want the JIRA issues to be synced.
- It’s recommended to select “Every Day” or “Every 12 Hours” if a large number of issues are expected to be imported.
- Click Save Connection Details.
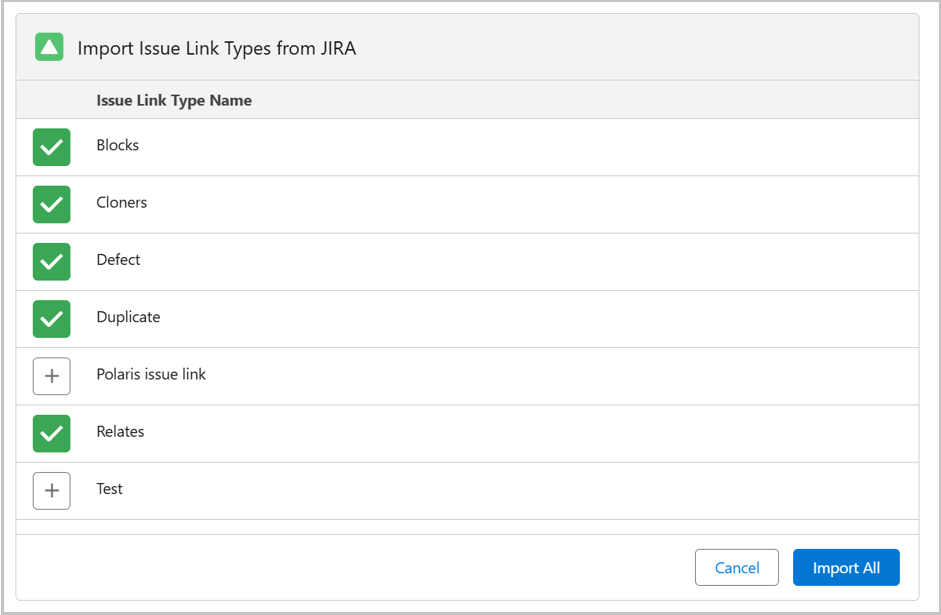
- In the Import Issues Link Types, you can decide which Issue Link Types to map into Provar Quality Hub.
- Lastly, you can decide which fields you’d like to create mappings for. This will allow you to map JIRA Issue fields to Quality Hub Issue fields for syncing and reporting purposes.
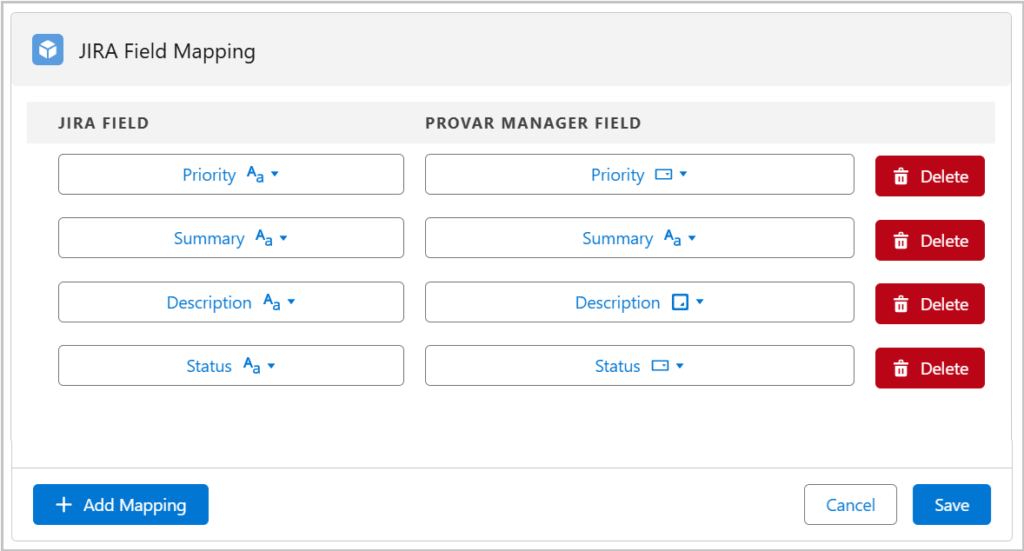
- Click Save.
Adding the JIRA Issue Sync Information Component to the Page
To add the JIRA Issue Sync Information component to the Issues tab, please follow the steps given below:
- Select any issue, from the list of Issues in the Projects tab.

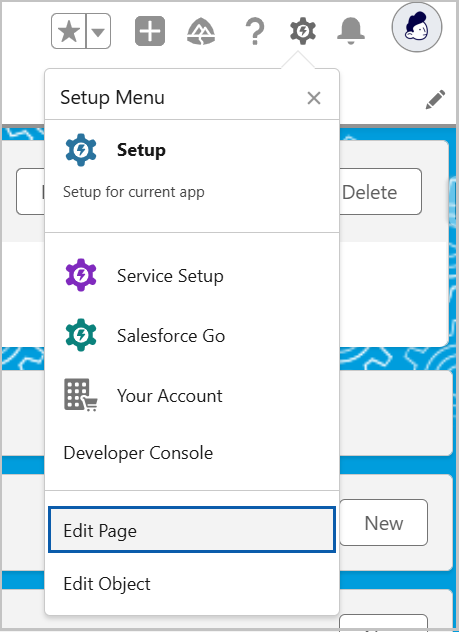
- Click Settings on the top-right and click Edit Page.
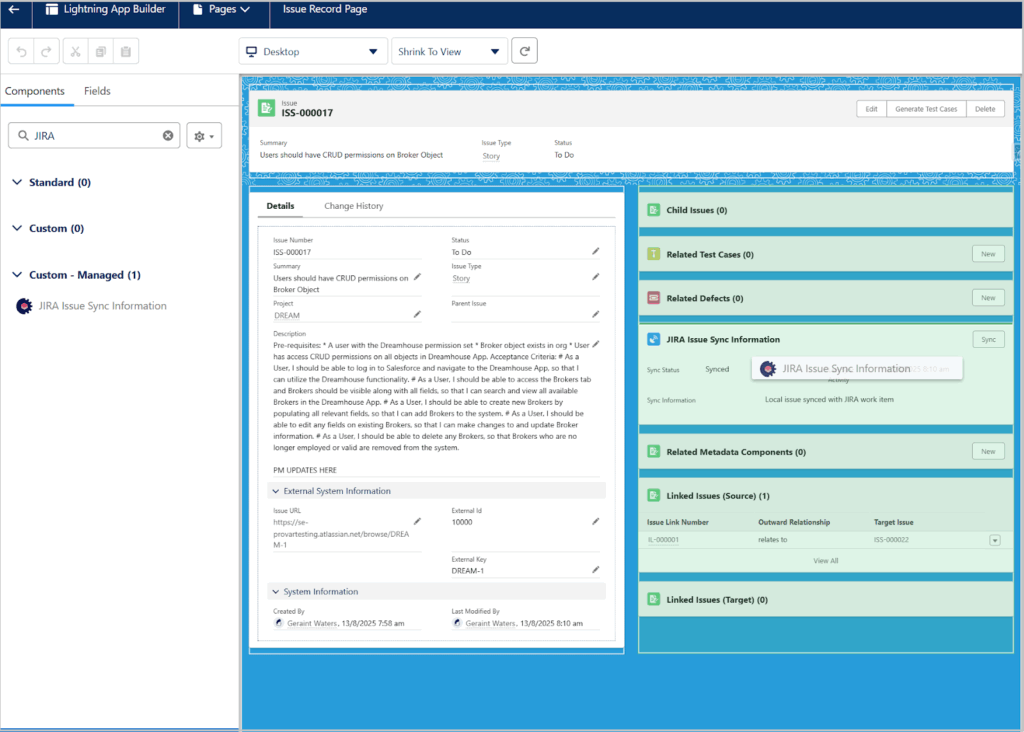
- Under Components, drag and drop the JIRA Issue Sync Information component onto the page.
- Click Save.
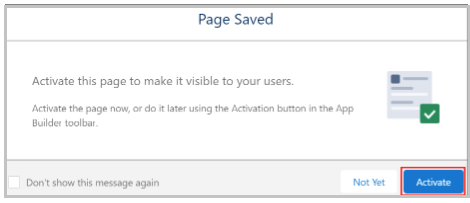
- Click Activate or Activation in the top right if this window does appear.
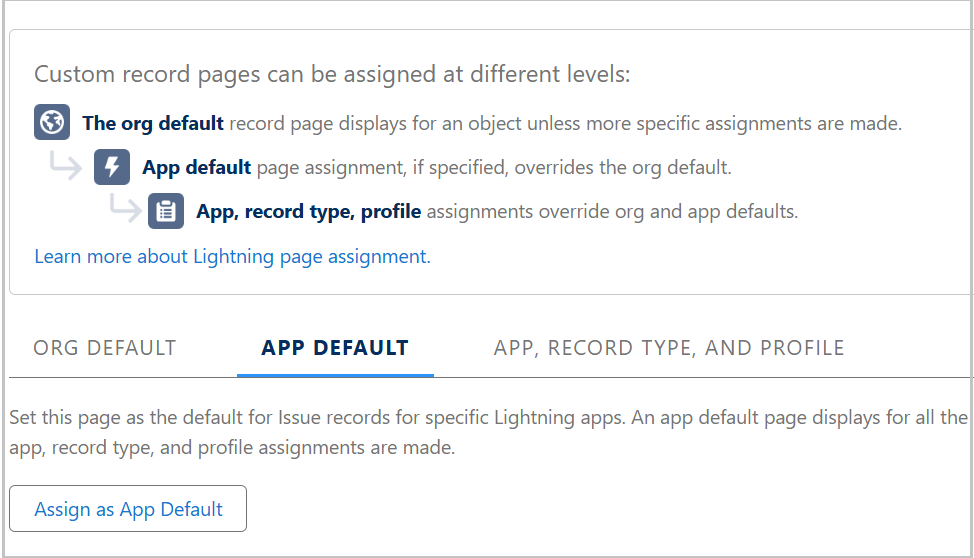
- Under App Default, click Assign as App Default.
- In the App Name field, select the Provar Quality Hub (Provar Manager) applications as shown below and click Next. Leave the Form Factor defaults then click Next again.
- A Review Assignments screen is displayed and click Save.
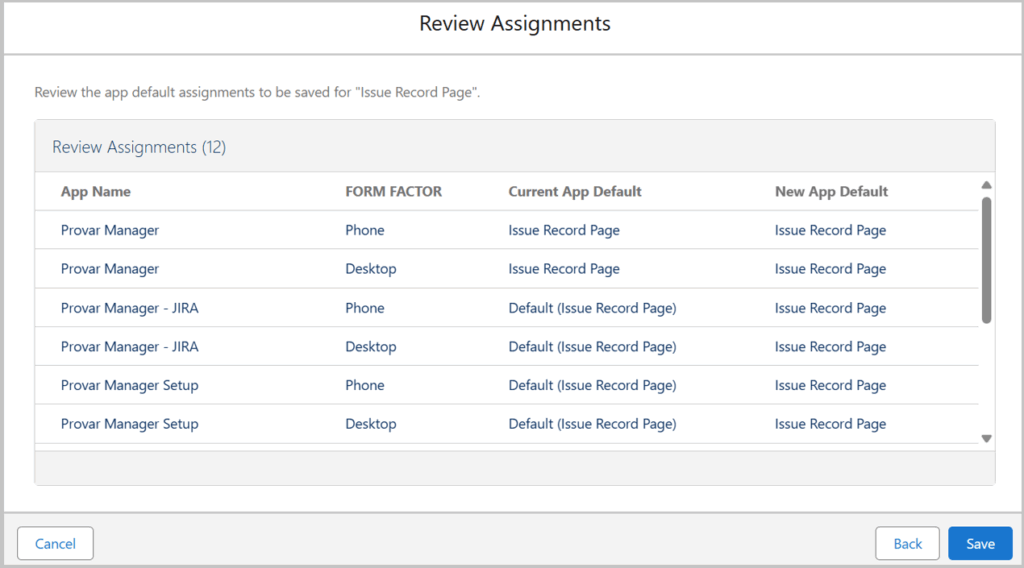
Adding the JIRA Bug Component to the Page
To add the JIRA Bug component to the Defects tab, please follow the steps below:
- Open the Defects tab in the Quality Hub Test Management app and select any defect.

- Click Settings on the top-right and click Edit Page.
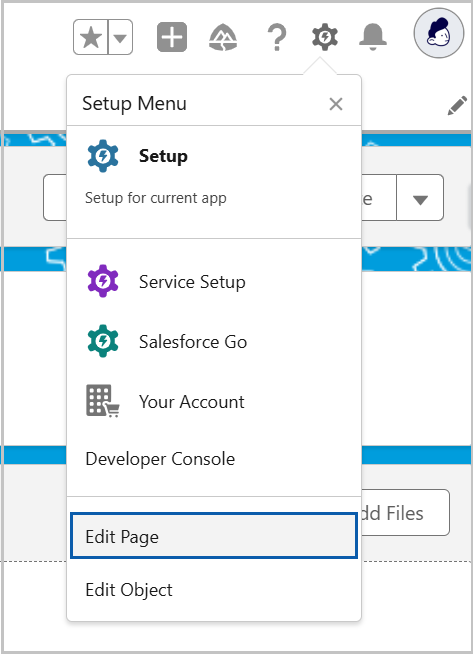
- Under Components, drag and drop the JIRA Bug Information component onto the page.
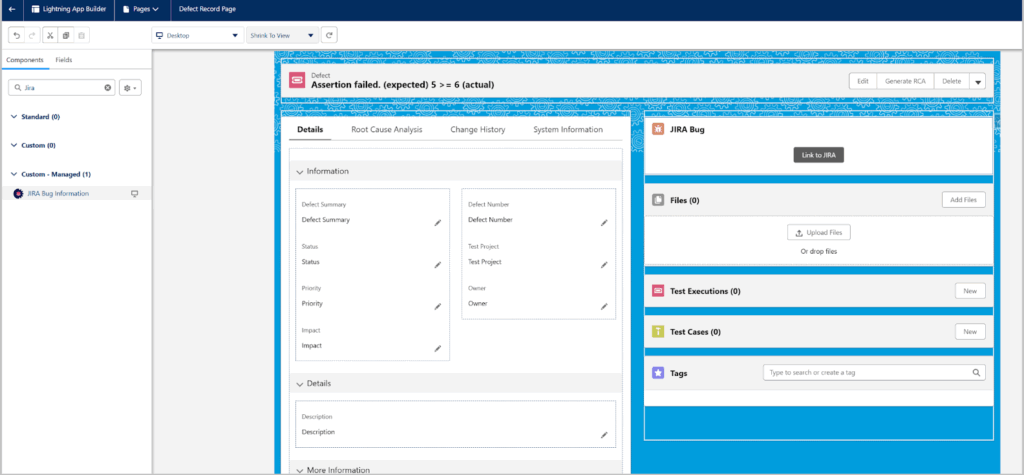
- Click Save.
- Click Activate or Activation in the top right if the screen does is not displayed.
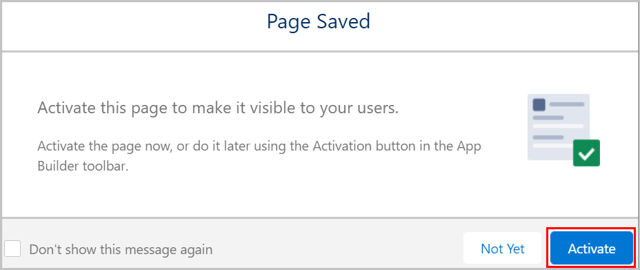
- Under App Default, click Assign as App Default.
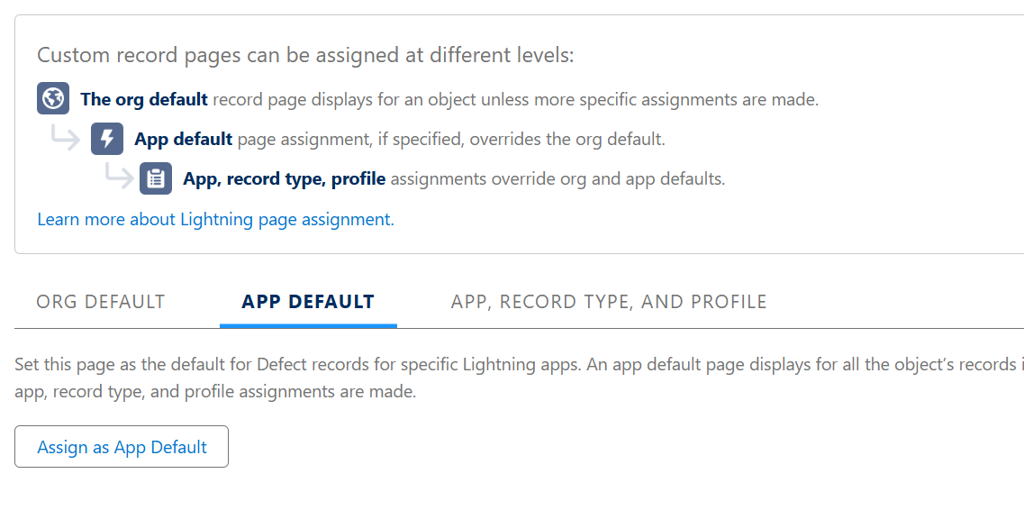
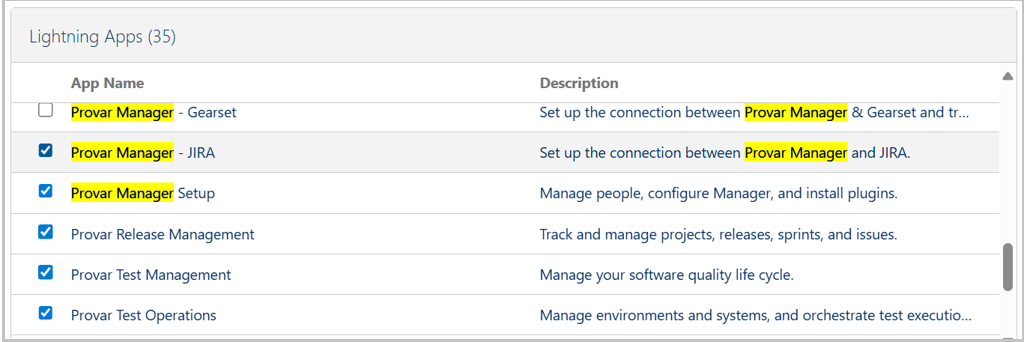
- In the App Name field, select the Quality Hub applications as shown below and click Next.
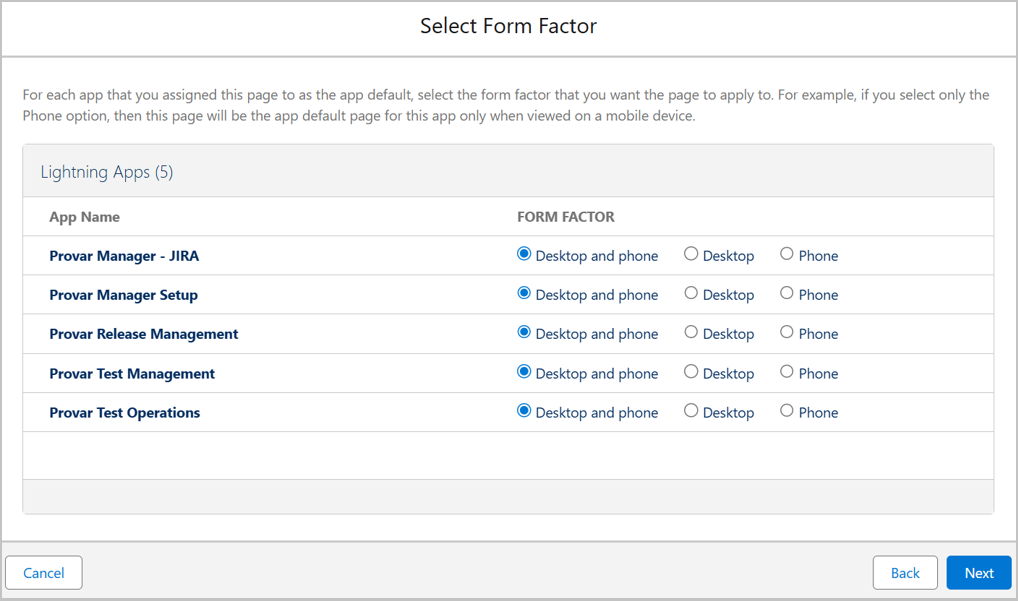
- Leave the Form Factor as default and click Next.
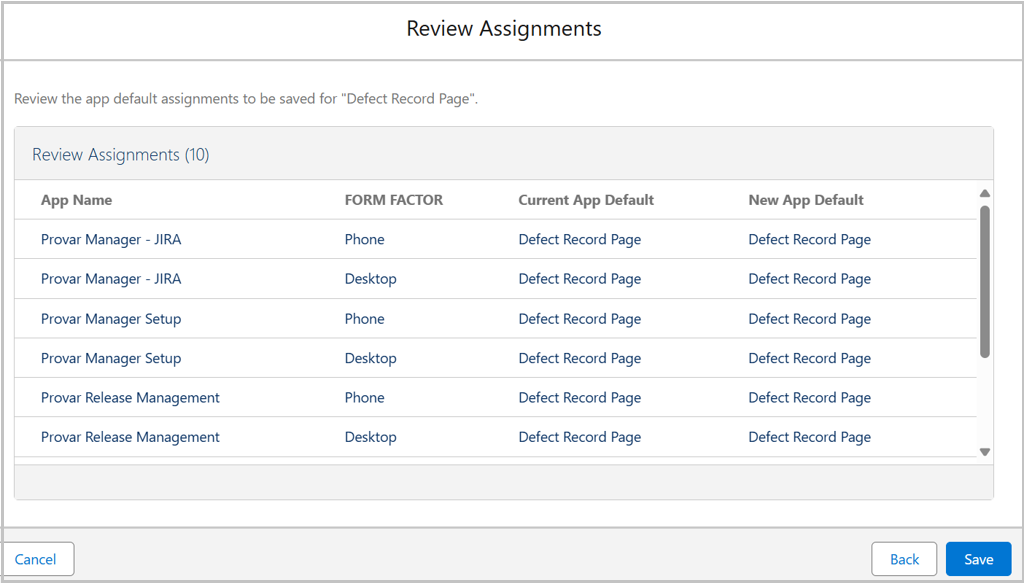
- A Review Assignments screen is displayed. Click Save.
Using the Plugin
In this section, we will show you how you can use the JIRA plugin in Quality Hub.
Some of the activities that you can perform with the plugin are listed below:
- Import Projects into Quality Hub
- Import Issues into Quality Hub
- Relating Test Cases to JIRA User Stories
- Create Bugs in JIRA from Quality Hub
- Syncing Issues between Quality Hub and JIRA
Importing Projects
To import Projects into Quality Hub follow these instructions:
- Open either the Quality Hub – JIRA app or the Quality Hub Release Management app.
- Click the Projects tab.
- Click Import.
- If you have the Azure DevOps plugin installed as well, you have to select Jira from the Select a Release Management Tool screen first.

- You will see a list of all the projects in your JIRA instance that you have access to.
- You can choose to either Import All or cherry-pick your projects then click Import.
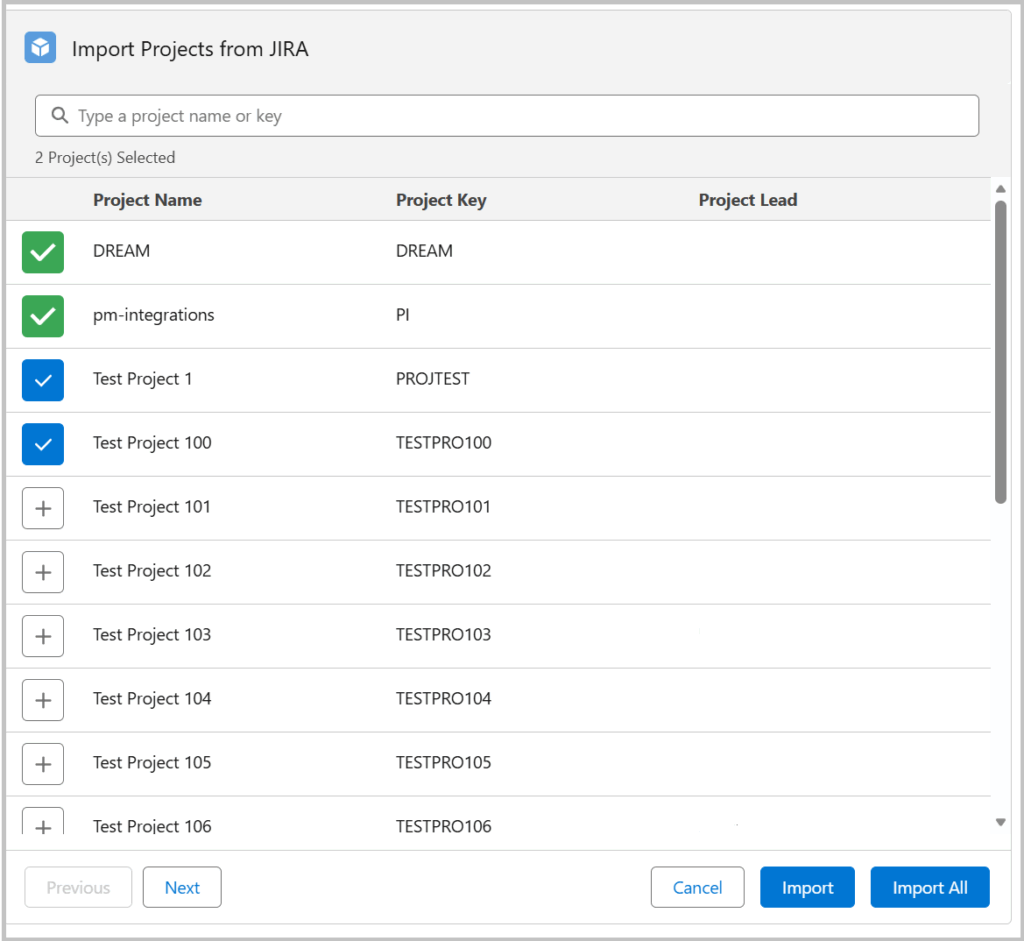
- Click Import. You will see a message Projects Imported successfully.
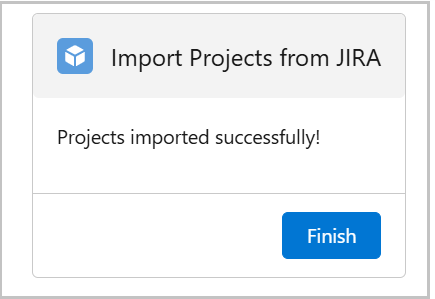
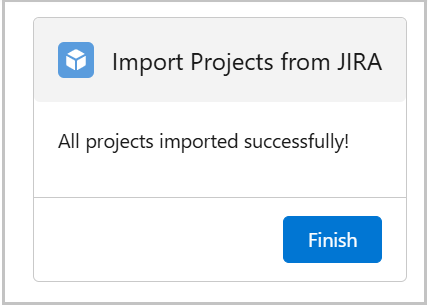
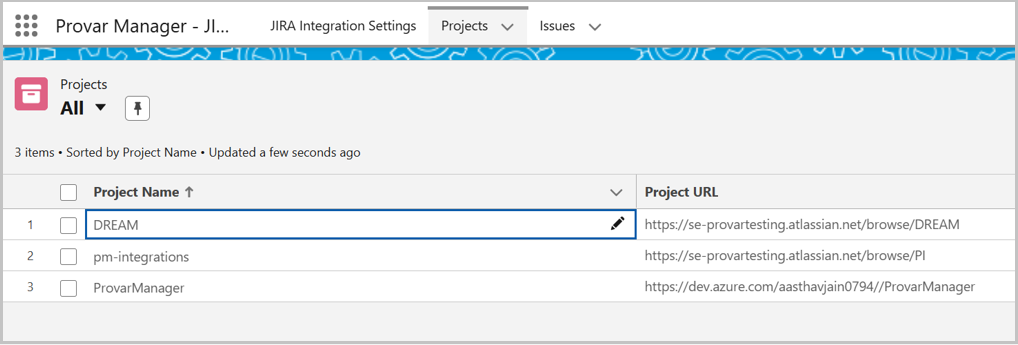
- Click Finish. You will find your selected projects in the Projects tab.
Setting Priorities Map
Open the previously created Project record, where you’ll find all the Settings tabs. If priorities are being imported, ensure that the Quality Hub priorities are mapped to the corresponding JIRA project priorities.
Quality Hub supports up to five priority levels. If your JIRA project has more than five, you’ll need to map multiple Jira priorities to a single PQH priority level.

Importing Issues
Open the previously created Project record and you’ll see all the Issue Types the project has (e.g. Task, Story, Epic, Bug, Sub task) but no Issues on the Related Tab.
You can import Issues using these instructions:
- Click Import.

- Depending on what you want to test, select the user stories you want to import (click ‘+’).
Note: Epics are imported automatically and Releases linked to the imported issues are automatically imported. If sync is enabled, they are kept in sync automatically as well. - Click Import.
- You can either Import All issues at once or cherry-pick them then click Import.
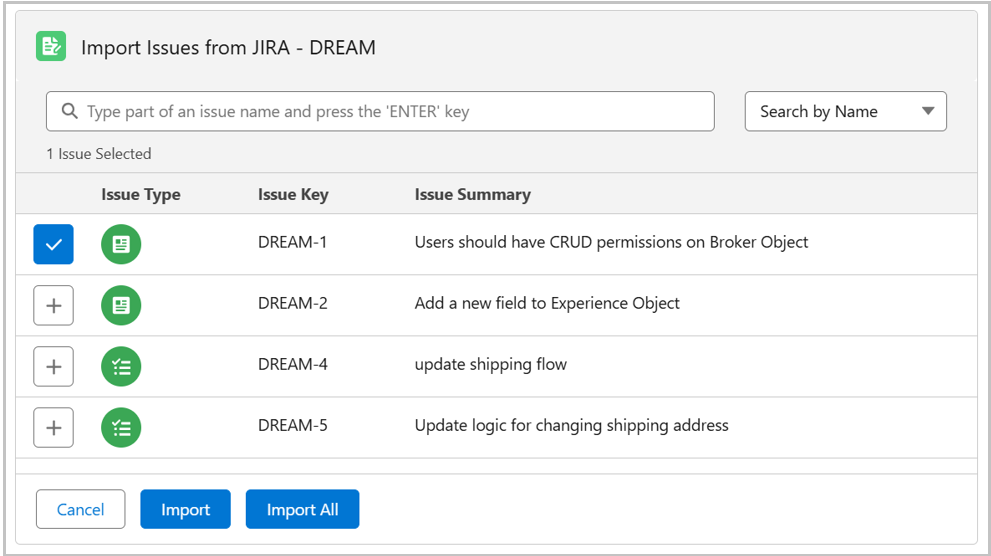
- Refresh the page and you will see all the issues and the related epics as well.

- By clicking on an Epic record you will be able to see all the child issues.
Relating Test Cases to JIRA Issues
Note: Ensure you have imported the Project, Issues, and Issue Link Types beforehand.
One of the advantages of integrating Provar Quality Hub with JIRA is that you can create and relate test cases to user stories.
If you open an Issue record you can see on the left-hand side all the information about the issue; the name, the description, the status, its external key & URL, and what sort of issue type it is (e.g. Epic).
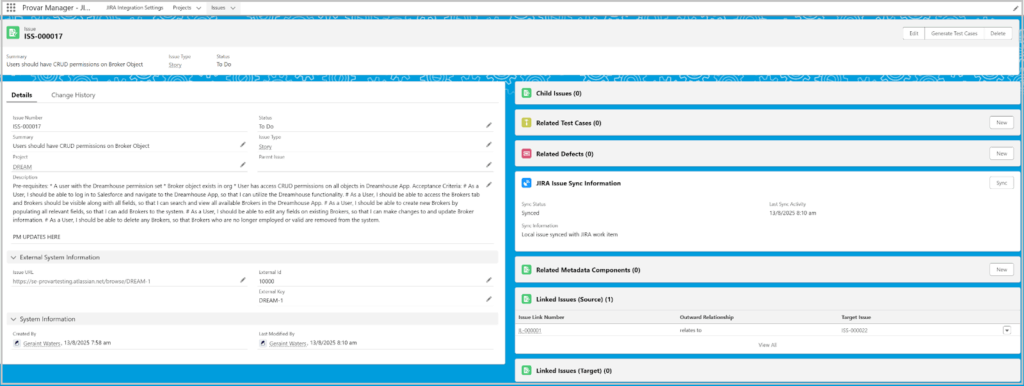
On the top right hand side, you can see information related to the sync status. We will cover syncing in more detail in the Syncing Issues between Provar Manager & JIRA section.

You can relate your test cases to your JIRA issues by clicking New in the Test Cases related list.
Sending Defects to JIRA
You have the option of sending defects to JIRA as issues (e.g. Bugs) from the Defect record itself by following these steps:
- Open a Defect record from any Quality Hub app.
- The Defects tab is enabled by default in the Quality Hub Test Management app.
- On the JIRA Bug component, click Link to JIRA.

Note: This component must be added to the layout first by the end user, please refer to the Adding the JIRA Bug Component to the Page section for more.
- In the Parent issue field, select the imported user story it is related to.
- In the Issue Type field, select the type of issue (e.g. Bug)
- In the Issue Link Type field, select the relationship between the defect and the user story.
- Once you have selected the options in all the fields, click Create JIRA Issue.

- If successful, the messages JIRA Issue created and JIRA Link Issue created are displayed.

In JIRA, you will find that a JIRA issue was created and related to the selected user story.
Syncing Issues between Quality Hub and JIRA
Quality Hub Issues can be synced back into or from JIRA. Once the sync has been enabled from the JIRA Integration Settings page, issues imported from JIRA will be synced based on the selected frequency.
Note: If the bi-directional sync has been enabled, the sync still occurs, but changes made in Quality Hub will now be reflected back into JIRA, such as updating the description or status fields. However, Quality Hub will not overwrite any changes made in JIRA, as we prefer to maintain JIRA changes over Quality Hub changes.

- Fields that are synced depend on Field Mappings you create in the JIRA Integration Settings page.
- By default, the Summary, Description, and Status fields are synced.
- Additional field mappings can be added and will allow for bi-directional syncing between Quality Hub Issues and JIRA items.
- You can force the sync to occur at any time by navigating to an imported Issue record.
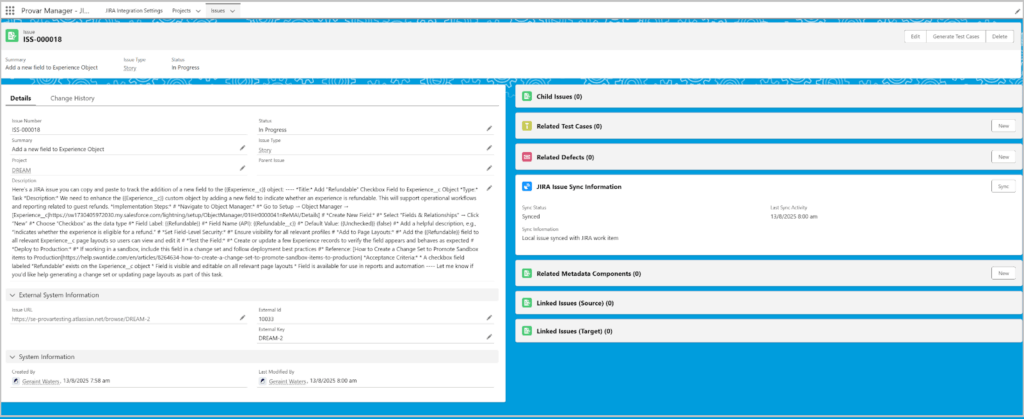
- From here, click the Sync button on the JIRA Issue Sync Information component, wherever you have added it in the layout as before.
- If bi-directional sync is enabled this will attempt to push changes made in Quality Hub to JIRA as well as import changes made in JIRA to Quality Hub.
- Home
- How to Use Quality Hub
- Actionable Insights
- Quality Hub Setup
- Quality Hub Setup and User Guide
- Installing/Updating Quality Hub
- Configuring Quality Hub
- Setting Up a Connection to Quality Hub
- How to Know if a File in Automation is Linked in Quality Hub
- Uploading Existing Manual Test Cases to Quality Hub with DataLoader.io
- Object Mapping Between Provar Automation and Quality Hub
- Quality Hub Filters
- Metadata Coverage with Quality Hub
- Quality Hub Integrations
- Plugins
- Release Management
- Test Management
- Test Operations
- Release Notes