Setting Up a Connection to Quality Hub
The Quality Hub connection establishes a connection with a Quality Hub instance. It is configured by creating a Quality Hub connection via the Connection tab. The Quality Hub connection (leveraging a normal Salesforce Connection) only requires a user login via OAuth Web Flow.
Prerequisites
There are some prerequisites for setting up a connection to Quality Hub as listed below:
- A Salesforce org with Quality Hub must already be installed.
- A Salesforce user with a Quality Hub license assigned and the Quality Hub permission set assigned too.
How to set up an OAuth Web Flow connection to Quality Hub
Step 1: Create a Connected App.
Step 2: Create a Quality Hub Connection (OAuth WebFlow).
In the Test Settings, navigate to the Connections tab and click the plus (+) sign. The Add New Connection screen is displayed. Give a Connection Name and create an OAuth WebFlow Connection. In the Connection Type field, select Quality Hub then select Quality Hub Connection.
For more information, please see Salesforce OAuth (Web Flow) connection.
In the created OAuth WebFlow connection, you have to provide the details of the Consumer Key, Consumer Secret, and Callback URL that is a part of OAuth WebFlow connection.
Note: The above 3 fields are not the credentials of the user but they are the credentials of the Connected App.
Click Authorise, and it will ask for your credentials; provide your credentials, and when the authorization is successful, the Access Token and Refresh Token are populated.
Note:
- Quality Hub is only available via the Salesforce Lightning Experience.
- Only one Quality Hub connection can be set.
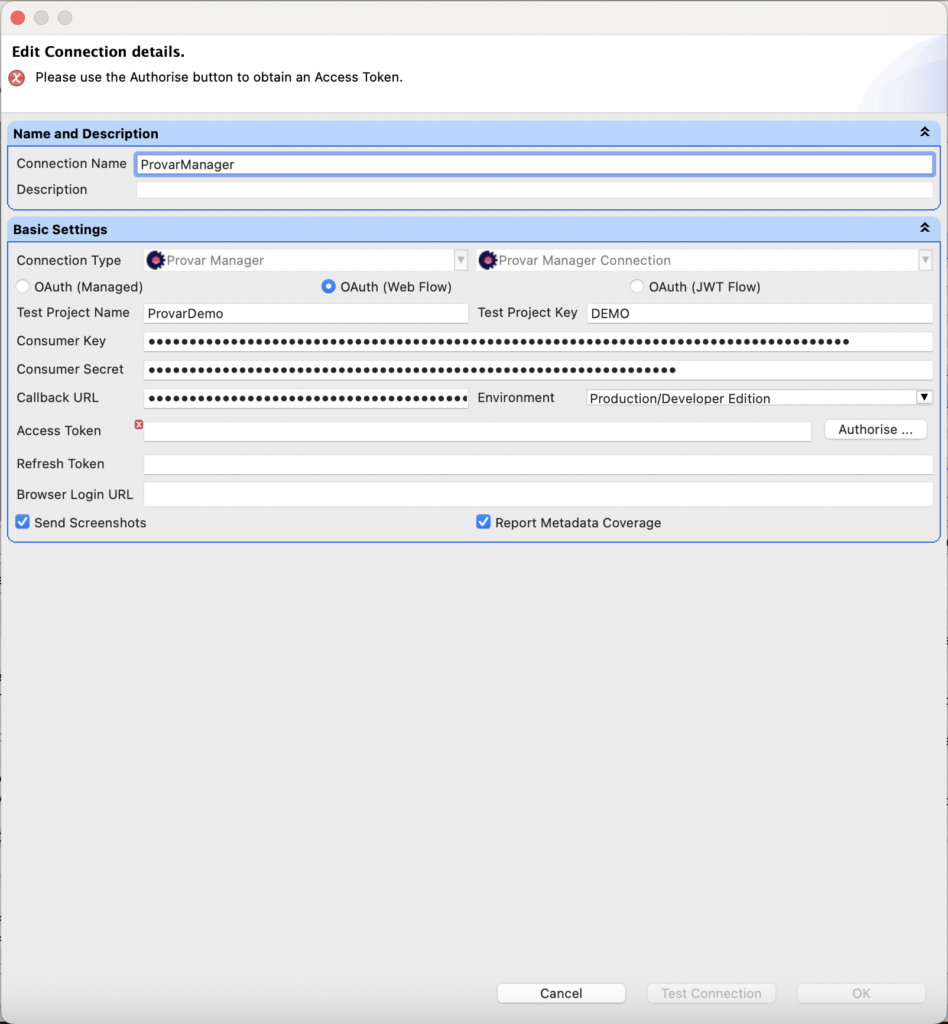
Above: Snapshot of creating a Quality Hub Connection.
When the Quality Hub connection is created, you can see it under the Connections tab.

Above: Screenshot of Quality Hub Connection in Provar.
Creating and linking the Test Project in Quality Hub
Once you have created the Quality Hub connection; a project is created in Quality Hub with a Test Project Name and a unique Test Project Key. For example, the project AY Test Project is created in Quality Hub which has a unique key.
If a user wants to link a Provar test project with an existing Quality Hub project then he has to provide that key (unique key) while creating the Quality Hub connection in Provar.
Note: The project was created in Quality Hub with the same name and unique key.
In Quality Hub –
Log on to the Quality Hub and click Environments > Test Projects. You can see the AY Test Project created in Test Manager.

Above: Snapshot of the Project created in Provar Manager.
Click on the project (AY Test Project), and you can see the details of the project.
When you click on the project, you can see Test Plans inside it. When you click on Test Plans, you can see Test Suites (these are Test Plan Folders in Provar) and Test Cycles inside it.

Above: Details of the project created in Quality Hub.
Uploading screenshots
To upload screenshots, we have provided one option at the connection level. You can now select the Send Screenshots checkbox in the connection dialog box to upload screenshots.
This option is now available. If you have selected this checkbox then whatever screenshots are captured, they will all be uploaded. If it’s unchecked or de-selected, then no screenshot will be uploaded.
Note: The screenshot capture is allowed only in UI API’s. For example, in the UI Assert test case in the above test case example, you can see the options:
- screenshot before
- screenshot after

Note: In case of an error, a screenshot will always be created and uploaded. So, the maximum number of possible screenshots on a test step execution is 3 (before, after, and on-error). The screenshots can be identified as (before_ and after_).
Report Metadata Coverage
You can also enable Metadata reporting on the connection to Quality Hub by checking the Report Metadata Coverage checkbox. After enabling this feature, Automation will start collecting what Salesforce metadata test cases interact with.
When uploading test cases to Quality Hub, the metadata coverage present locally is also uploaded, allowing you to start running test cases from Quality Hub based on metadata changes tracked in your DevOps pipeline.
When you enable that checkbox in the connection to Quality Hub, it does three things:
- It calculates the metadata coverage (i.e. what Salesforce metadata each Quality Hub-linked test case interacts with) when the connection is saved after checking the checkbox.
- Every time a Quality Hub-linked test case is changed, the metadata coverage is recalculated.
- Every time a test case is uploaded to Quality Hub, its metadata coverage is also uploaded.
QA teams can use this information in at least two ways:
- To report in Quality Hub what Salesforce components they have test cases for.
- To trigger test runs based on particular metadata component changing during the development pipeline.
Removing a Quality Hub Connection
Removing or deleting a Quality Hub connection removes all Quality Hub associations. Right-click on Quality Hub connection to delete and the Quality Hub connection is deleted, and the context menu Upload to PM won’t be visible in Provar.