Automation V3: Setting up Continuous Integration
Once the build file is ready and the version control has been set up (if required), tests can be scheduled using a Continuous Integration (CI) Server such as Jenkins.
The role of the CI Server is to run the regression pack (from a local machine or via a version control repository). The CI Server will trigger the Provar automation pack on a defined schedule or based on an external trigger, such as a new build or deployment.
Installing Jenkins
Start by downloading and installing Jenkins.
To download Jenkins, visit the Jenkins website. Click Download and select the file which suits your operating system.
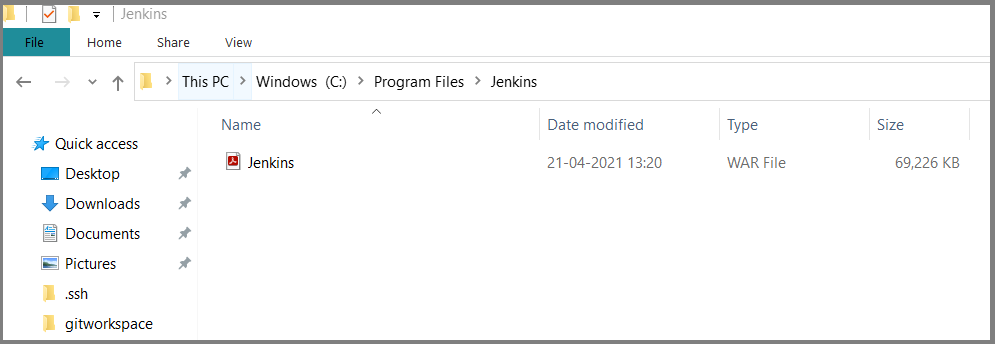
To install Jenkins, first move the downloaded Jenkins.war file to an appropriate directory, e.g. C:Program FilesJenkins.
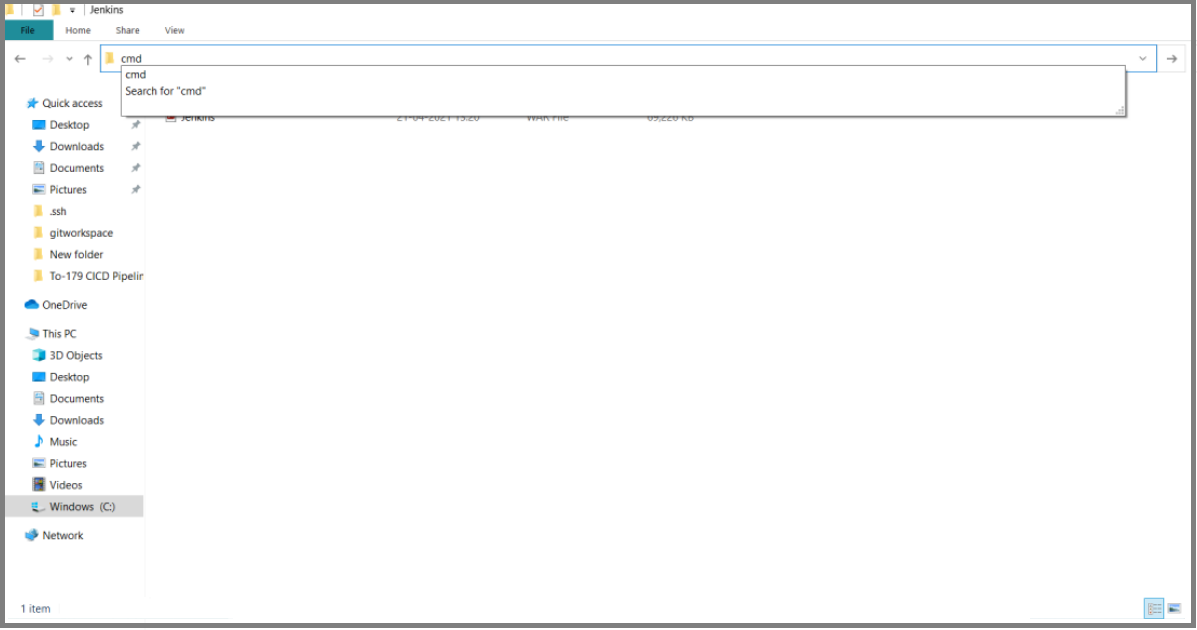
Then, open command prompt in this directory by clicking on the filepath and typing cmd.
Once command prompt has opened, type and run the command java –jar Jenkins.war.
Once the command has run, a password will be generated for logging into Jenkins.
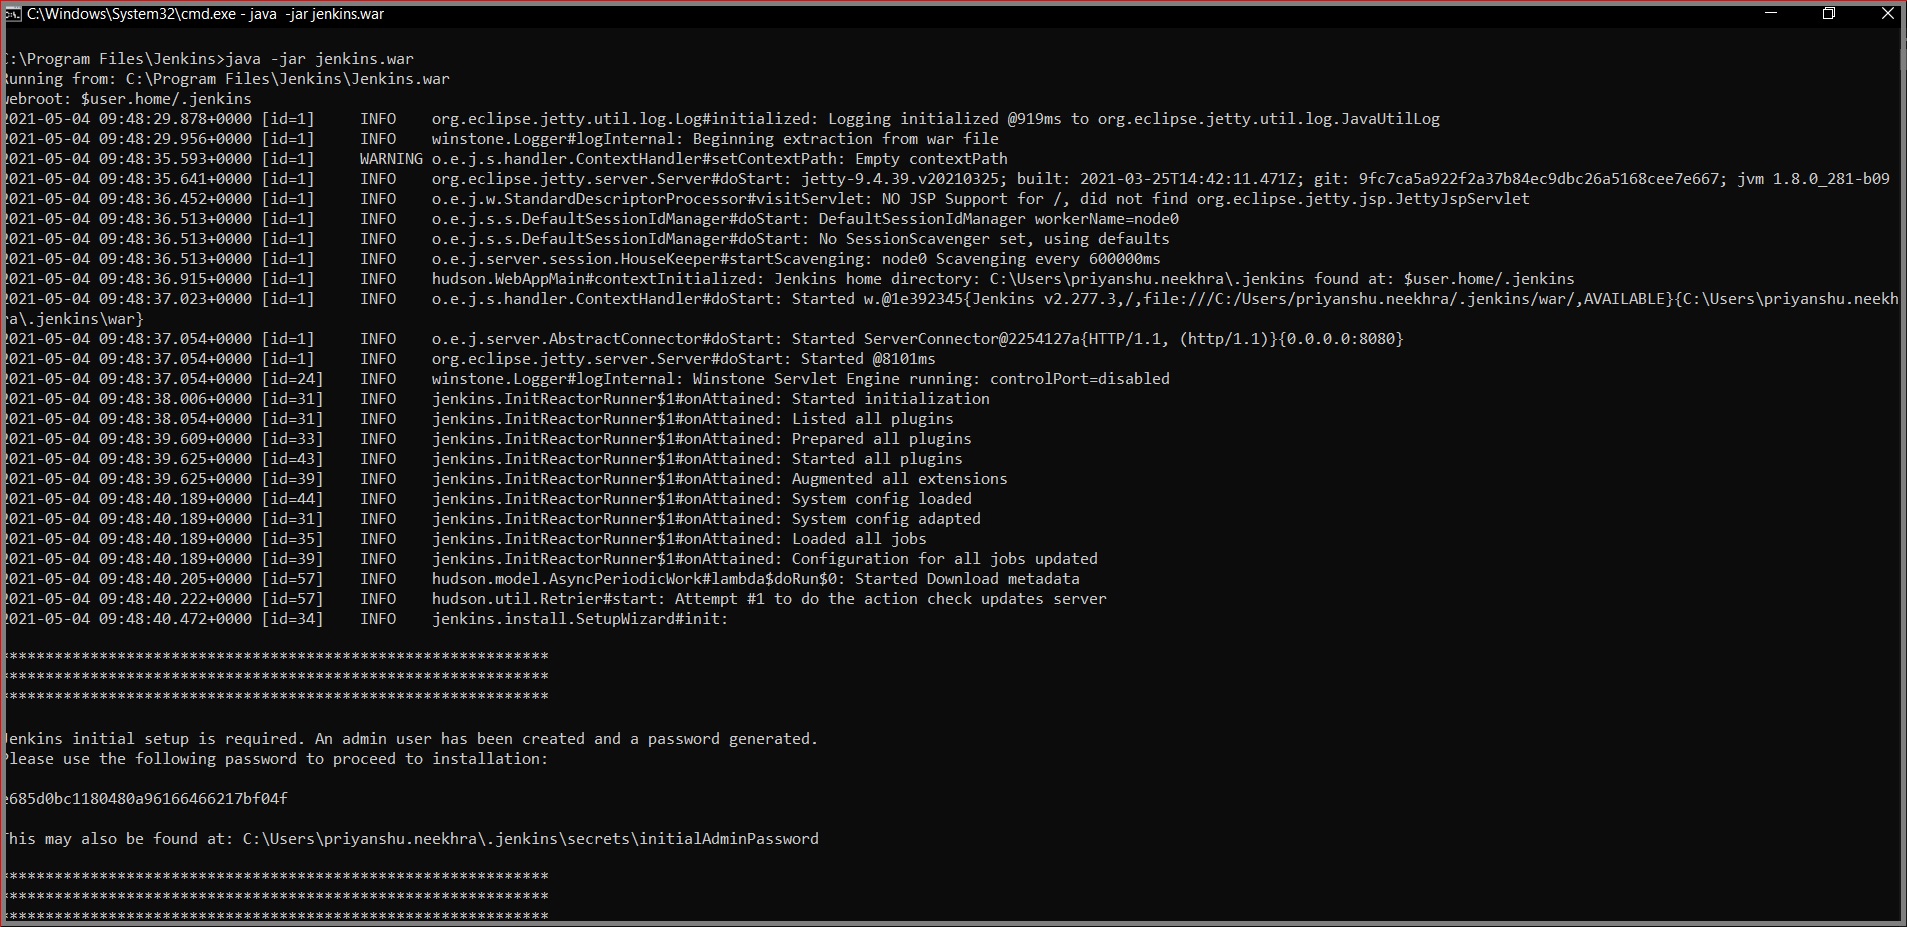
In this example, the password is cd3f375e0baa47f4b4a5591f1e920bfe.
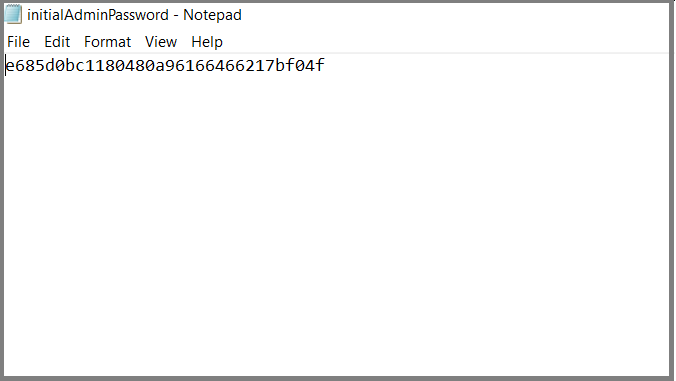
Note: This password can also be checked by referring to the InitialAdminPassword.txt file which has been created in the .jenkinssecrets folder.
Jenkins Setup
Next, open your browser and navigate to URL: localhost:8080.
The following screen will appear.
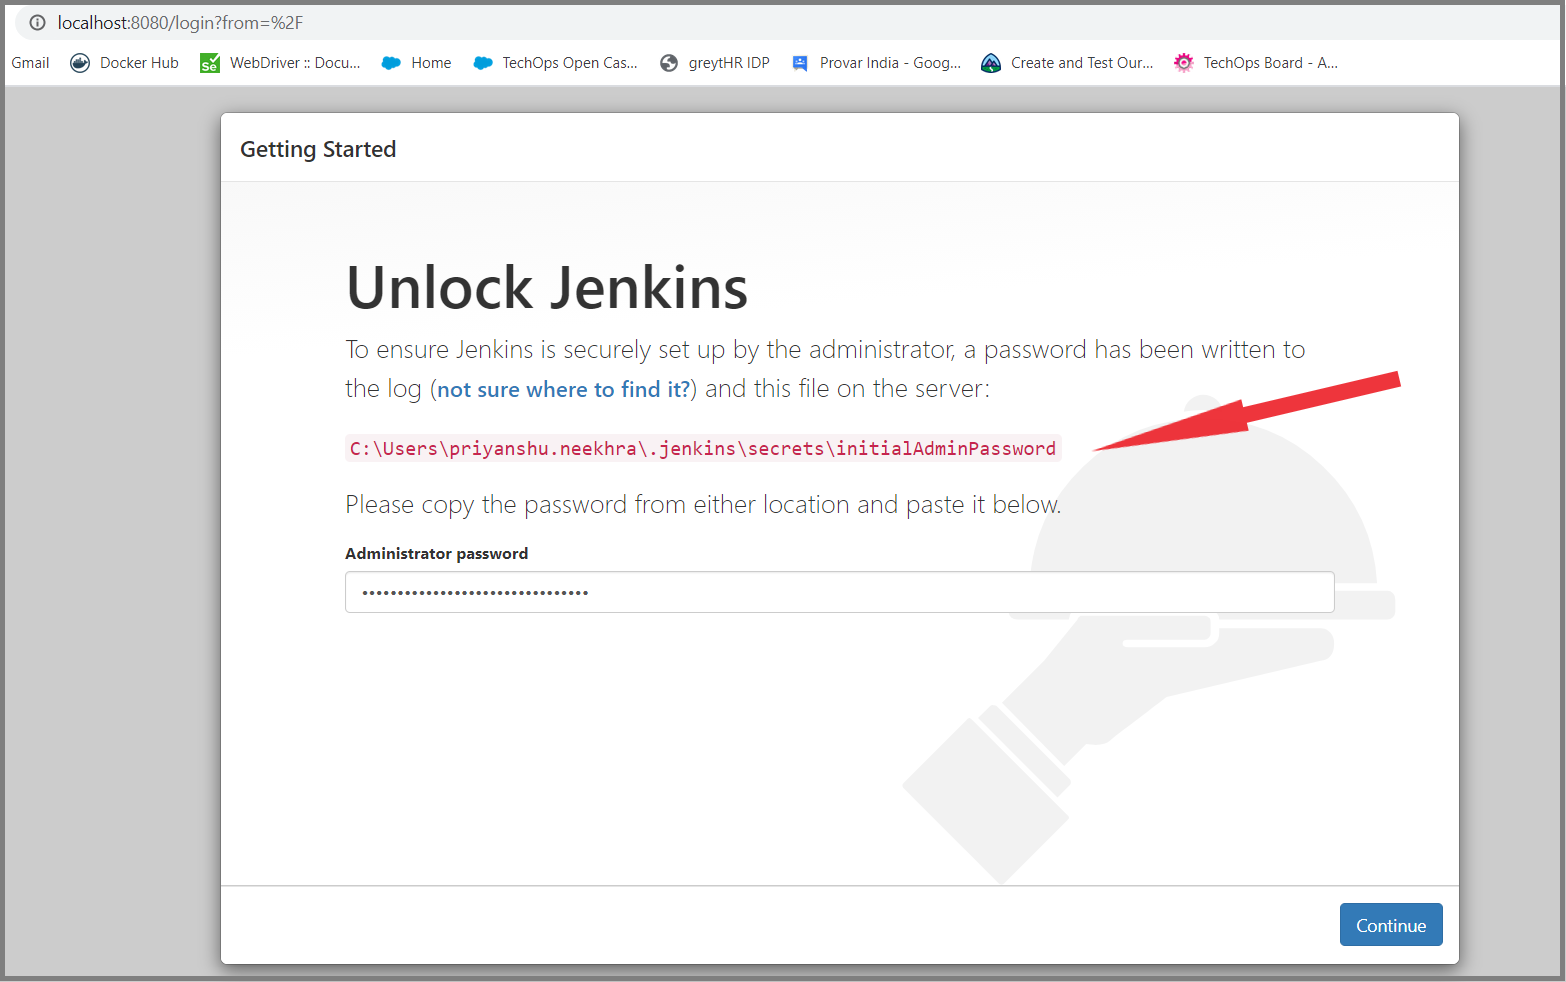
Enter your password then click Continue.
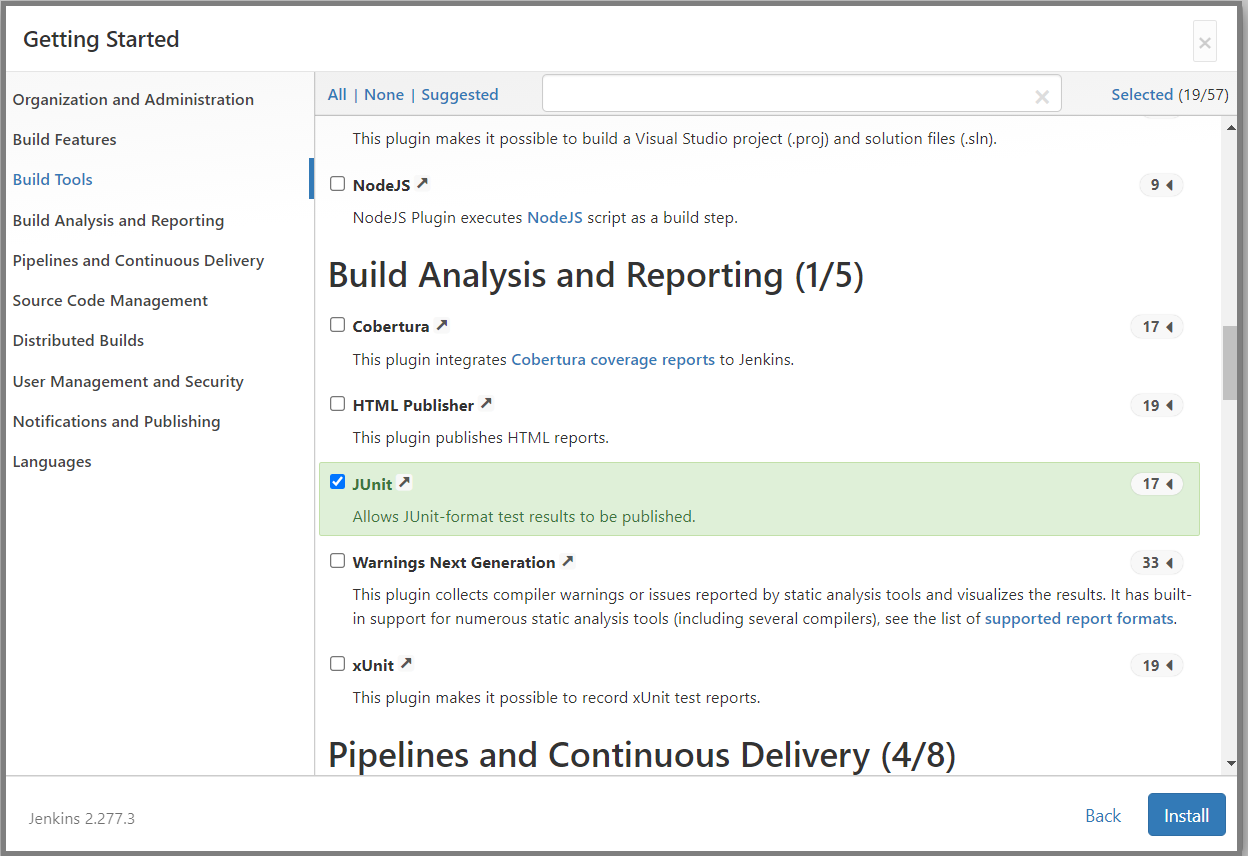
On the next screen, choose the option Select plugins to install.
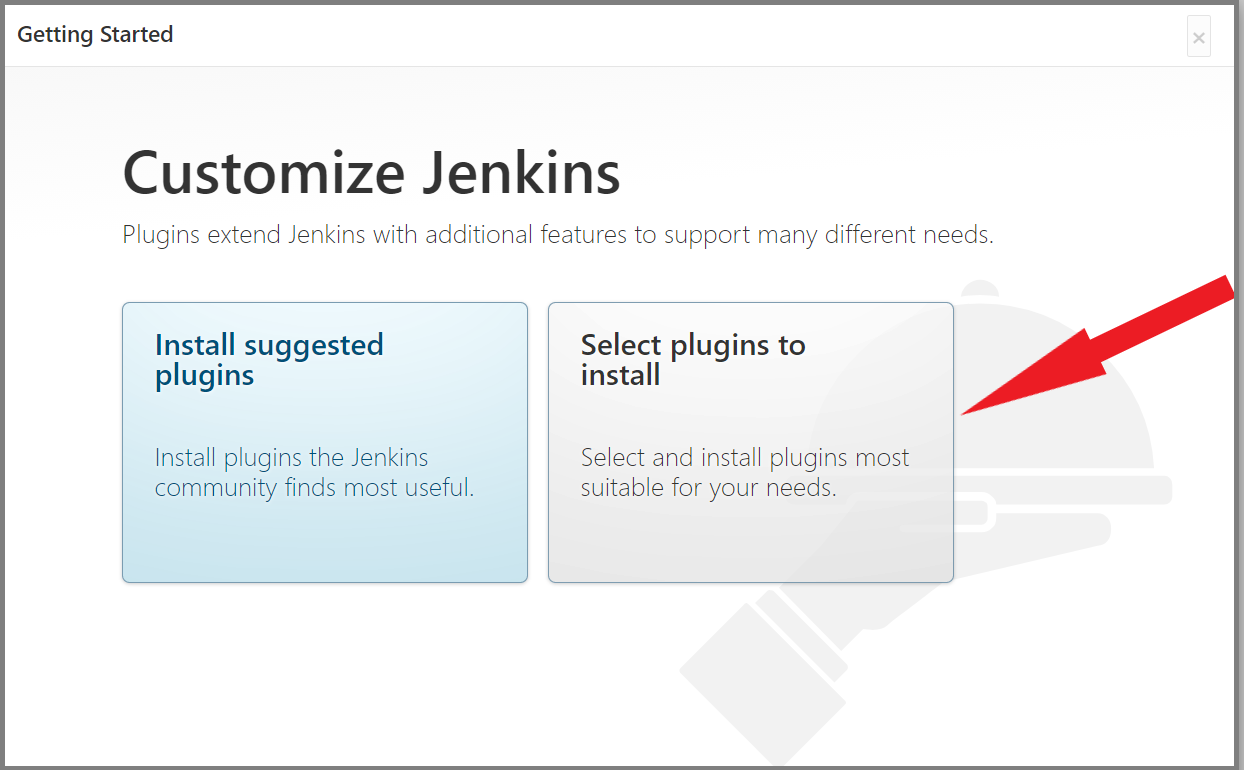
Some plugins will be defaulted already. These can be left as defaulted.
Make sure that the following plugins are ticked:
Ant Plugin (under Build Tools).
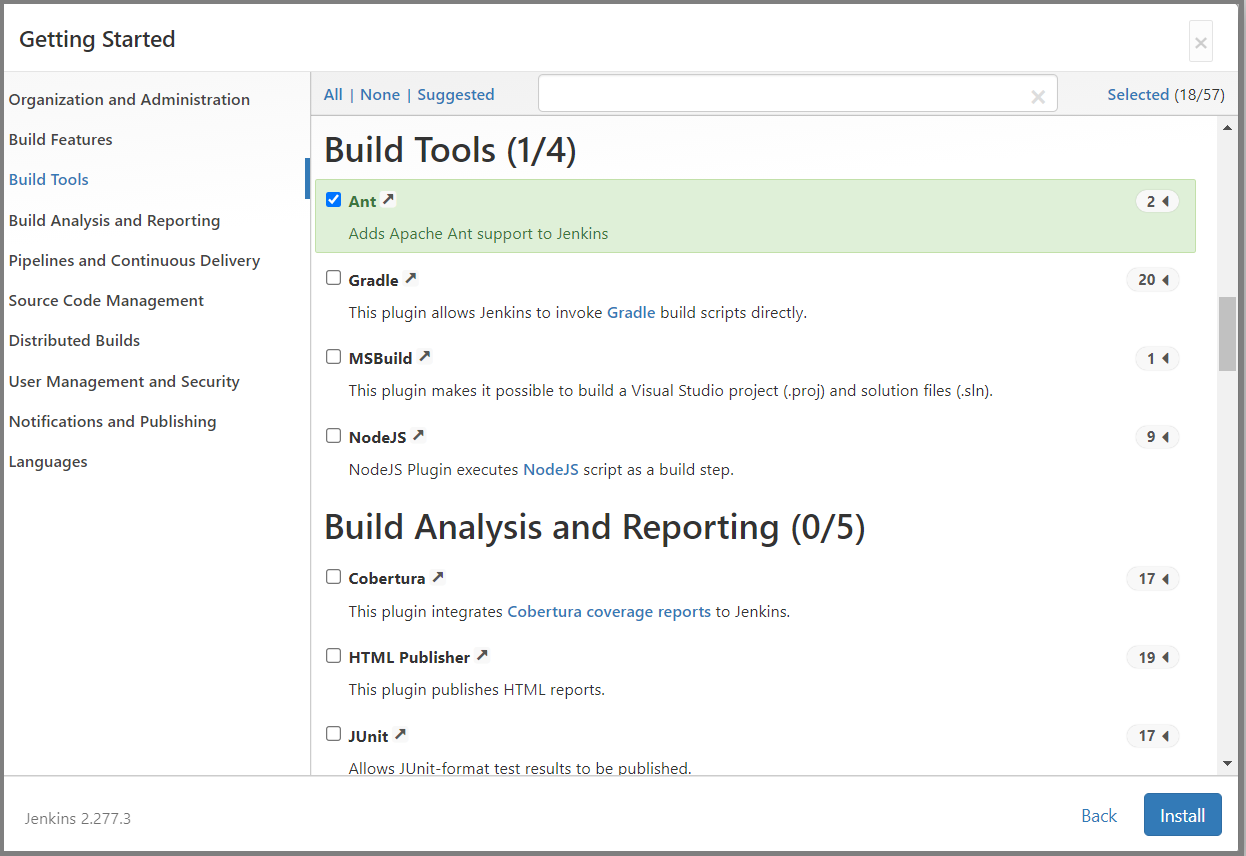
JUnit Plugin (under Build Analysis and Reporting).
If you want Jenkins to download the regression pack from your Version Control repository, also tick the relevant plugin under Source Code Management (e.g. the Git plugin).
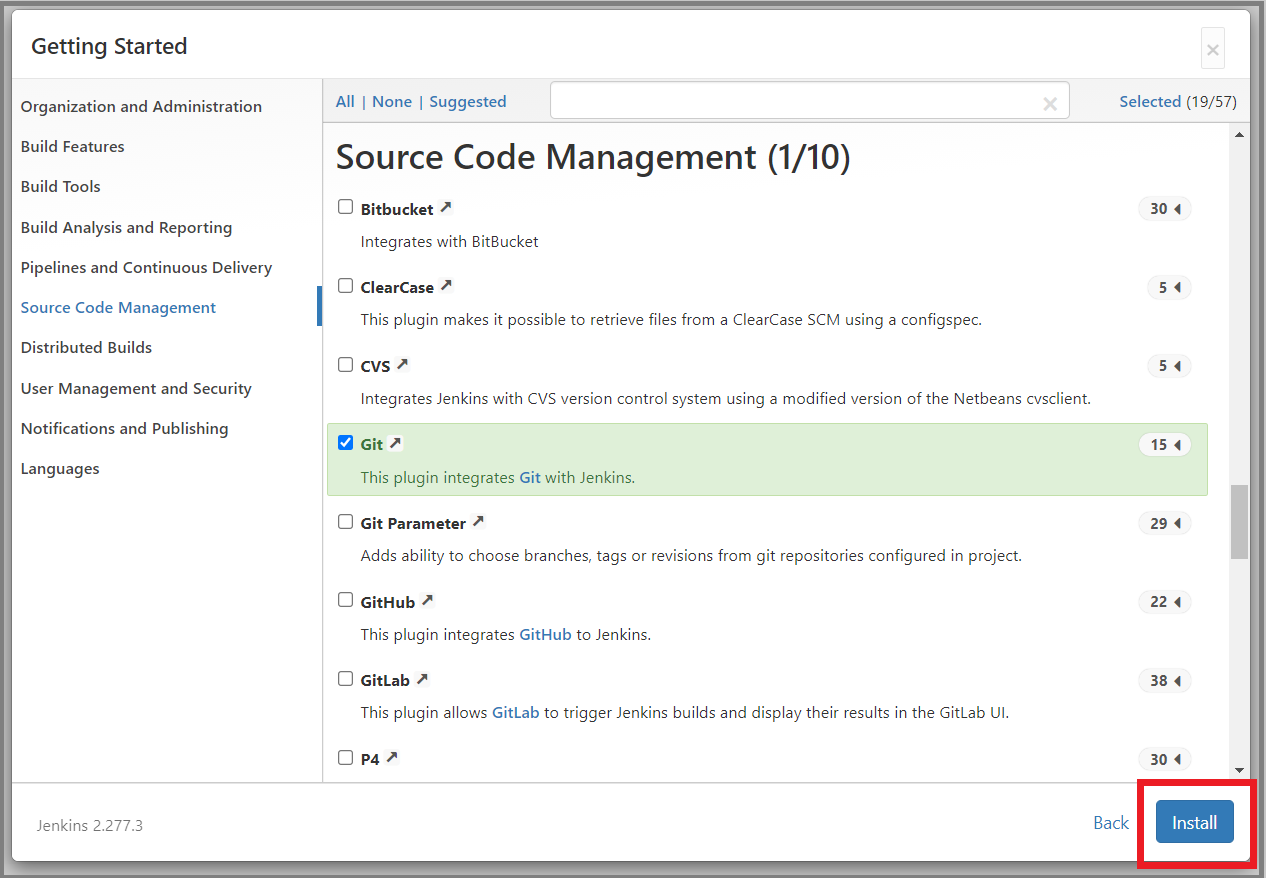
Click Install.
When this is completed, click Continue as admin on the following screen (instead of filling out Create First Admin User).
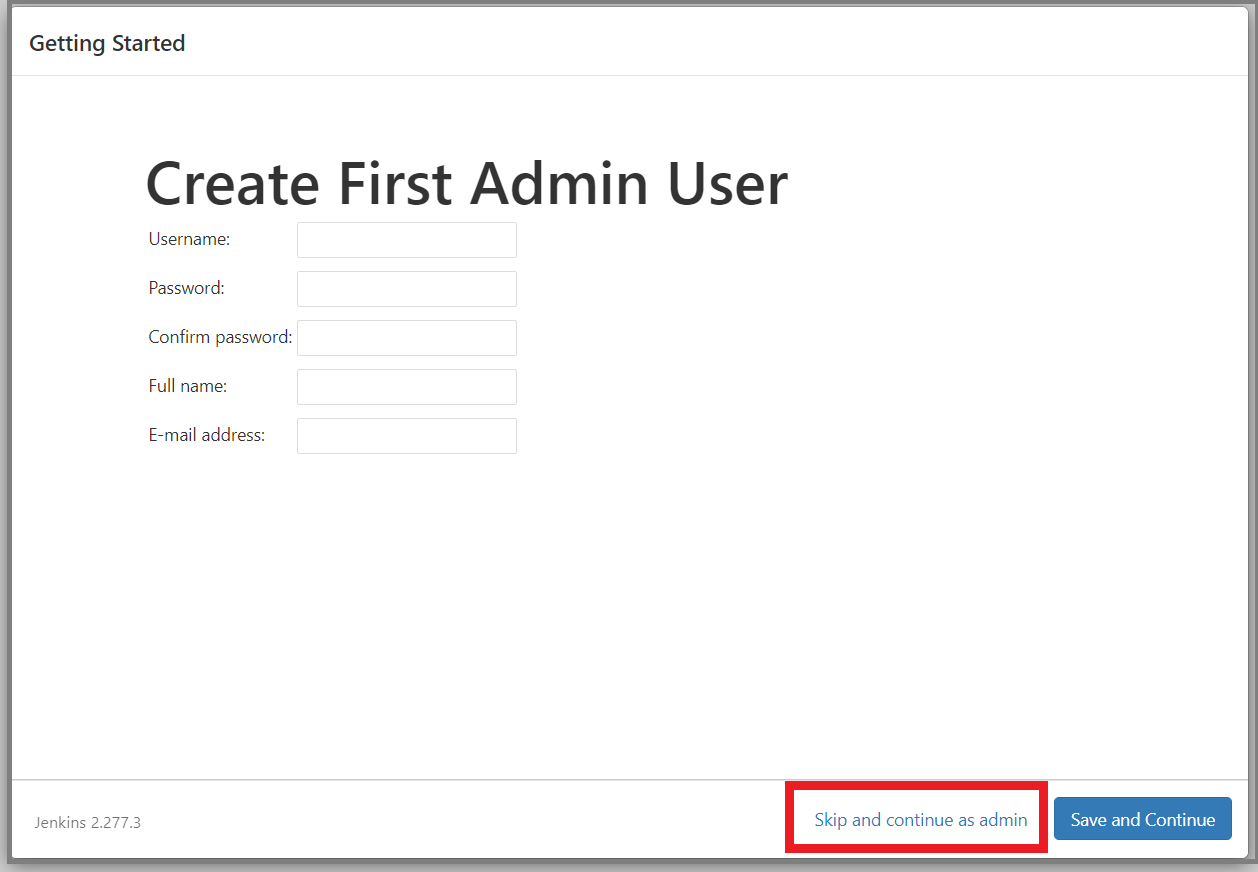
Note: The next time you log in, your username will be admin and your password will be the one generated earlier.
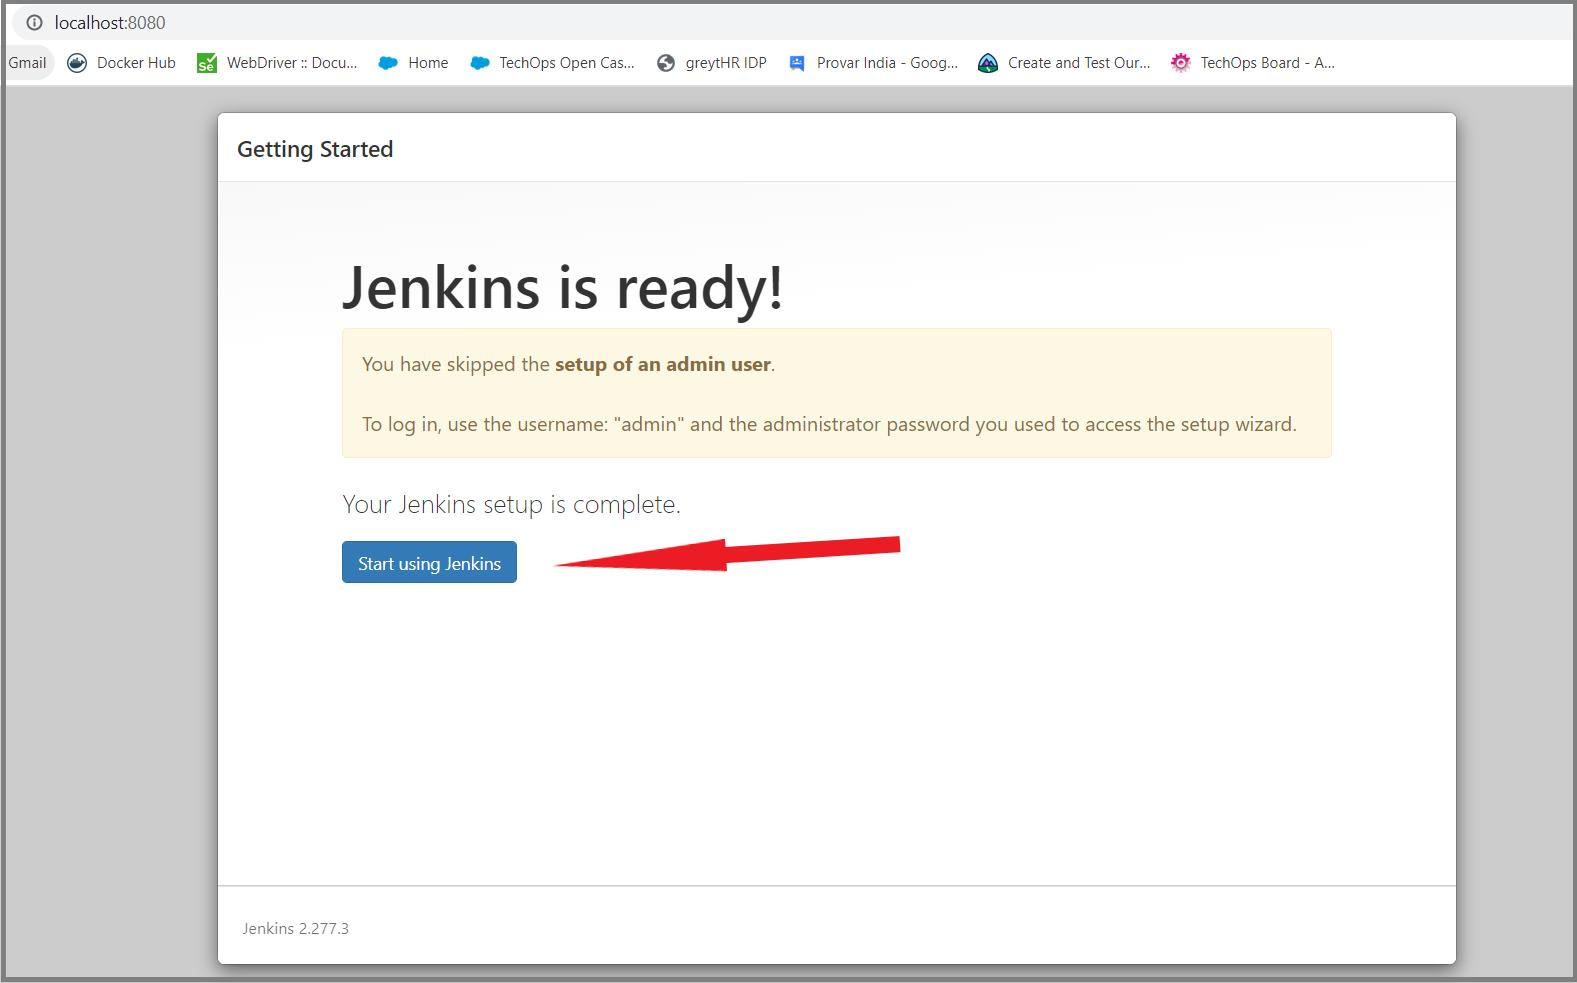
On the next screen, click Start using Jenkins to complete the setup.
Scheduling a Run
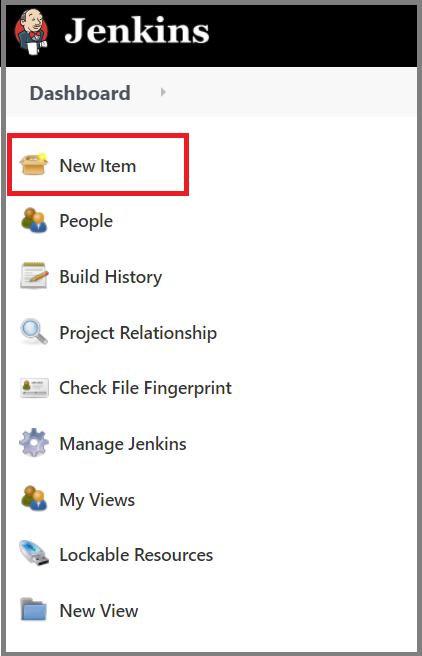
To schedule test in Jenkins, start by clicking the New Item option on the left-hand side.
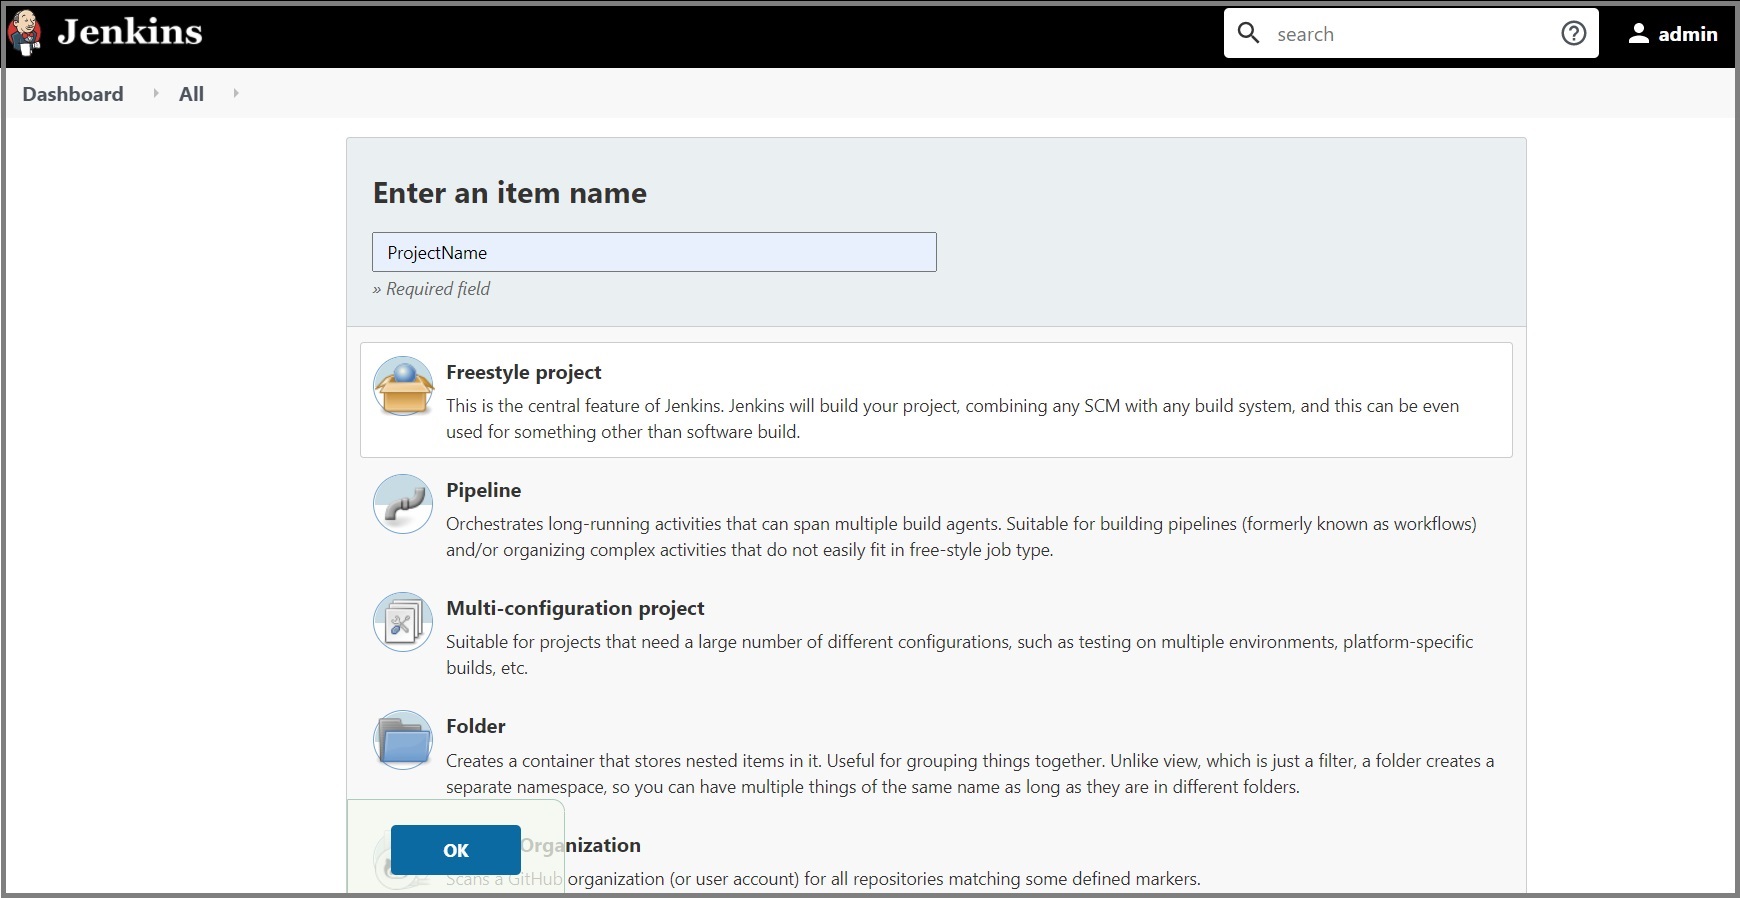
Provide a name for the new project, e.g. ProvarProject, then select the Freestyle project option and click OK.
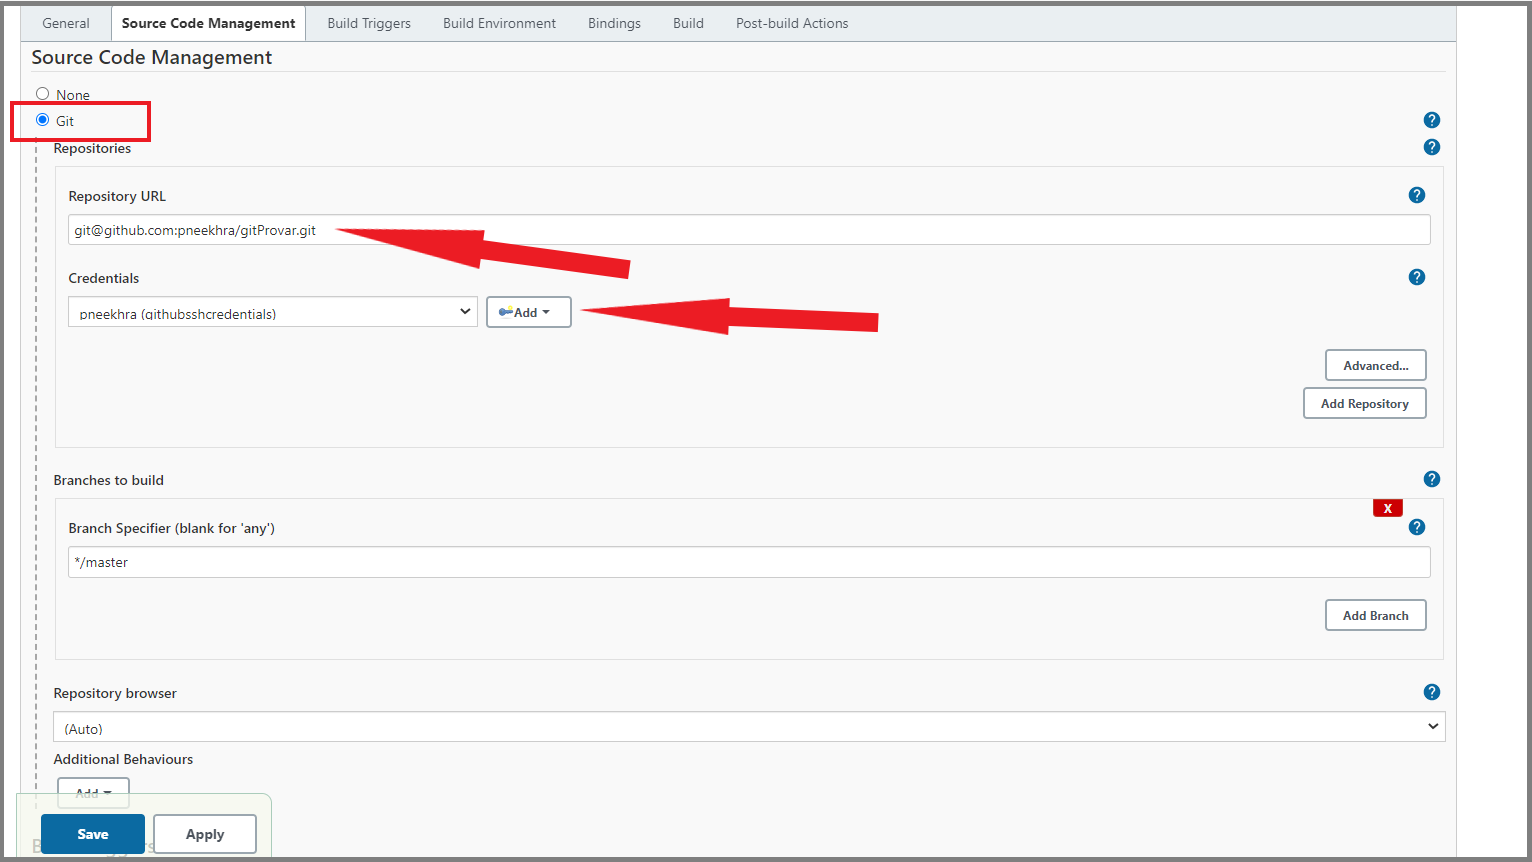
If you are using version control, navigate to Source Code Management and select Git. (If you are not using version control, skip ahead to Build Triggers).
Enter the Repository URL, which can be copied by clicking the Clone or Download button against the repository.
Then, provide Credentials (if applicable – this is only needed for private repositories).
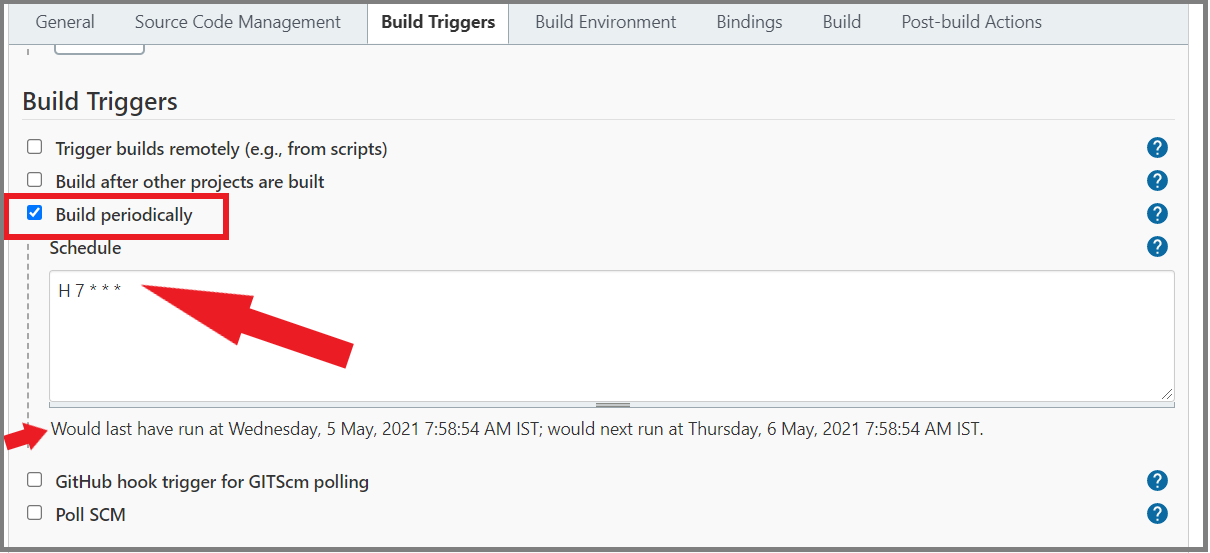
To define the execution schedule, navigate to Build Triggers. Here, you can define when you want Provar tests to be run. Choose Build periodically if you want to set up a schedule.
(Alternatively, you can also select Trigger builds remotely or Build after other projects are built if you want to trigger the execution using a script or following completion of other project builds.)
If you choose the Build periodically option, you will then need to enter an expression in Schedule to define when the tests should be run. This is done using a CRON expression.
To create this expression, you can write your own from scratch or copy or adapt one of the examples below.
Example 1:
H H(3-4) * * *
Schedule: Every Day of the week, every Month in a year, every Day in a month at a time between 3 – 4 am in the morning at any minute.
Example 2:
H (30 -45) 3 * * *
Schedule: every Day of the week, every Month in a year, every Day in a month at 3 am in the morning between 30 -45 minutes.
Example 3:
*/5 * * * * :
Schedule: every 5 minutes.
Example 4:
0 8 * * *
Schedule: every day at 8h 00.
Enter your preferred syntax in Schedule, then check the validation message underneath to confirm the syntax is correct and the schedule has been defined as expected.
The ‘Would last have run at…’ information will show the most recent (past) run and next upcoming run, based on your syntax.
Finally, navigate to Build and click the Add build step dropdown, then choose Invoke ANT.
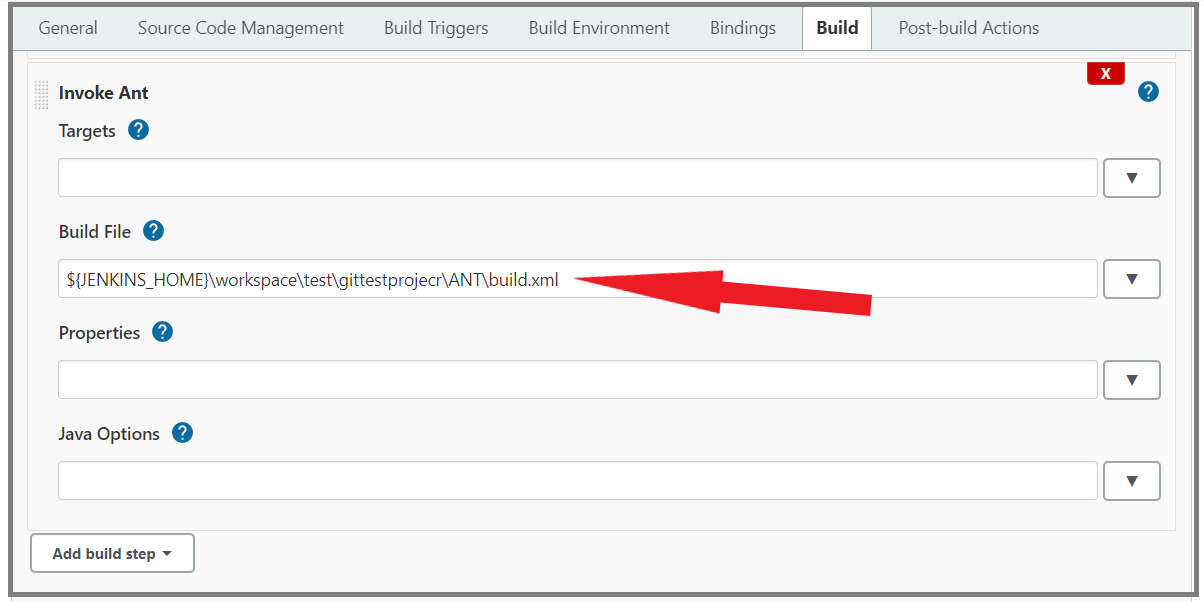
Leave Targets blank, unless you know that your build file has multiple targets. (If your build file was generated using the default settings supplied in Run Under ANT, leaving Targets blank will work fine.)
If you have modified the Build File so that there are multiple targets, enter the name of the desired target, e.g. runtests.
Then, choose the Advanced… option and provide the build.xml path.
If the project is fetched from git, it should use the JENKINS_HOME variable (see screenshot above). If the project is local, it can be a filepath, e.g. C:UsersHeatherDocumentsGitHubdevDevOpsANTbuild.xml.
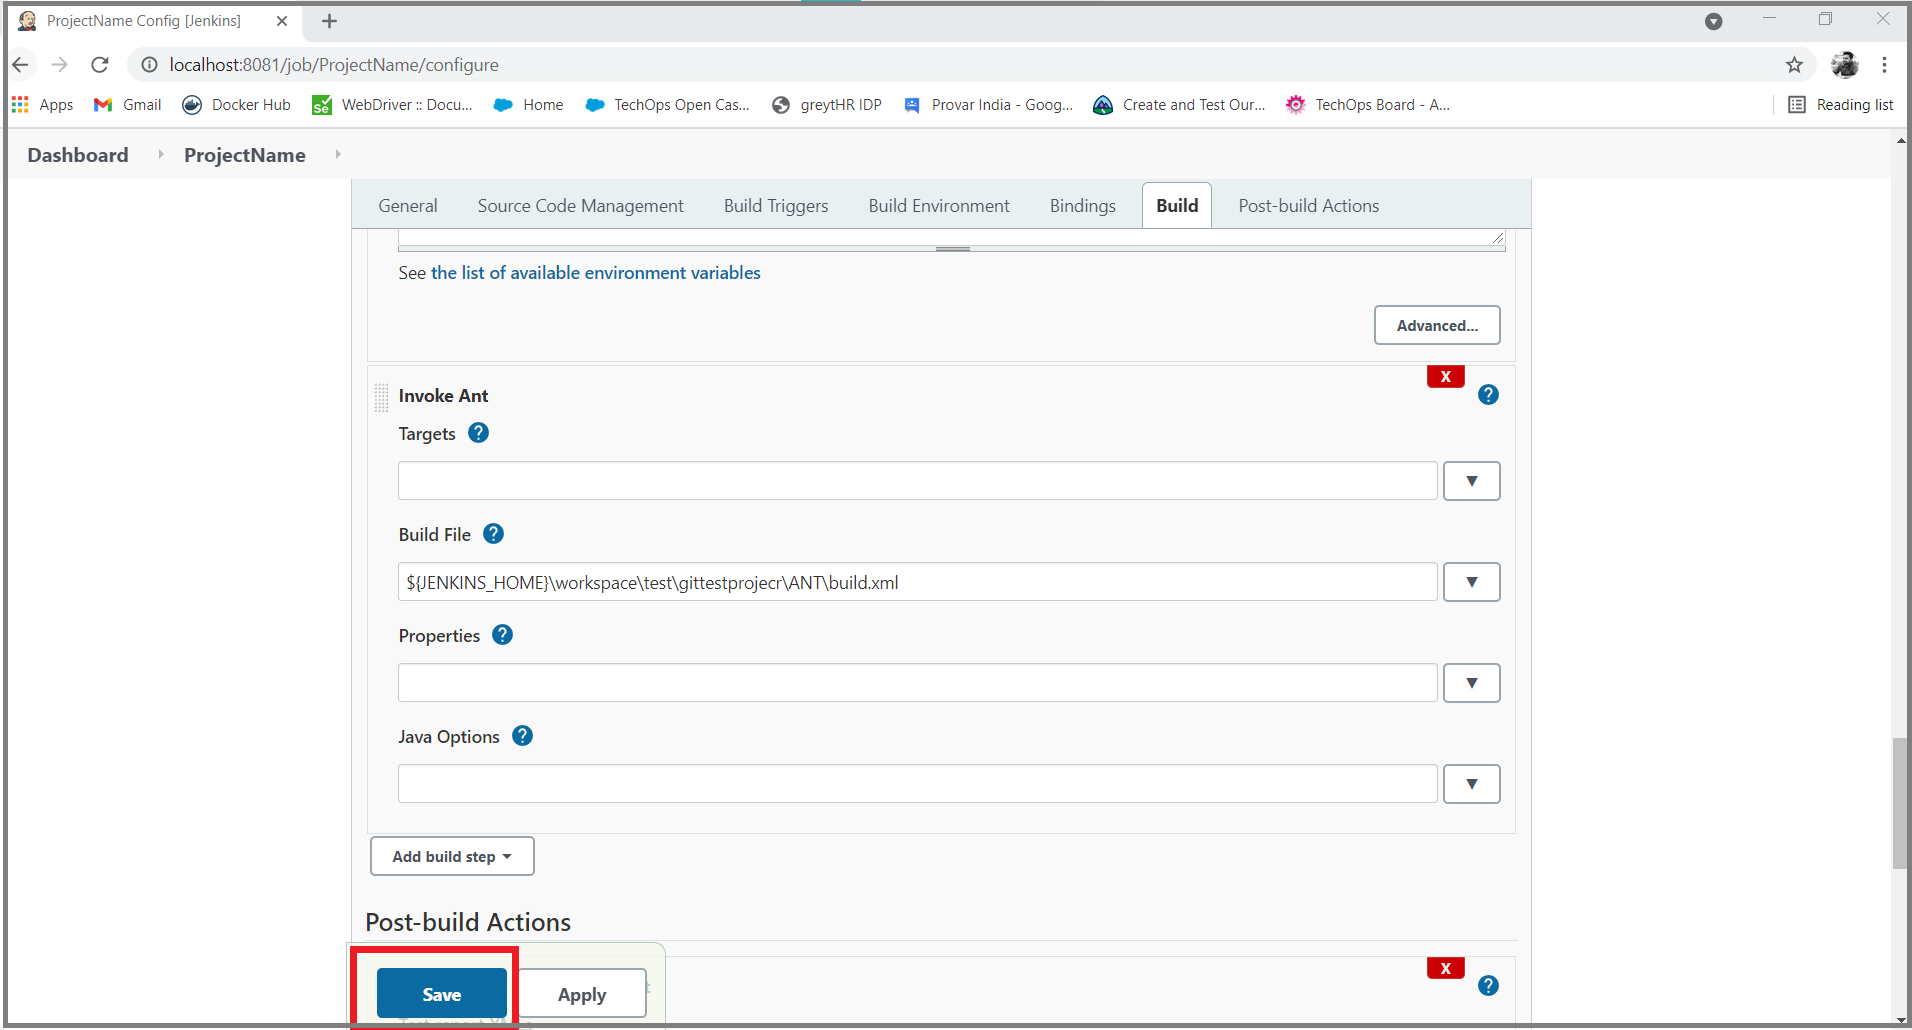
Click Save.
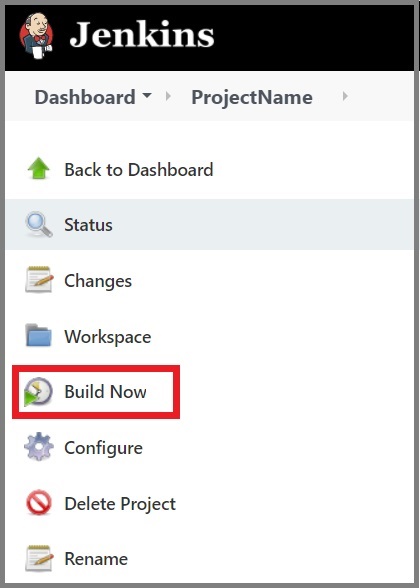
Test your build by clicking the Build Now option in the left-hand sidebar.
Build progress will be shown within Jenkins. If the build is successful, results will also be emailed as defined in the original build file.
Configuring test reports
Once your build generates test results, Jenkins’ JUnit plugin can be used to display these results graphically.
When Provar tests are executed via CI, Provar automatically generates a JUnit.xml file alongside its HTML and PDF reports. Using the JUnit plugin, this JUnit.xml file can be converted into a graphical visualization of the test results. The plugin also provides a web UI for viewing test reports and tracking failures.
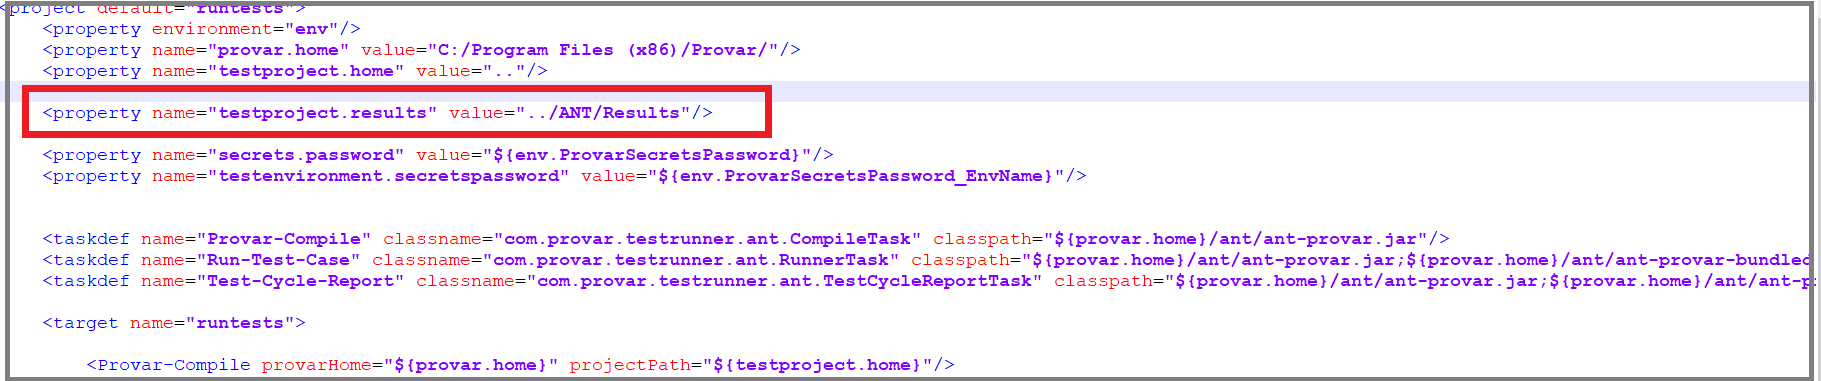
Since Provar generates the JUnit.xml file automatically, very little further set up is required. One thing to keep in mind is that the Results folder, which contains this JUnit.xml, should be generated or placed in Jenkins’ workspace folder.
For example, if the project is inside Jenkins’ workspace, define the results path as shown below.
Follow the steps below to get the JUnit plugin up and running.
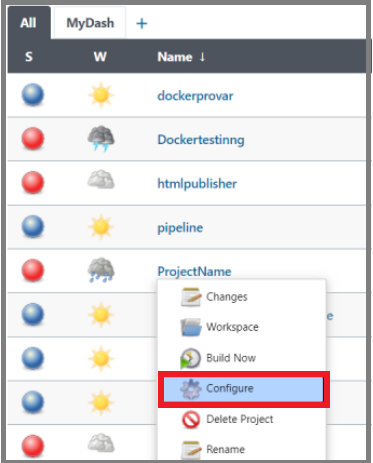
In Jenkins, click on the dropdown arrow on your Job Name and select Configure.
Navigate to ‘Post-build Actions’, then click the Add post-build action dropdown and select Publish JUnit test result report.
In Test report XMLs, set the path of the JUnit.xml file (note that this is generated inside your Results folder). This XML file should also be inside the workspace of the job of Jenkins. Enter the relative path of the results folder generated after execution:
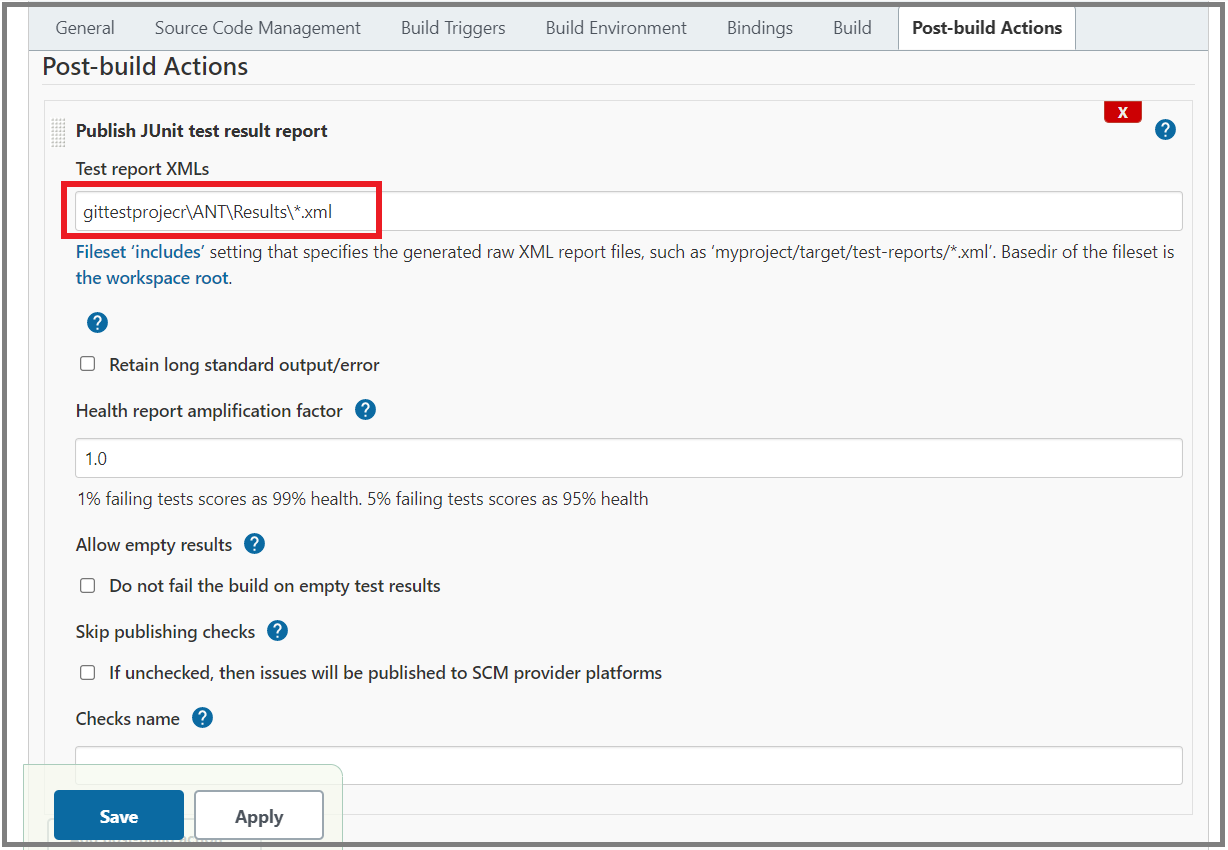
Note: Before the first execution of your build, this field will show an error, since the file is not generated until after the execution.
Then, save and trigger the job.
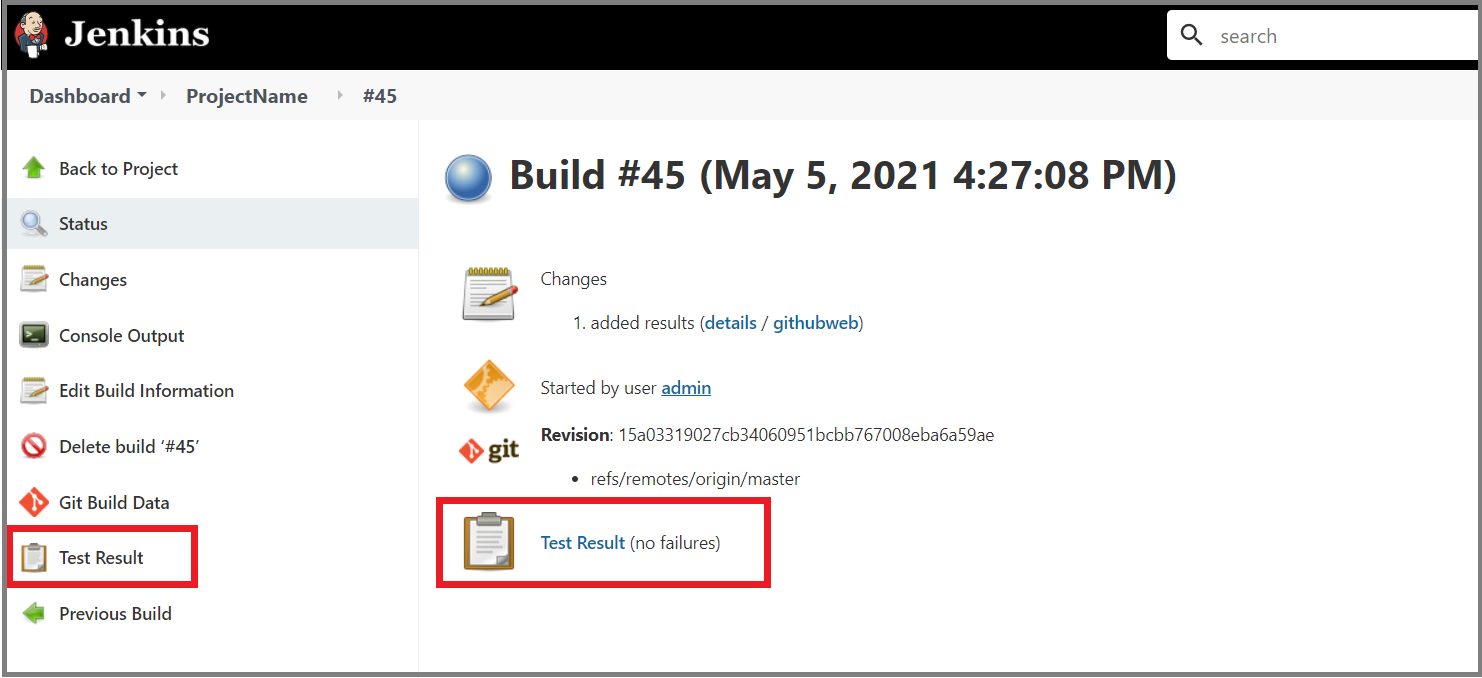
Once execution completes, you can view JUnit results by clicking Test Result on the Execution View screen.
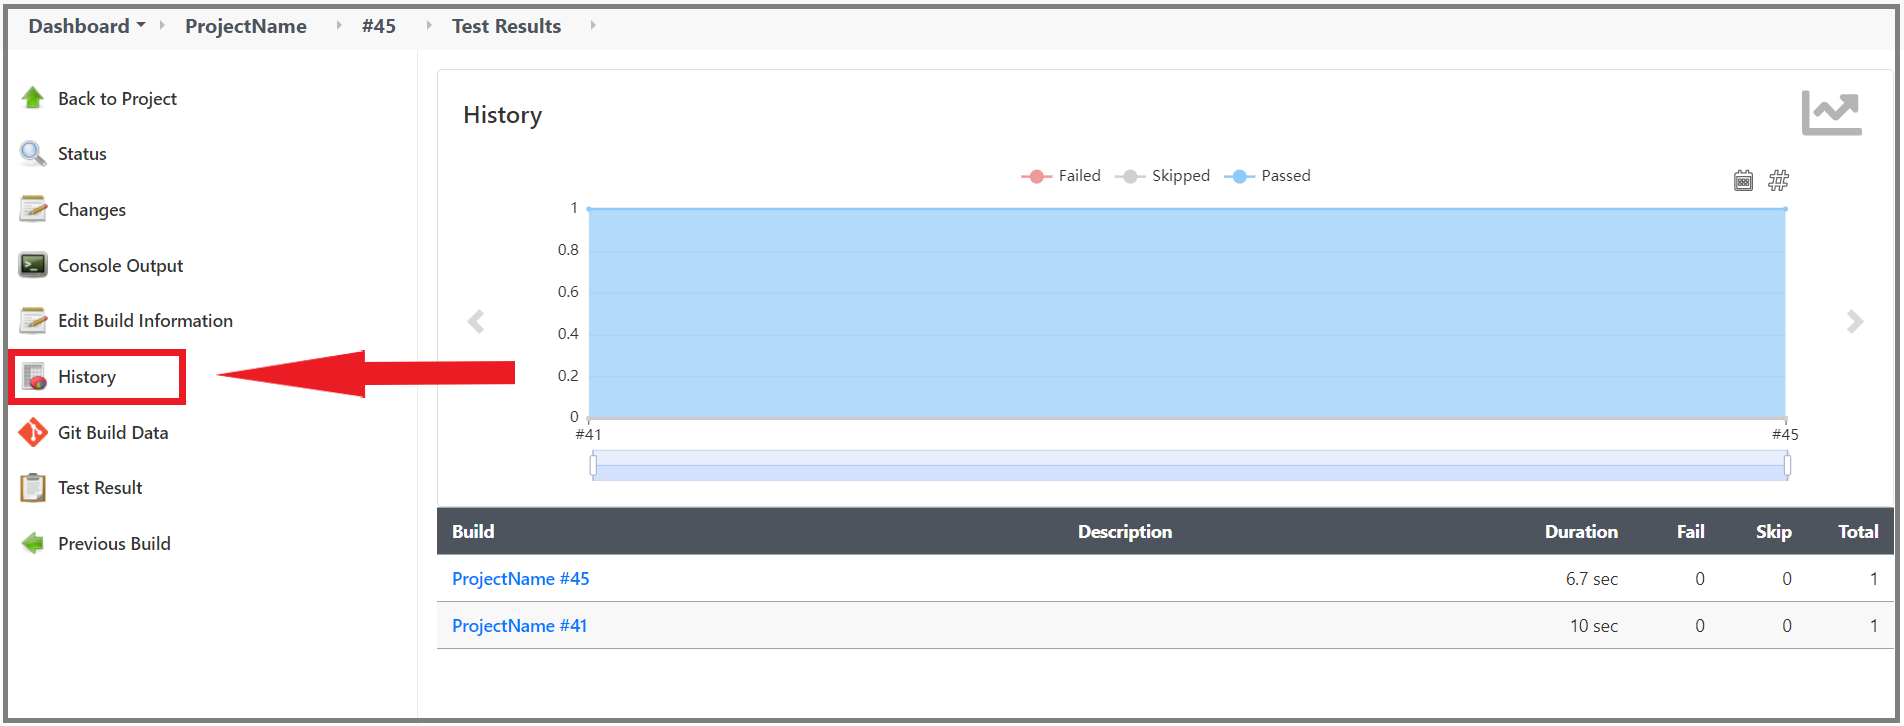
On the next screen, a History link is available to show the historical view or trend of execution.
Note: The historical data is visible until two or more execution cycles.
This completes the CI set up.
- Provar Automation V2
- System Requirements
- Browser and Driver Recommendations
- Installing Provar Automation
- Updating Provar Automation
- Licensing Provar
- Granting Org Permissions to Provar Automation
- Optimizing Org and Connection Metadata Processing in Provar
- Using Provar Automation
- Understanding Provar’s Use of AI Service for Test Automation
- Provar Automation
- Creating a New Test Project
- Import Test Project from a File
- Import Test Project from a Remote Repository
- Import Test Project from Local Repository
- Commit a Local Test Project to Source Control
- Salesforce API Testing
- Behavior-Driven Development
- Consolidating Multiple Test Execution Reports
- Creating Test Cases
- Custom Table Mapping
- Functions
- Debugging Tests
- Defining a Namespace Prefix on a Connection
- Defining Proxy Settings
- Environment Management
- Exporting Test Cases into a PDF
- Exporting Test Projects
- Japanese Language Support
- Override Auto-Retry for Test Step
- Customize Browser Driver Location
- Mapping and Executing the Lightning Article Editor in Provar
- Managing Test Steps
- Namespace Org Testing
- NitroX
- Provar Test Builder
- ProvarDX
- Refresh and Recompile
- Reintroduction of CLI License Check
- Reload Org Cache
- Reporting
- Running Tests
- Searching Provar with Find Usages
- Secrets Management and Encryption
- Setup and Teardown Test Cases
- Tags and Service Level Agreements (SLAs)
- Test Cycles
- Test Data Generation
- Test Plans
- Testing Browser – Chrome Headless
- Testing Browser Options
- Tooltip Testing
- Using the Test Palette
- Using Custom APIs
- Callable Tests
- Data-Driven Testing
- Page Objects
- Block Locator Strategies
- Introduction to XPaths
- Creating an XPath
- JavaScript Locator Support
- Label Locator Strategies
- Maintaining Page Objects
- Mapping Non-Salesforce fields
- Page Object Operations
- ProvarX™
- Refresh and Reselect Field Locators in Test Builder
- Using Java Method Annotations for Custom Objects
- Applications Testing
- Database Testing
- Document Testing
- Email Testing
- Email Testing in Automation
- Email Testing Examples
- Gmail Connection in Automation with App Password
- App Configuration for Microsoft Connection in MS Portal for OAuth 2.0
- OAuth 2.0 Microsoft Exchange Email Connection
- Support for Existing MS OAuth Email Connection
- OAuth 2.0 MS Graph Email Connection
- Create a Connection for Office 365 GCC High
- Mobile Testing
- OrchestraCMS Testing
- Salesforce CPQ Testing
- ServiceMax Testing
- Skuid Testing
- Vlocity API Testing
- Webservices Testing
- Provar Manager
- How to Use Provar Manager
- Provar Manager Setup
- Provar Manager Integrations
- Release Management
- Test Management
- Test Operations
- Provar Manager and Provar Automation
- Setting Up a Connection to Provar Manager
- Object Mapping Between Automation and Manager
- How to Upload Test Plans, Test Plan Folders, Test Plan Instances, and Test Cases
- Provar Manager Filters
- Uploading Callable Test Cases in Provar Manager
- Uploading Test Steps in Provar Manager
- How to Know if a File in Automation is Linked in Test Manager
- Test Execution Reporting
- Metadata Coverage with Manager
- Provar Grid
- DevOps
- Introduction to Provar DevOps
- Introduction to Test Scheduling
- Apache Ant
- Configuration for Sending Emails via the Automation Command Line Interface
- Continuous Integration
- AutoRABIT Salesforce DevOps in Provar Test
- Azure DevOps
- Running a Provar CI Task in Azure DevOps Pipelines
- Configuring the Automation secrets password in Microsoft Azure Pipelines
- Parallel Execution in Microsoft Azure Pipelines using Multiple build.xml Files
- Parallel Execution in Microsoft Azure Pipelines using Targets
- Parallel execution in Microsoft Azure Pipelines using Test Plans
- Bitbucket Pipelines
- CircleCI
- Copado
- Docker
- Flosum
- Gearset
- GitHub Actions
- Integrating GitHub Actions CI to Run Automation CI Task
- Remote Trigger in GitHub Actions
- Parameterization using Environment Variables in GitHub Actions
- Parallel Execution in GitHub Actions using Multiple build.xml Files
- Parallel Execution in GitHub Actions using Targets
- Parallel Execution in GitHub Actions using Test Plan
- Parallel Execution in GitHub Actions using Job Matrix
- GitLab Continuous Integration
- Travis CI
- Jenkins
- Execution Environment Security Configuration
- Provar Jenkins Plugin
- Parallel Execution
- Running Provar on Linux
- Reporting
- Salesforce DX
- Git
- Version Control
- Salesforce Testing
- Recommended Practices
- Salesforce Connection Best Practices
- Improve Your Metadata Performance
- Java 21 Upgrade
- Testing Best Practices
- Automation Planning
- Supported Testing Phases
- Provar Naming Standards
- Test Case Design
- Create records via API
- Avoid using static values
- Abort Unused Test Sessions/Runs
- Avoid Metadata performance issues
- Increase auto-retry waits for steps using a global variable
- Create different page objects for different pages
- The Best Ways to Change Callable Test Case Locations
- Working with the .testProject file and .secrets file
- Best practices for the .provarCaches folder
- Best practices for .pageObject files
- Troubleshooting
- How to Use Keytool Command for Importing Certificates
- Installing Provar After Upgrading to macOS Catalina
- Browsers
- Configurations and Permissions
- Add Permissions to Edit Provar.ini File
- Configure Provar UI in High Resolution
- Enable Prompt to Choose Workspace
- Increase System Memory for Provar
- Refresh Org Cache Manually
- Show Hidden Provar Files on Mac
- Java Version Mismatch Error
- Unable to test cases, test suites, etc… from the Test Project Navigation sidebar
- Connections
- DevOps
- Error Messages
- Provar Manager 3.0 Install Error Resolution
- Provar Manager Test Case Upload Resolution
- Administrator has Blocked Access to Client
- JavascriptException: Javascript Error
- Resolving Failed to Create ChromeDriver Error
- Resolving Jenkins License Missing Error
- Resolving Metadata Timeout Errors
- Test Execution Fails – Firefox Not Installed
- Selenium 4 Upgrade
- Licensing, Installation and Firewalls
- Memory
- Test Builder and Test Cases
- Release Notes
- Provar Automation V3
- Automation V3: Setting Java Development Kit (JDK) Environment Variables
- Automation V3: Adding a Salesforce OAuth (Web Flow) Connection
- Automation V3: Docker Runner
- Automation V3: Running Automation Tests on Jenkins
- Automation V3: Remote Trigger in GitHub Actions
- Automation V3: Internationalization Support
- Automation V3: Configuration on Jenkins
- Automation V3: Provar Manager – Test Execution Reporting
- Automation V3: Secrets Management and Encryption
- Automation V3: Updating Automation on Windows
- Automation V3: Updating Automation on Mac
- Automation V3: Installing Automation on Windows
- Automation V3: Installing Automation on Mac
- Automation V3: Commit a Local Test Project to Source Control
- Automation V3: Activating Your License
- Automation V3: Resolving High Memory Usage
- Automation V3: Test Palette Introduction
- Automation V3: Provar Naming Standards
- Automation V3: Refresh Org Cache Manually
- Automation V3: Show Hidden Provar Files on Mac
- Automation V3: NitroX Supported Components
- Automation V3: Salesforce Lightning Web Component (LWC) Locator Support
- Automation V3: Enabling and Disabling NitroX
- Automation V3: Introducing NitroX
- Automation V3: Salesforce Connection Best Practices
- Automation V3: Version Control and DevOps
- Automation V3: Test Case Design
- Automation V3: Salesforce DX Integration
- Automation V3: Running Provar on Linux
- Automation V3: Variable Set Syntax
- Automation V3: Provar Jenkins Plugin
- Automation V3: Introduction to Test Scheduling
- Automation V3: Execution Environment Security Configuration
- Automation V3: GitHub Desktop – Creating a Git Repository for Automation Projects
- Automation V3: Amazon Web Service (AWS) & Jenkins Configuration
- Automation V3: Setting up Continuous Integration
- Automation V3: Integrating GitHub Actions CI to Run Automation CI Task
- Automation V3: GitLab Continuous Integration
- Automation V3: Gearset DevOps CI/CD via Jenkins
- Automation V3: Parallel Execution in GitHub Actions using Test Plan
- Automation V3: Parallel Execution in GitHub Actions using Job Matrix
- Automation V3: Parallel Execution in GitHub Actions using Targets
- Automation V3: Parallel Execution in GitHub Actions using Multiple build.xml Files
- Automation V3: Flosum Integration Introduction
- Automation V3: Flosum Configuration
- Automation V3: Setting up Continuous Integration with Jenkins for Docker
- Automation V3: Flosum Architecture Overview
- Automation V3: Docker Continuous Integration
- Automation V3: Generating the build.xml File for Docker
- Automation V3: Running Provar Tests on Docker using Docker File
- Automation V3: Copado Integration Introduction
- Automation V3: Provar Test Results Package
- Automation V3: Copado Architecture Overview
- Automation V3: Copado Configuration
- Automation V3: CircleCI Common Build Errors
- Automation V3: CircleCI Orbs
- Automation V3: Running a Provar CI Task in Azure DevOps Pipelines
- Automation V3: CircleCI via Docker
- Automation V3: Parallel Execution in Microsoft Azure Pipelines using Multiple build.xml Files
- Automation V3: Parallel Execution in Microsoft Azure Pipelines using Targets
- Automation V3: Parallel Execution in Microsoft Azure Pipelines using Test Plans
- Automation V3: Configuring the Automation Secrets Password in Microsoft Azure Pipelines
- Automation V3: System Requirements
- Installing Provar Automation V3
- Updating Provar Automation V3
- Licensing Provar Automation V3
- Automation V3: Optimizing Org and Connection Metadata Processing in Provar
- Automation V3: Granting Org Permissions to Provar Automation
- Using Provar Automation V3
- Automation V3: Provar Automation
- Automation V3: Test Data Generation
- Automation V3: Creating a New Test Project
- Automation V3: Creating Custom Test Steps
- Automation V3: Provar Test Builder
- Automation V3: Reintroduction of CLI license Check
- Automation V3: Creating Test Cases
- Automation V3: Debugging Tests
- Automation V3: Environment Management
- Automation V3: Managing Test Steps
- Automation V3: Reporting
- Automation V3: Import Test Project from a File
- Automation V3: Import Test Project from Local Repository
- Automation V3: Import Test Project from a Remote Repository
- Automation V3: Running Tests
- Automation V3: Testing Browser Options
- Automation V3: Testing Browser – Chrome Headless
- Automation V3: Provar Feature Flags and Properties Configuration
- Automation V3: Defining Proxy Settings
- Automation V3: Behavior-Driven Development
- Automation V3: Customize Browser Driver Location
- Automation V3: Setup and Teardown Test Cases
- Automation V3: Japanese Language Support
- Automation V3: Reload Org Cache
- Automation V3: Using Java Method Annotations for Custom Objects
- Automation V3: Salesforce API Testing
- Automation V3: Consolidating Multiple Test Execution Reports
- Automation V3: Tags and Service Level Agreements (SLAs)
- Automation V3: Test Plans
- Automation V3: Searching Provar with Find Usages
- Automation V3: Exporting Test Projects
- Automation V3: Tooltip Testing
- Automation V3: Refresh and Recompile
- Custom Table Mapping in V3
- NitroX in V3
- ProvarDX in V3
- Test Cycles in V3
- Using Custom APIs in V3
- Page Objects in V3
- Automation V3: ProvarX™
- Automation V3: Creating an XPath
- Automation V3: Mapping Non-Salesforce Fields
- Automation V3: Introduction to XPaths
- Automation V3: JavaScript Locator Support
- Automation V3: Create different page objects for different pages
- Automation V3: Maintaining Page Objects
- Automation V3: Refresh and Reselect Field Locators in Test Builder
- Callable Tests in V3
- Functions in V3
- Automation V3: TestCaseErrors
- Automation V3: TestRunErrors
- Automation V3: TestCaseSuccessful
- Automation V3: TestCaseOutCome
- Automation V3: TestCasePath
- Automation V3: StringTrim
- Automation V3: TestCaseName
- Automation V3: DateFormat
- Automation V3: Not
- Automation V3: IsSorted
- Automation V3: StringReplace
- Automation V3: StringNormalize
- Automation V3: DateParse
- Automation V3: DateAdd
- Automation V3: GetEnvironmentVariable
- Automation V3: GetSelectedEnvironment
- Automation V3: NumberFormat
- Automation V3: Using Functions
- Automation V3: UniqueId
- Automation V3: Count
- Automation V3: Round
- Using the Test Palette in V3
- Automation V3: Read Test Step
- Automation V3: String Test Steps
- Automation V3: Generate Test Case
- Automation V3: For Each Test Step
- Automation V3: Page Object Cleaner
- Automation V3: Assert Salesforce Layout
- Automation V3: Break Test Step
- Automation V3: UI On Screen
- Automation V3: UI Handle Alert
- Automation V3: UI Assert
- Automation V3: Set Values
- Automation V3: UI With Row
- Automation V3: UI Action
- Automation V3: UI Connect
- Automation V3: Fail Test Step
- Automation V3: While Test Step
- Automation V3: Apex Execute
- Automation V3: List Compare
- Automation V3: UI Navigate
- Automation V3: UI Fill
- Automation V3: If Test Step
- Automation V3: Group Steps Test Step
- Automation V3: Set Values Test Step
- Automation V3: Apex Bulk
- Automation V3: Sleep Test Step
- Automation V3: Switch Test Step
- Automation V3: Finally Test Step
- Automation V3: Wait For Test Step
- Automation V3: Extract Salesforce Layout
- Automation V3: Assert Test Step
- Applications Testing in V3
- Automation V3: Mobile Emulation (Salesforce Mobile)
- Automation V3: Using Provar with Amazon Web Services (AWS) Device Farm
- Automation V3: PDF Testing
- Automation V3: App Configuration for Microsoft Connection in MS Portal for OAuth 2.0
- Automation V3: OAuth 2.0 Microsoft Exchange Email Connection
- Automation V3: Create a Connection for Office 365 GCC High
- Automation V3: Support for Existing MS OAuth Email Connection
- Automation V3: Gmail Connection in Automation with App Password
- Automation V3: Email Testing in Automation
- Automation V3: OAuth 2.0 MS Graph Email Connection
- Automation V3: Email Testing Examples
- Automation V3: Database Connections
- Automation V3: Web Services
- Data-Driven Testing in V3
- DevOps with V3
- Automation V3: Introduction to Provar DevOps
- Automation V3: Bitbucket Pipelines
- Automation V3: Perfecto Mobile
- Automation V3: ANT Task Parameters
- Automation V3: ANT: Generating ANT Build File
- Automation V3: ANT Licensing
- Automation V3: Reading Data from Excel
- Automation V3: Configuration on other CI tools
- Automation V3: Setting Apache Ant Environment Variables
- Automation V3: BrowserStack Desktop
- Automation V3: Integrating with LambdaTest
- Automation V3: Sauce Labs Desktop
- Automation V3: AutoRABIT Salesforce DevOps in Provar Test
- Automation V3: Selenium Grid
- Automation V3: Working with Git
- Automation V3: Configuration for Sending Emails via the Automation Command Line Interface
- Automation V3: Parameterization using Environment Variables in GitHub Actions
- Automation V3: Slack Integration with Automation
- Automation V3: Zephyr Cloud and Server
- Automation V3: Adding a Salesforce Communities Connection
- Automation V3: Integrating with Sauce Labs Real Device
- Automation V3: Travis CI
- Salesforce Testing with V3
- Automation V3: Salesforce Release Updates
- Automation V3: Adding a Salesforce Connection
- Automation V3: Adding a Log-on As Connection
- Automation V3: Adding a Salesforce OAuth (JWT Flow) Connection
- Automation V3: Salesforce Console Testing
- Automation V3: Adding a Salesforce Portal Connection
- Automation V3: Visualforce Testing
- Automation V3: List and Table Testing
- Provar Manager and Provar Automation V3
- Automation V3: Setting Up a Connection to Provar Manager
- Automation V3: Provar Manager Filters
- Automation V3: Importing 3rd-Party Test Projects
- Automation V3: Uploading Test Steps in Provar Manager
- Automation V3: Test Management
- Automation V3: Provar Manager Test Operations
- Automation V3: Provar Manager Test Execution
- Automation V3: Release Management
- Automation V3: Provar Manager Plugins
- Automation V3: Provar Manager Test Coverage
- Automation V3: Provar Manager Setup and User Guide
- Automation V3: Uploading 3rd-Party Test Results
- Automation V3: Uploading Existing Manual Test Cases to Provar Manager with DataLoader.Io
- Automation V3: Quality Journey, Quality Center, and Dashboards
- Automation V3: Object Mapping Between Provar Automation and Provar Manager
- Automation V3: Uploading Callable Test Cases in Provar Manager
- Automation V3: Metadata Coverage with Manager
- Recommended Practices with V3
- Automation V3: Automation Planning
- Automation V3: Supported Testing Phases
- Automation V3: Best practices for the .provarCaches folder
- Automation V3: Best practices for .pageObject files
- Automation V3: Avoid Metadata performance issues
- Automation V3: The Best Ways to Change Callable Test Case Locations
- Automation V3: Improve Your Metadata Performance
- Automation V3: Abort Unused Test Sessions/Runs
- Automation V3: Create Records via API
- Automation V3: Increase auto-retry waits for steps using a global variable
- Troubleshooting with V3
- Automation V3: Add Permissions to Edit Provar.ini File
- Automation V3: Test Builder Does Not Launch
- Automation V3: Provar License Issue Solution
- Automation V3: How to Configure a Single Sign-On Connection
- Automation V3: Out of Memory Error During CI Execution
- Automation V3: Add Gmail Firewall Exception
- Automation V3: Add a License Firewall Exception
- Automation V3: Resolving Jenkins License Missing Error
- Automation V3: Increase System Memory for Provar
- Automation V3: Resolving Metadata Timeout Errors
- Automation V3: How to Use Keytool Command for Importing Certificates
- Automation V3: Java Version Mismatch Error
- Automation V3: Provar Manager 3.0 Install Error Resolution
- Automation V3: Test Case Does Not Run on IE Browser
- Automation V3: Test Builder Not Working Correctly
- Provar Grid and Provar Automation V3
- AI with Provar Automation V3