Automation V3: Flosum Configuration
Now that the Jenkins server is set up for Automation test execution, we can begin setting up the Salesforce org with the Flosum installation to queue the Jenkins job that we just created.
Prior to setting up the webhook to trigger our Automation job on another end system, a pipeline has to be created in Flosum. Before you can initiate a pipeline, you need to have a valid branch in Flosum to run it from. The entire process is detailed in the following steps.
- Registering your Organization
- Creating a Snapshot
- Committing to Branch
- Creating a Webhook
- Creating a Pipeline
Registering your Organization
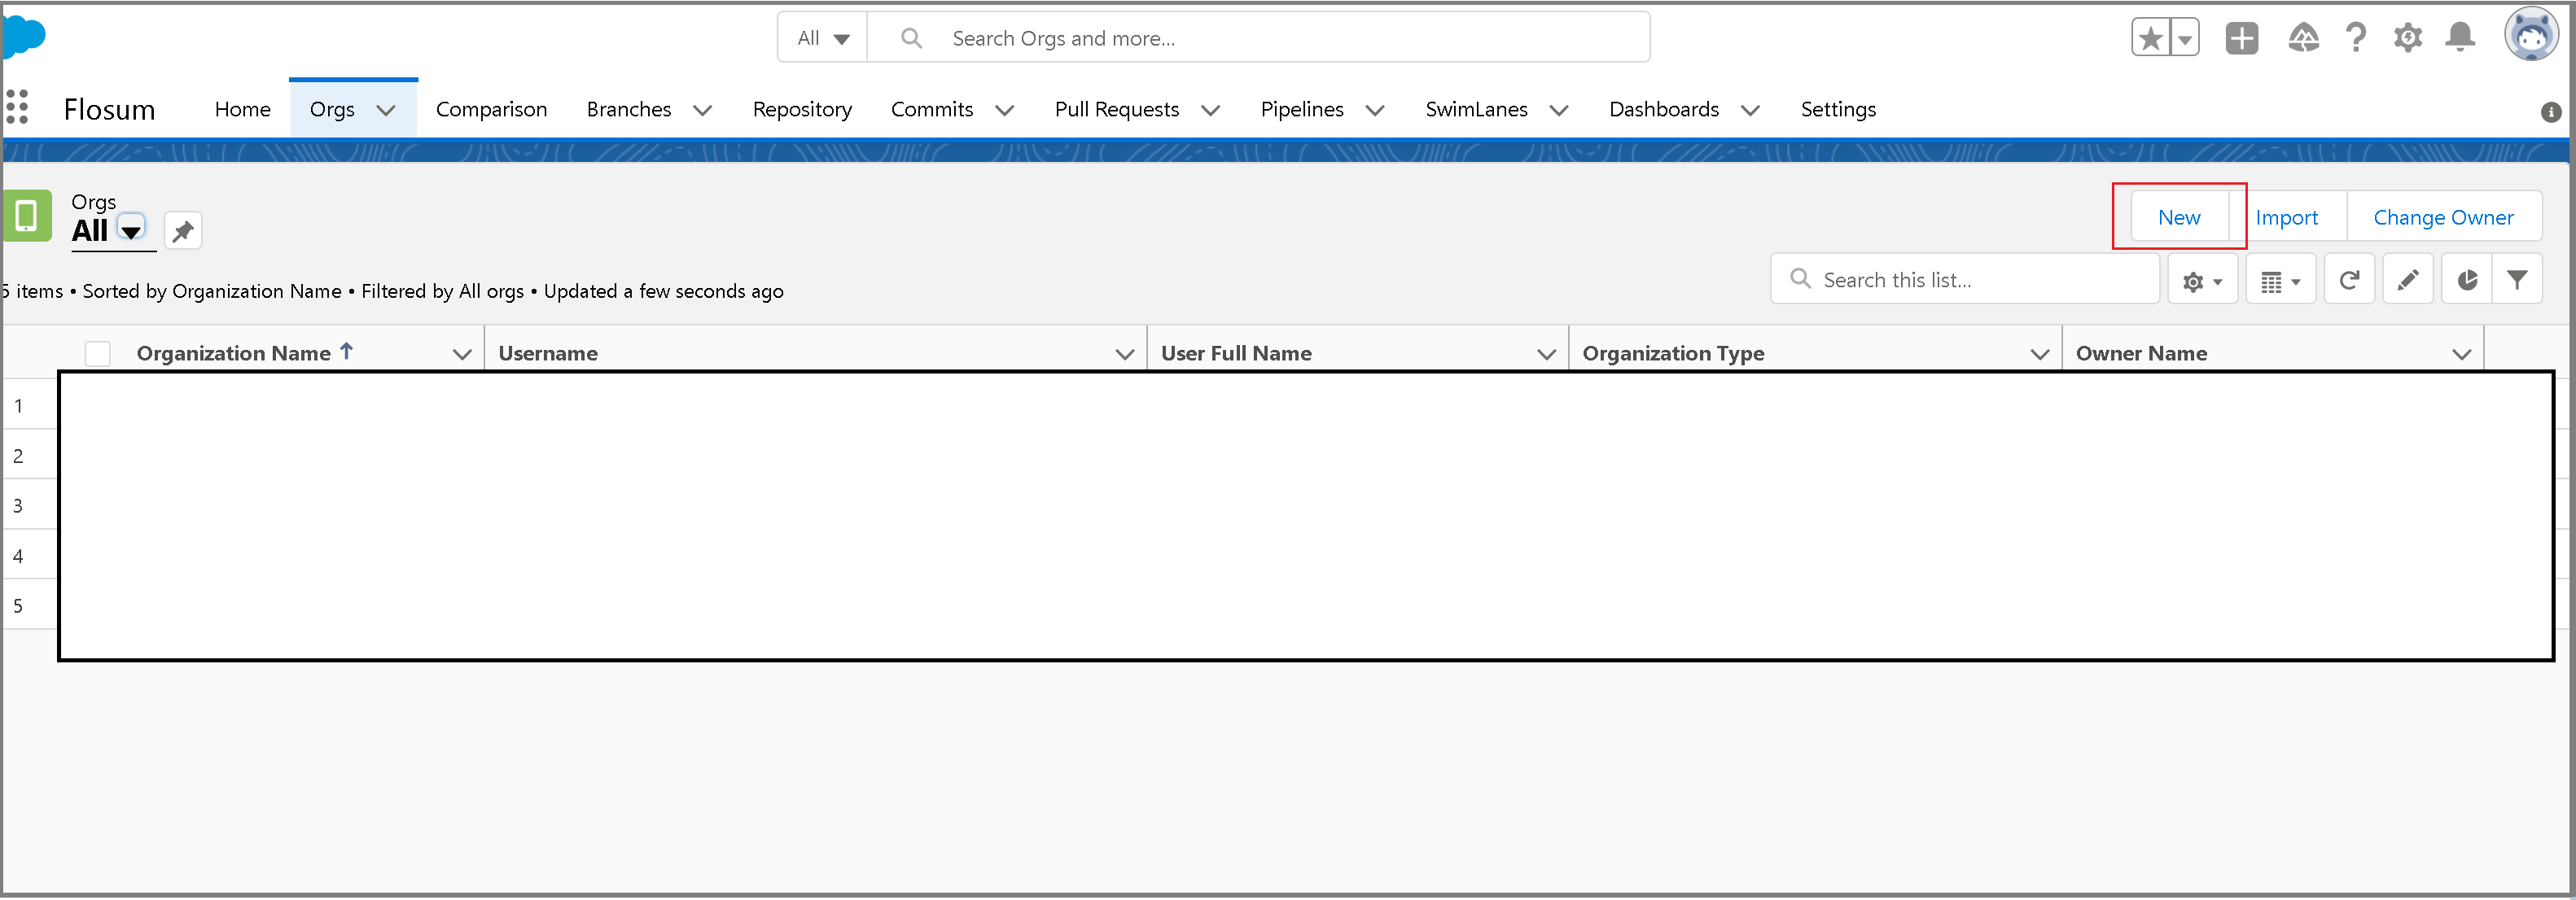
The first step in setting up the pipeline in Flosum is to add an organization. Navigate to the Orgs tab in your Flosum org and click New.

Enter the Organization Name, Authentication Type (automatic is easier), and Organization Type. This needs to be an org that you are connecting to from Flosum to trigger the pipeline. In practice, this would be whatever org you are making deployments/triggering changes on that triggers your Automation tests elsewhere. In other words, if you want to run Automation tests following a deployment/change in a Developer org, your setup might look like the screenshot given below.

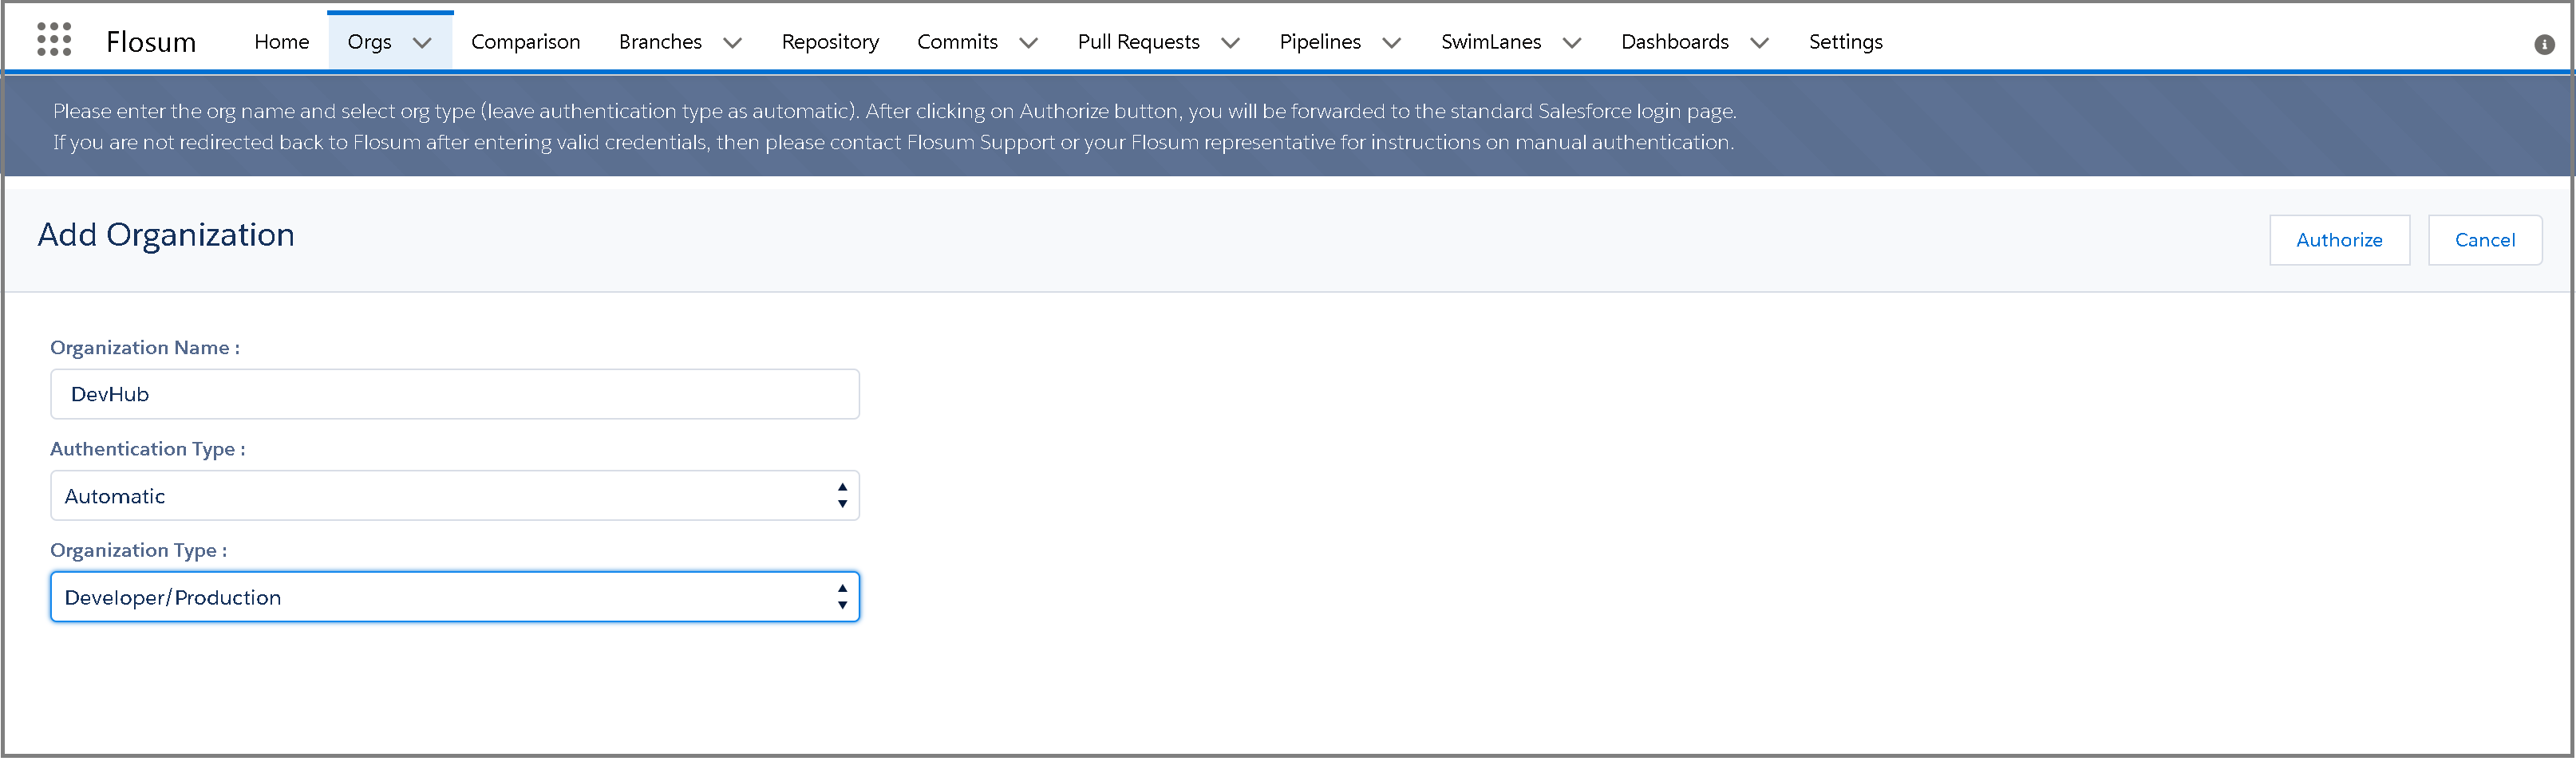
Once you enter these field details in, you’ll have to authorize Flosum to connect to this org by clicking Authorize in the top right corner and following the Salesforce authentication there.
Success! Your org has been added to Flosum and we can continue on to the next step of creating a snapshot.
Creating a Snapshot
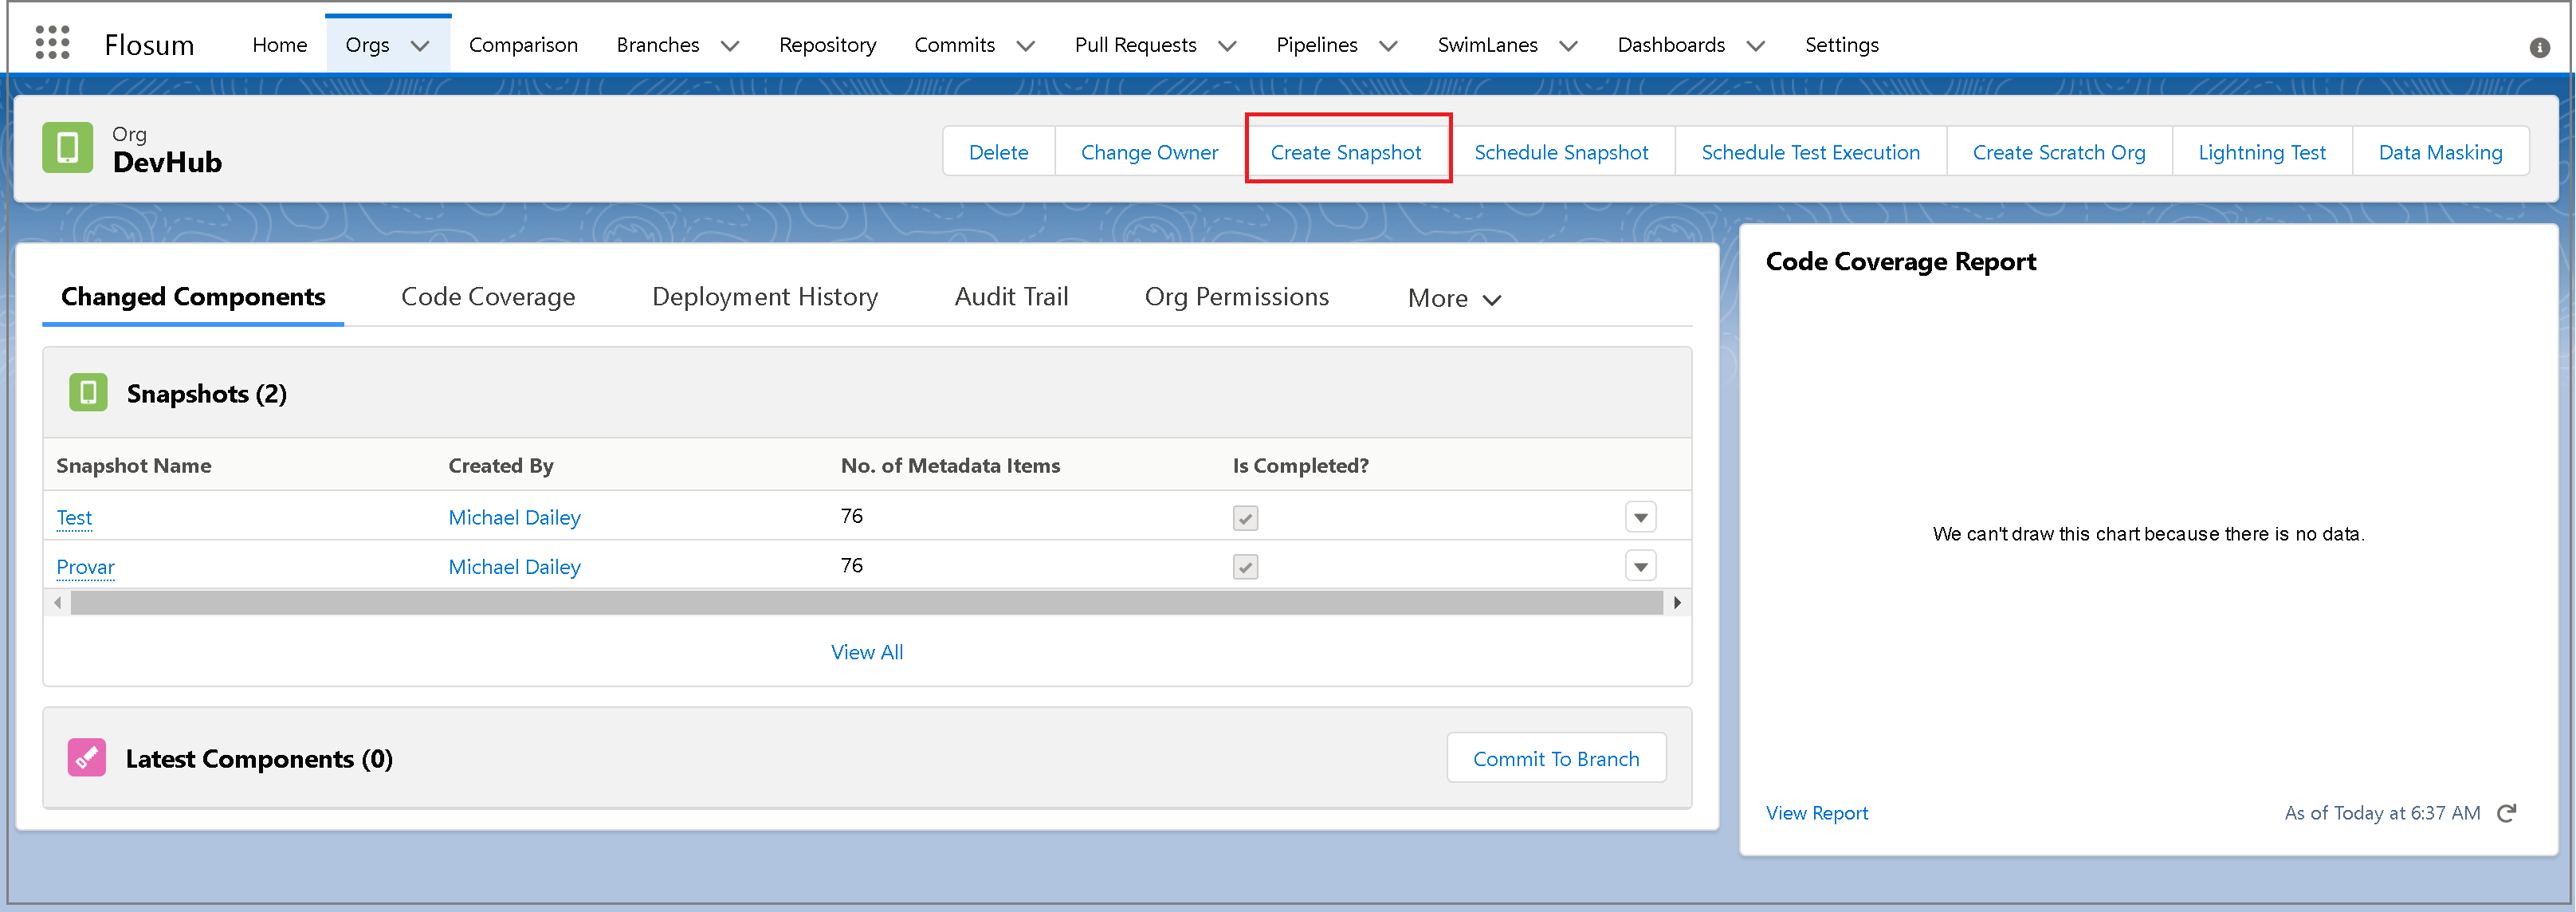
In order to create a snapshot, navigate to the org we just created and select Create Snapshot.

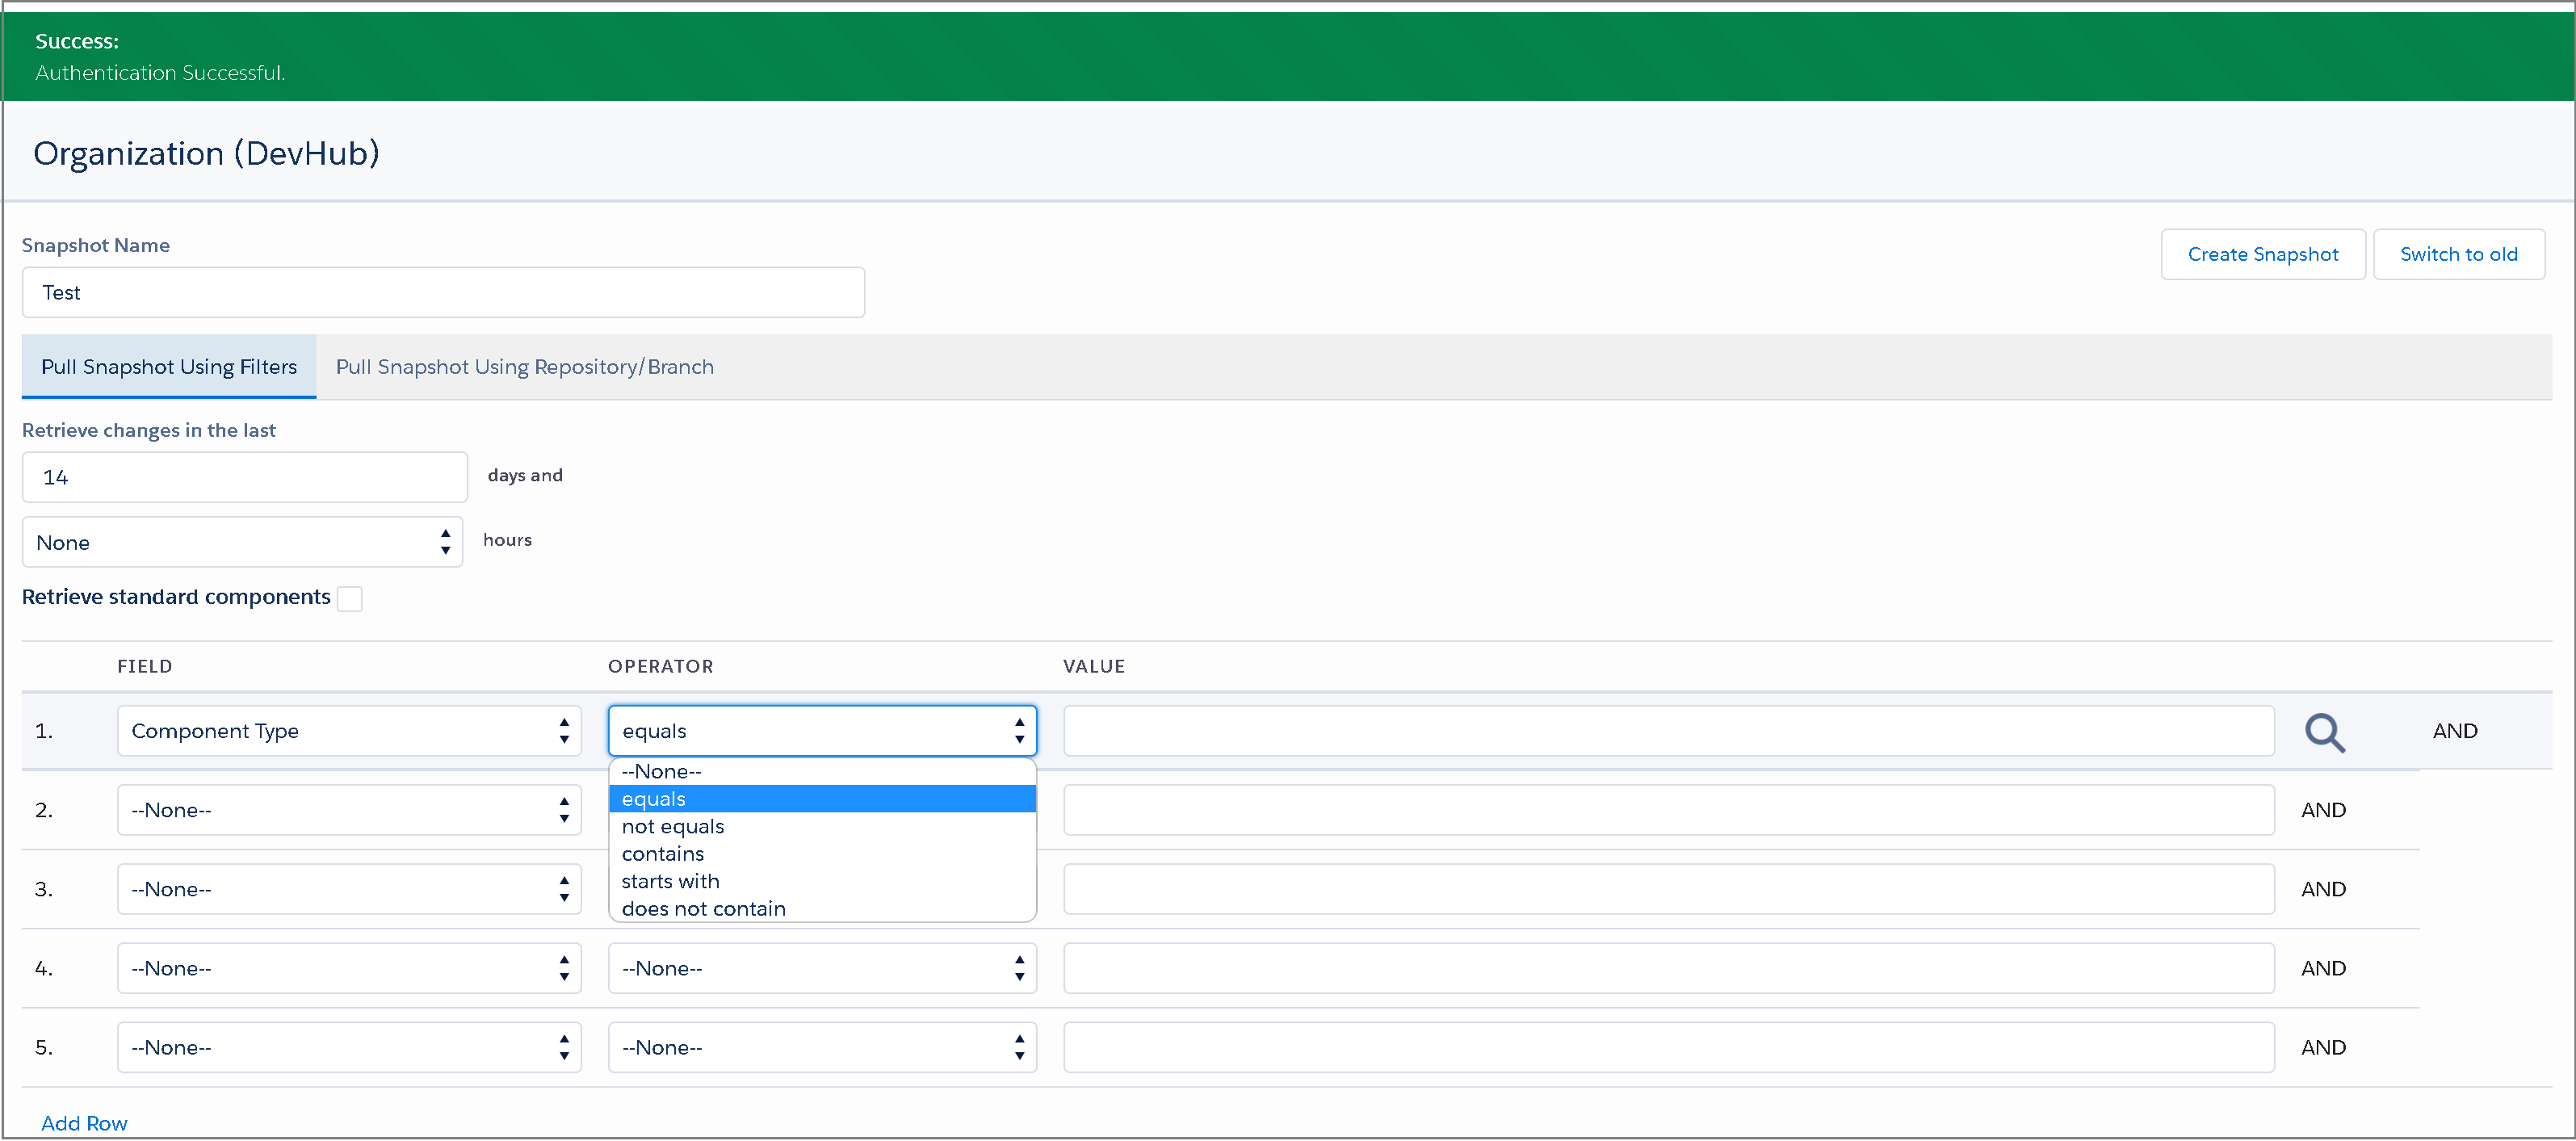
First, you will enter a name for your Snapshot. A snapshot is essentially a specific capture of metadata that you wish to deploy or validate. You can create a partial or complete snapshot. You can configure a lot of options for the snapshot.
For example, you can select the number of days that you want to retrieve changes for the selected components. You can also filter the components based on component type, component name, or changed by fields.

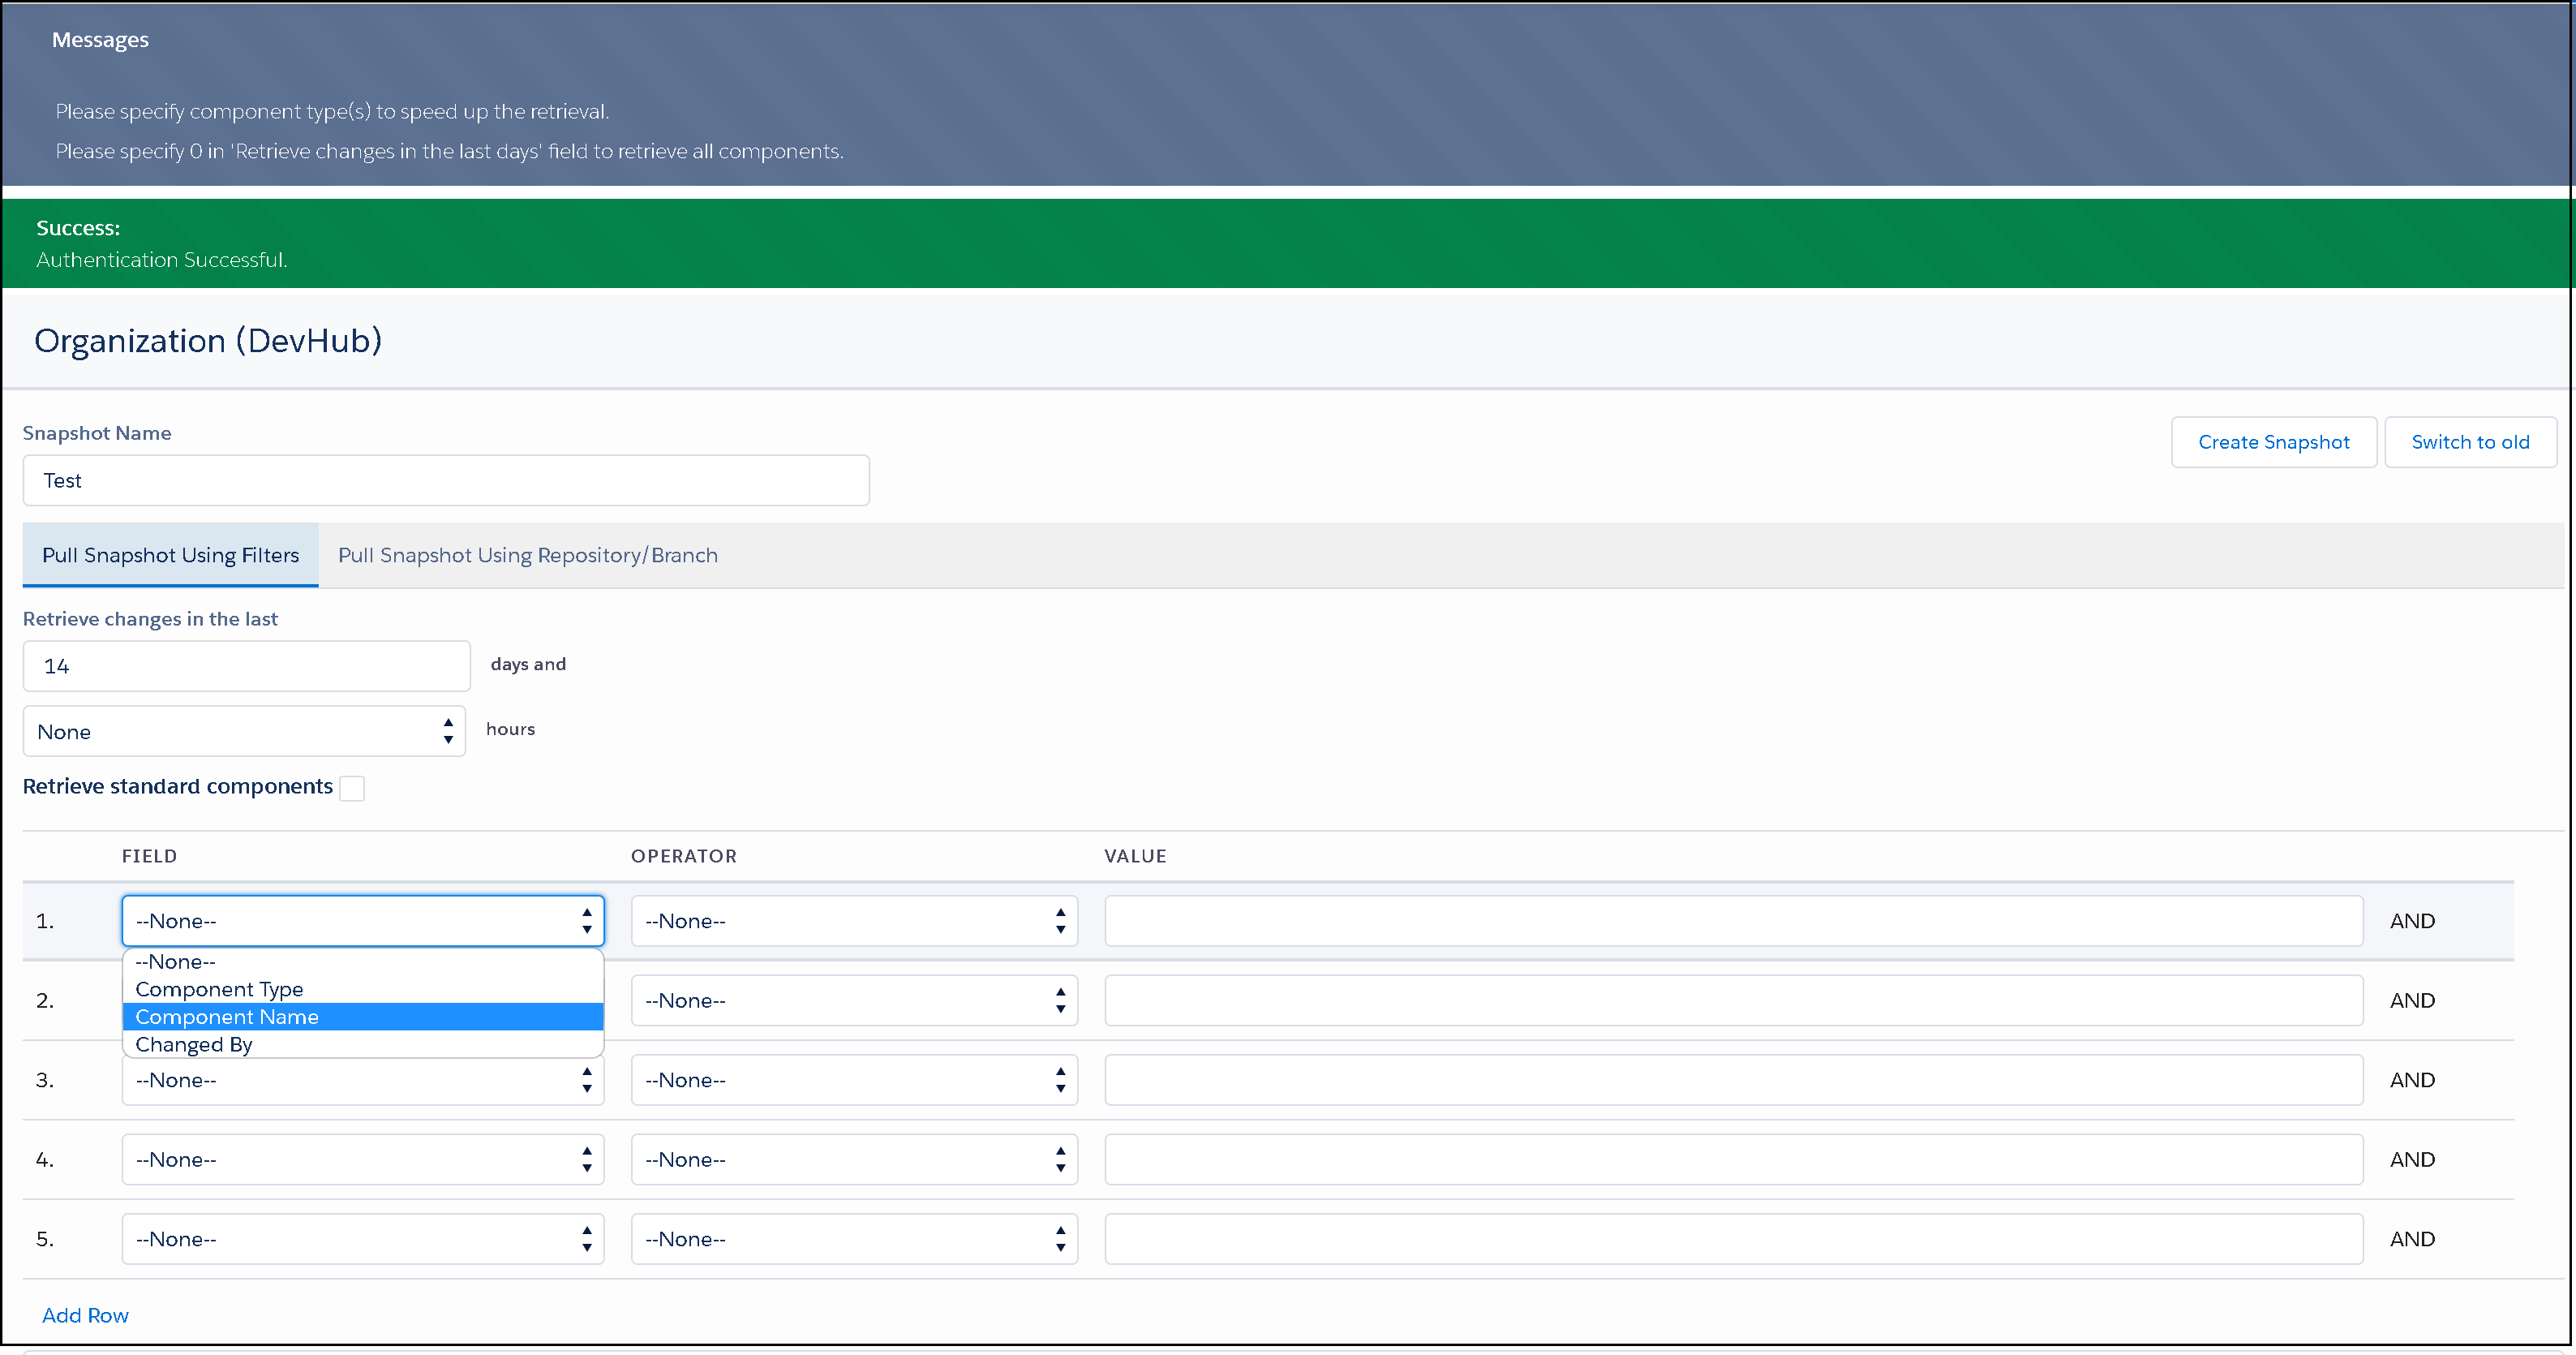
The operator can be set to a wide variety of options, depending on which components you are trying to filter for.

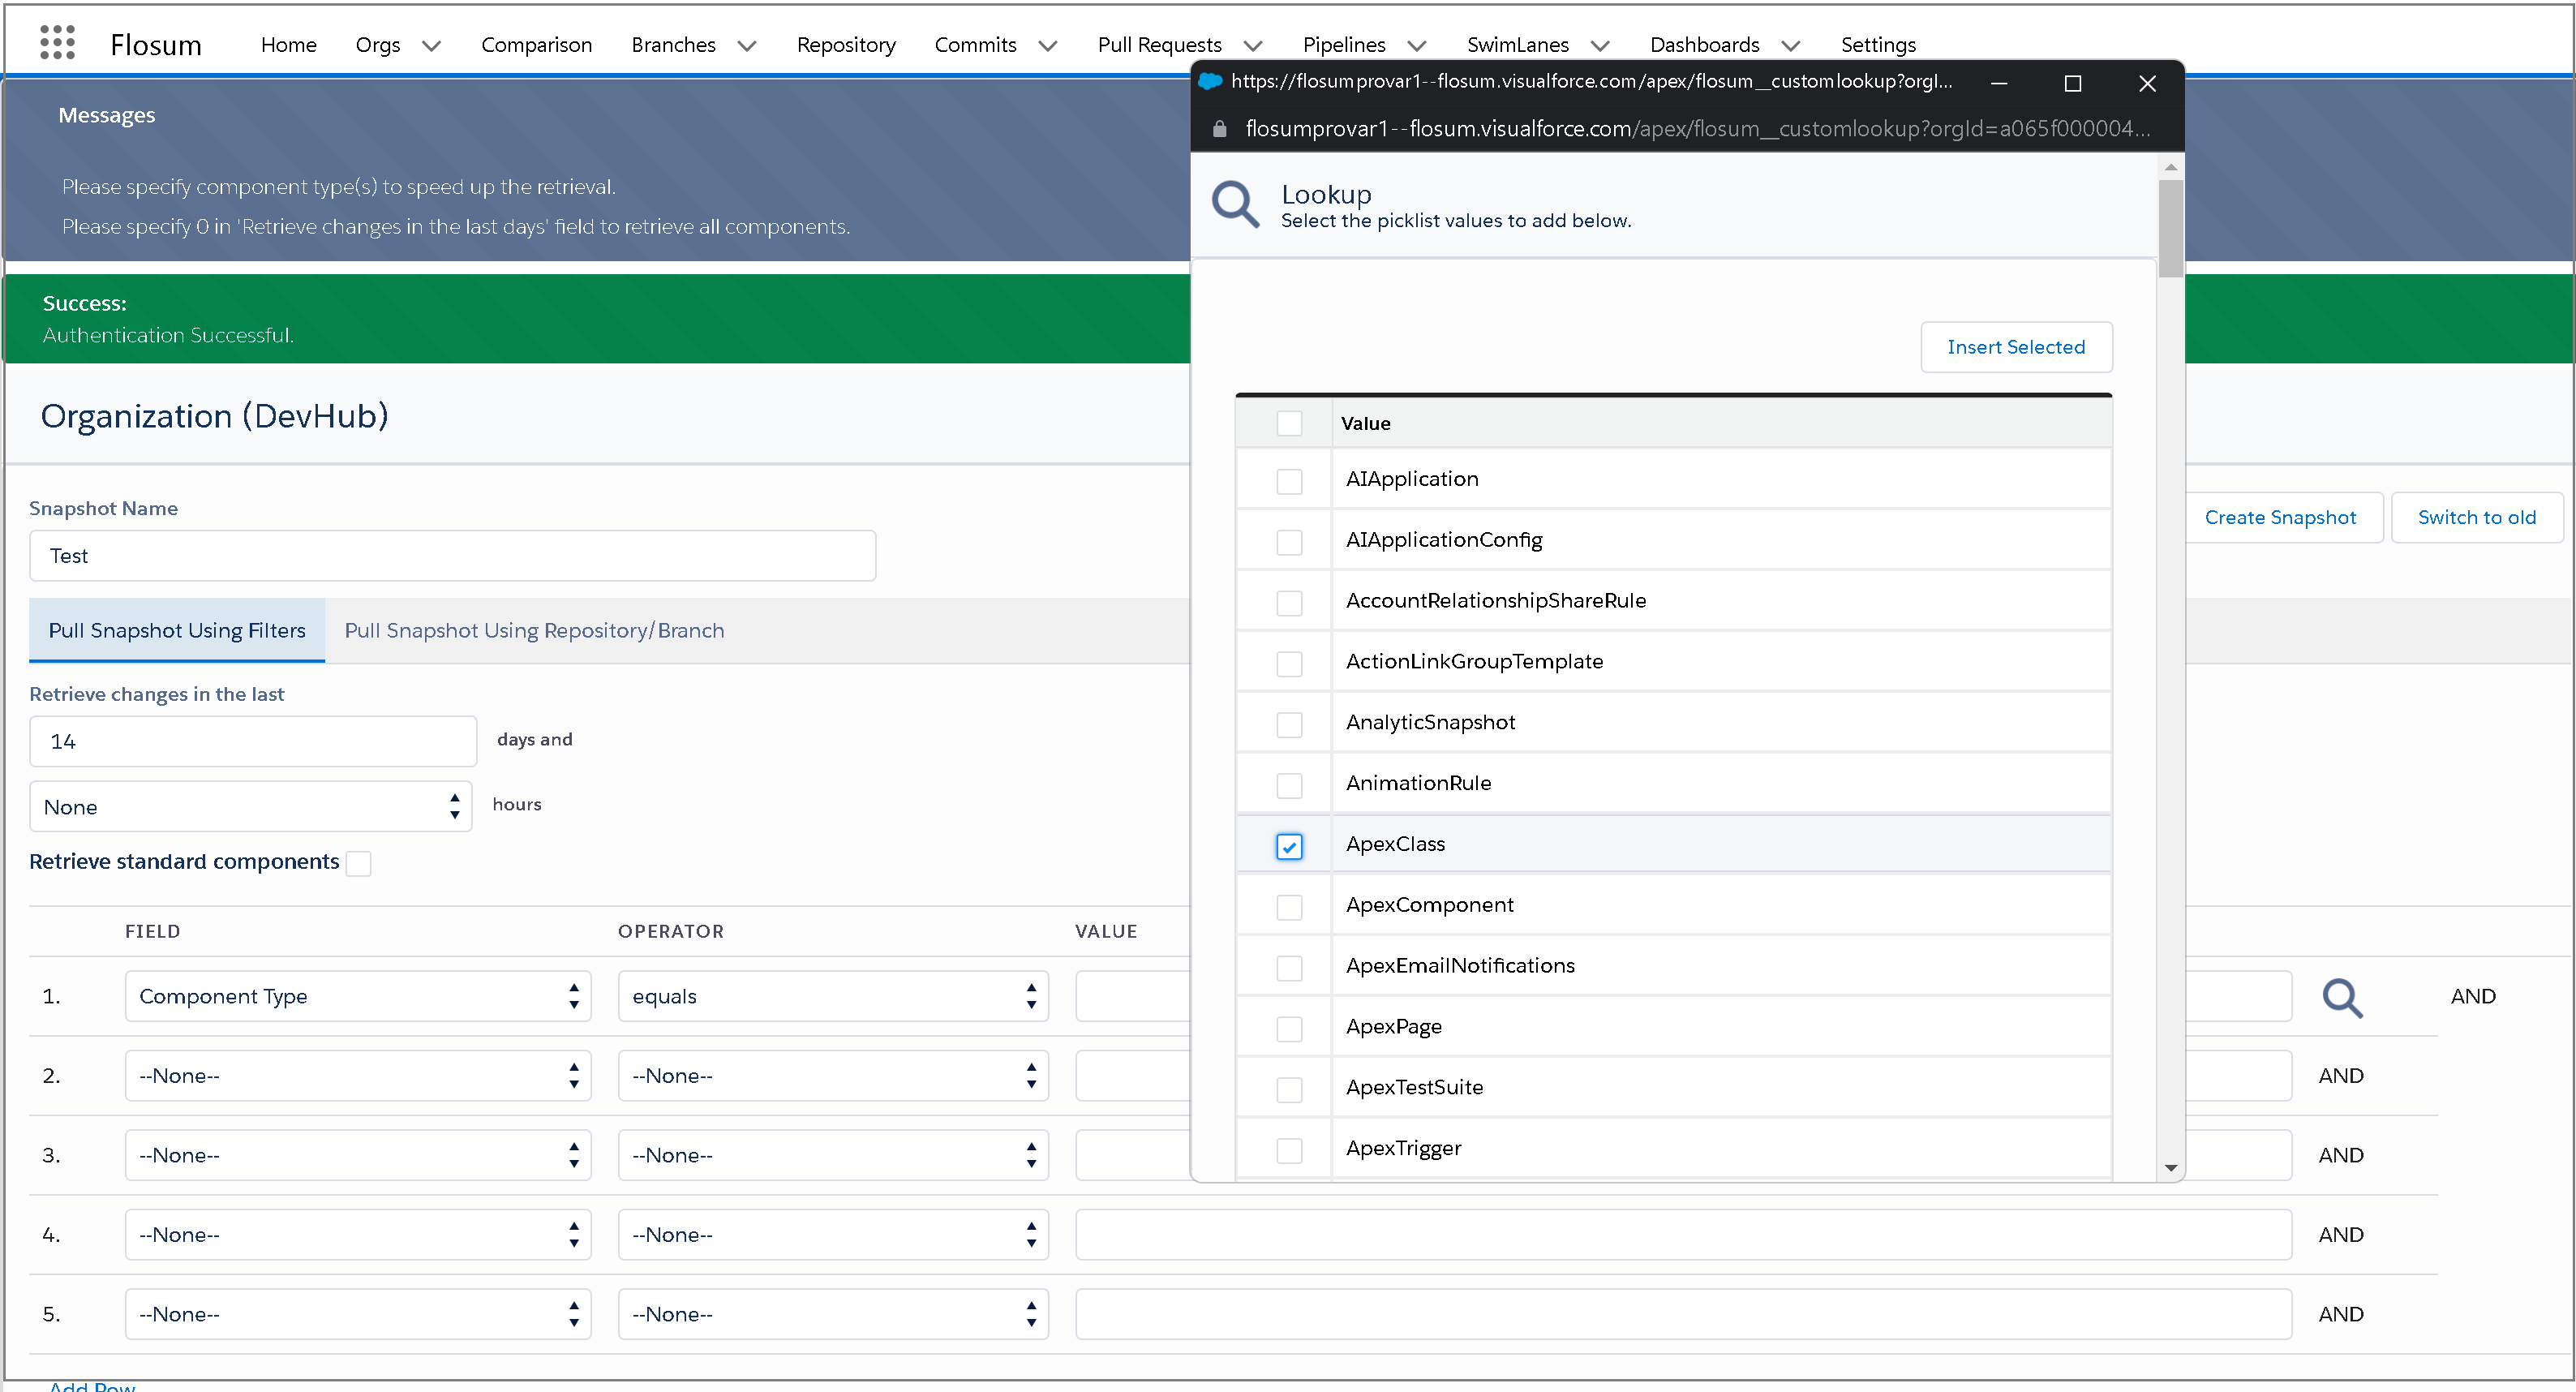
Once you’ve selected a field and an operator, you can use the search icon on the far right to search for specific components by value. You can add each individual component you want by checking the boxes next to the relevant item.

For testing purposes, we’ve kept it simple and changed the retrieval date to ‘0’ days to retrieve all components.

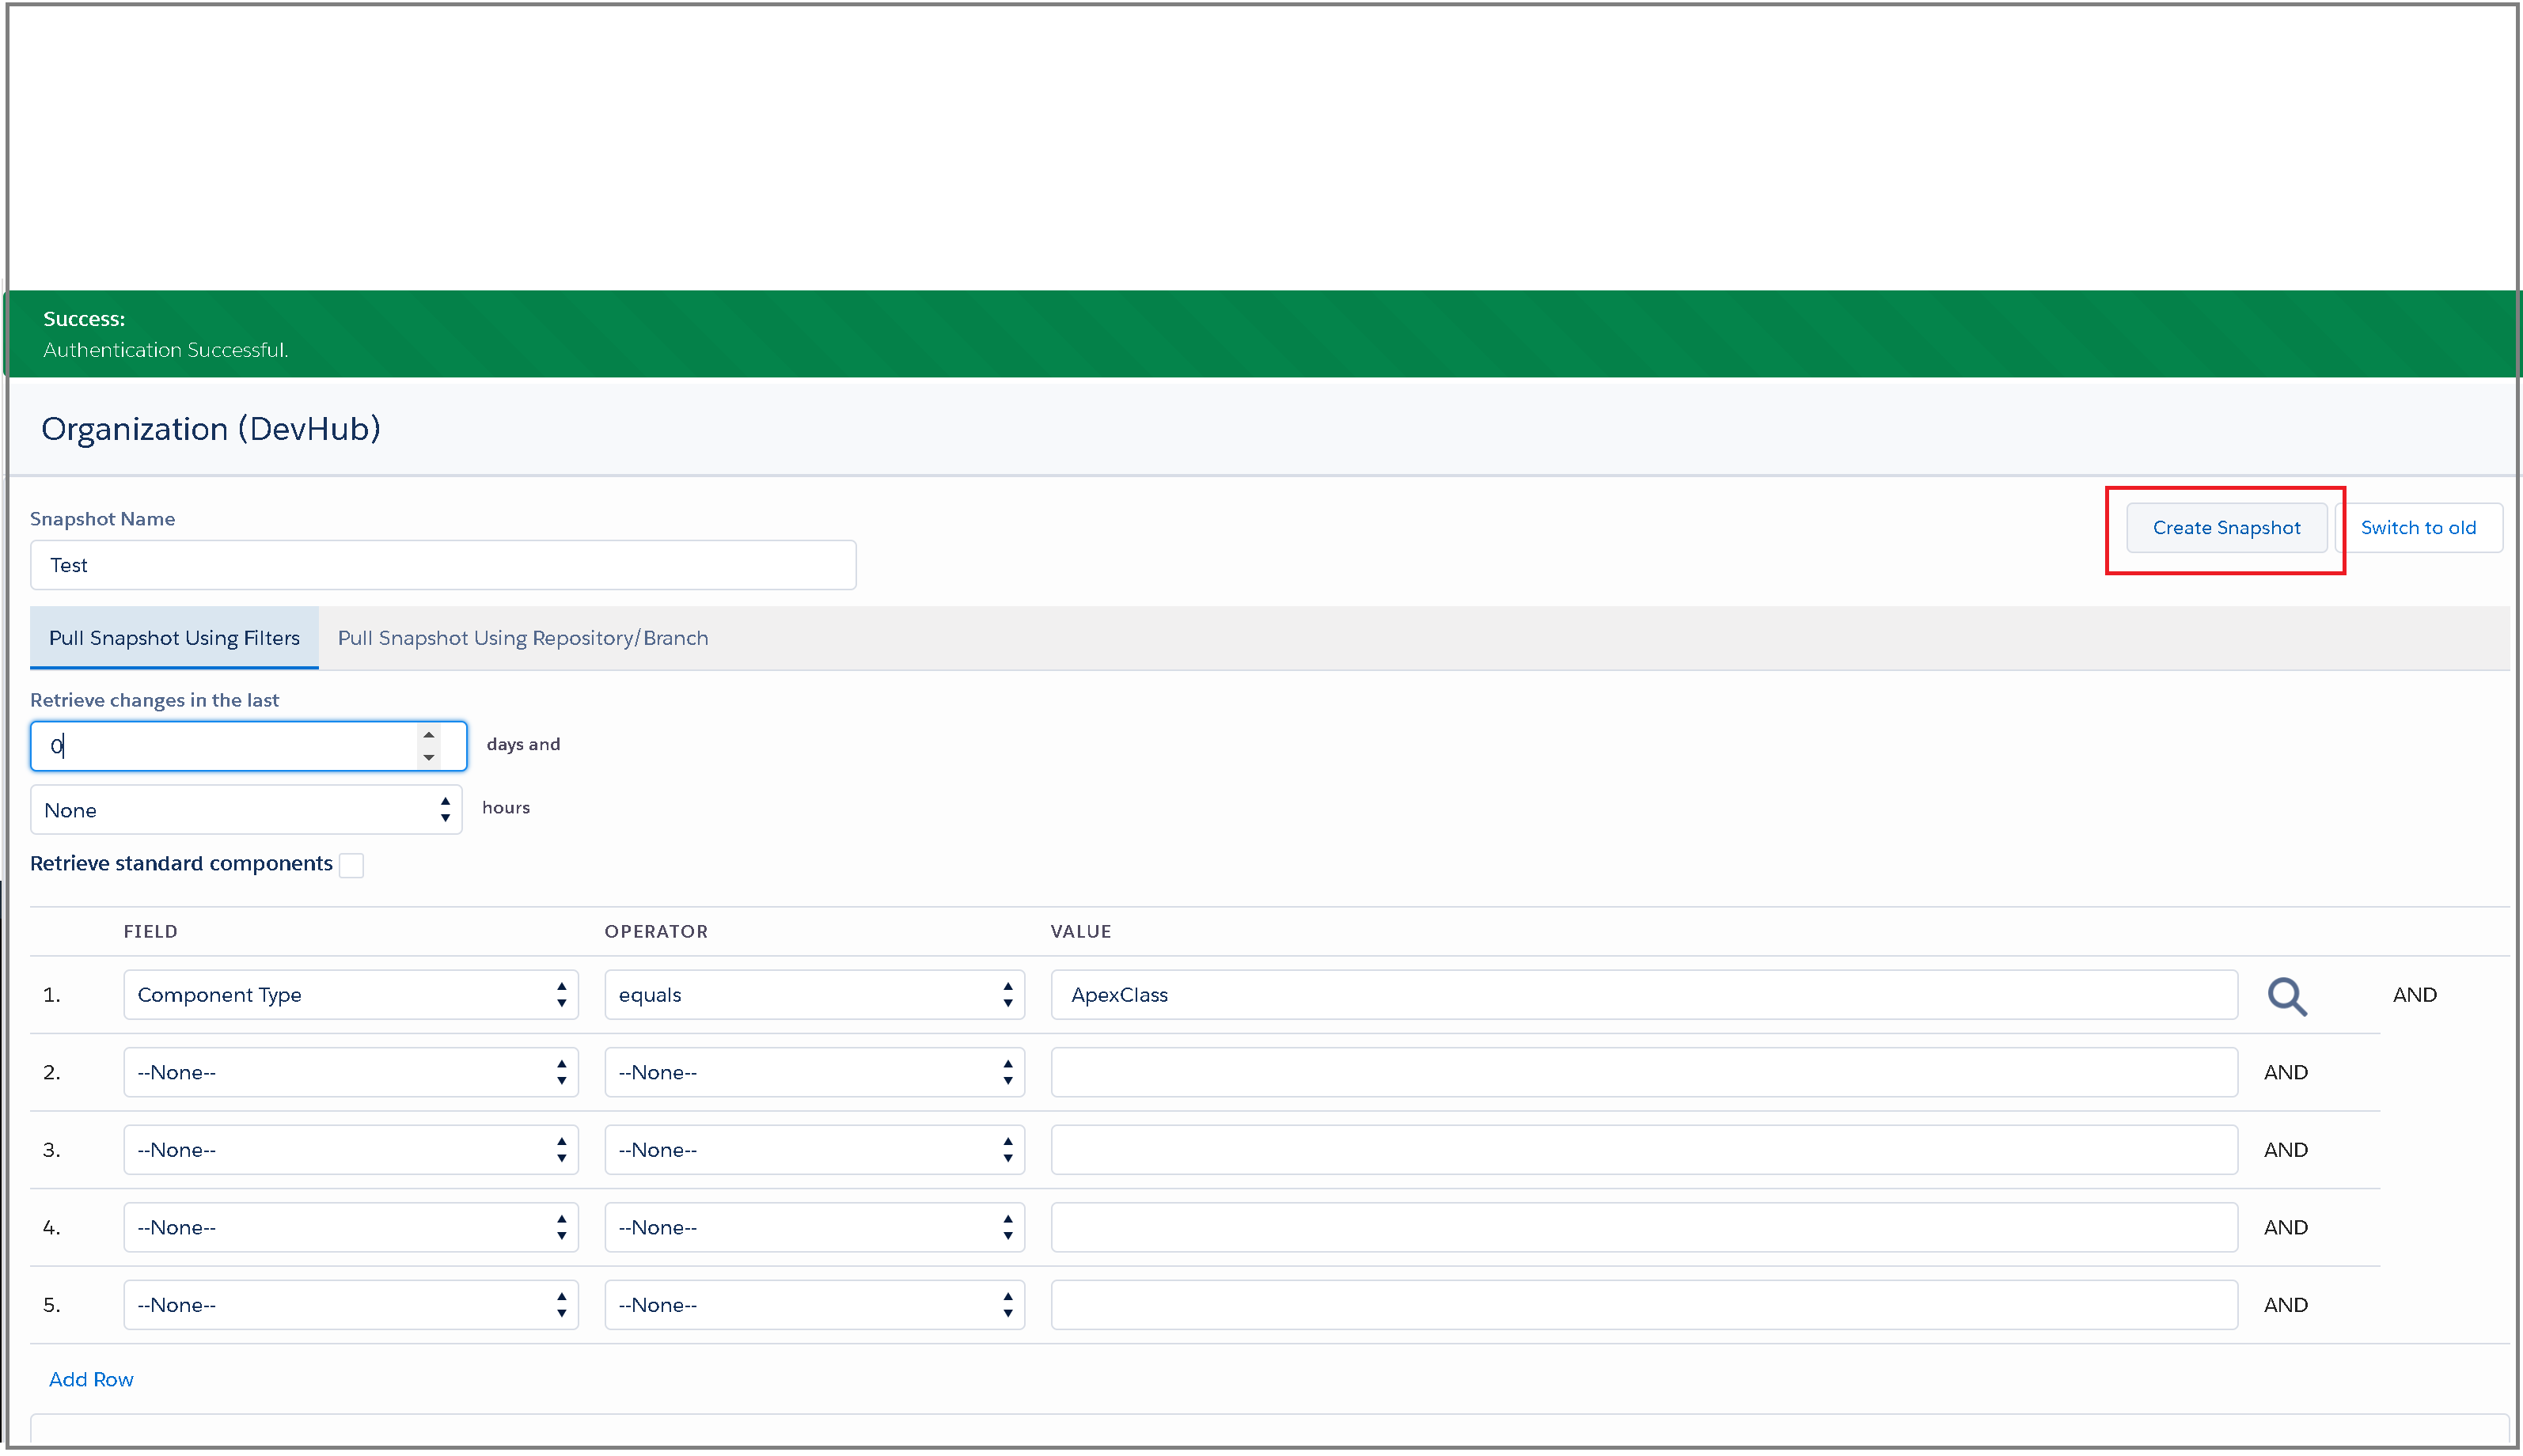
Once you are satisfied with the snapshot, click create snapshot in the top right corner.
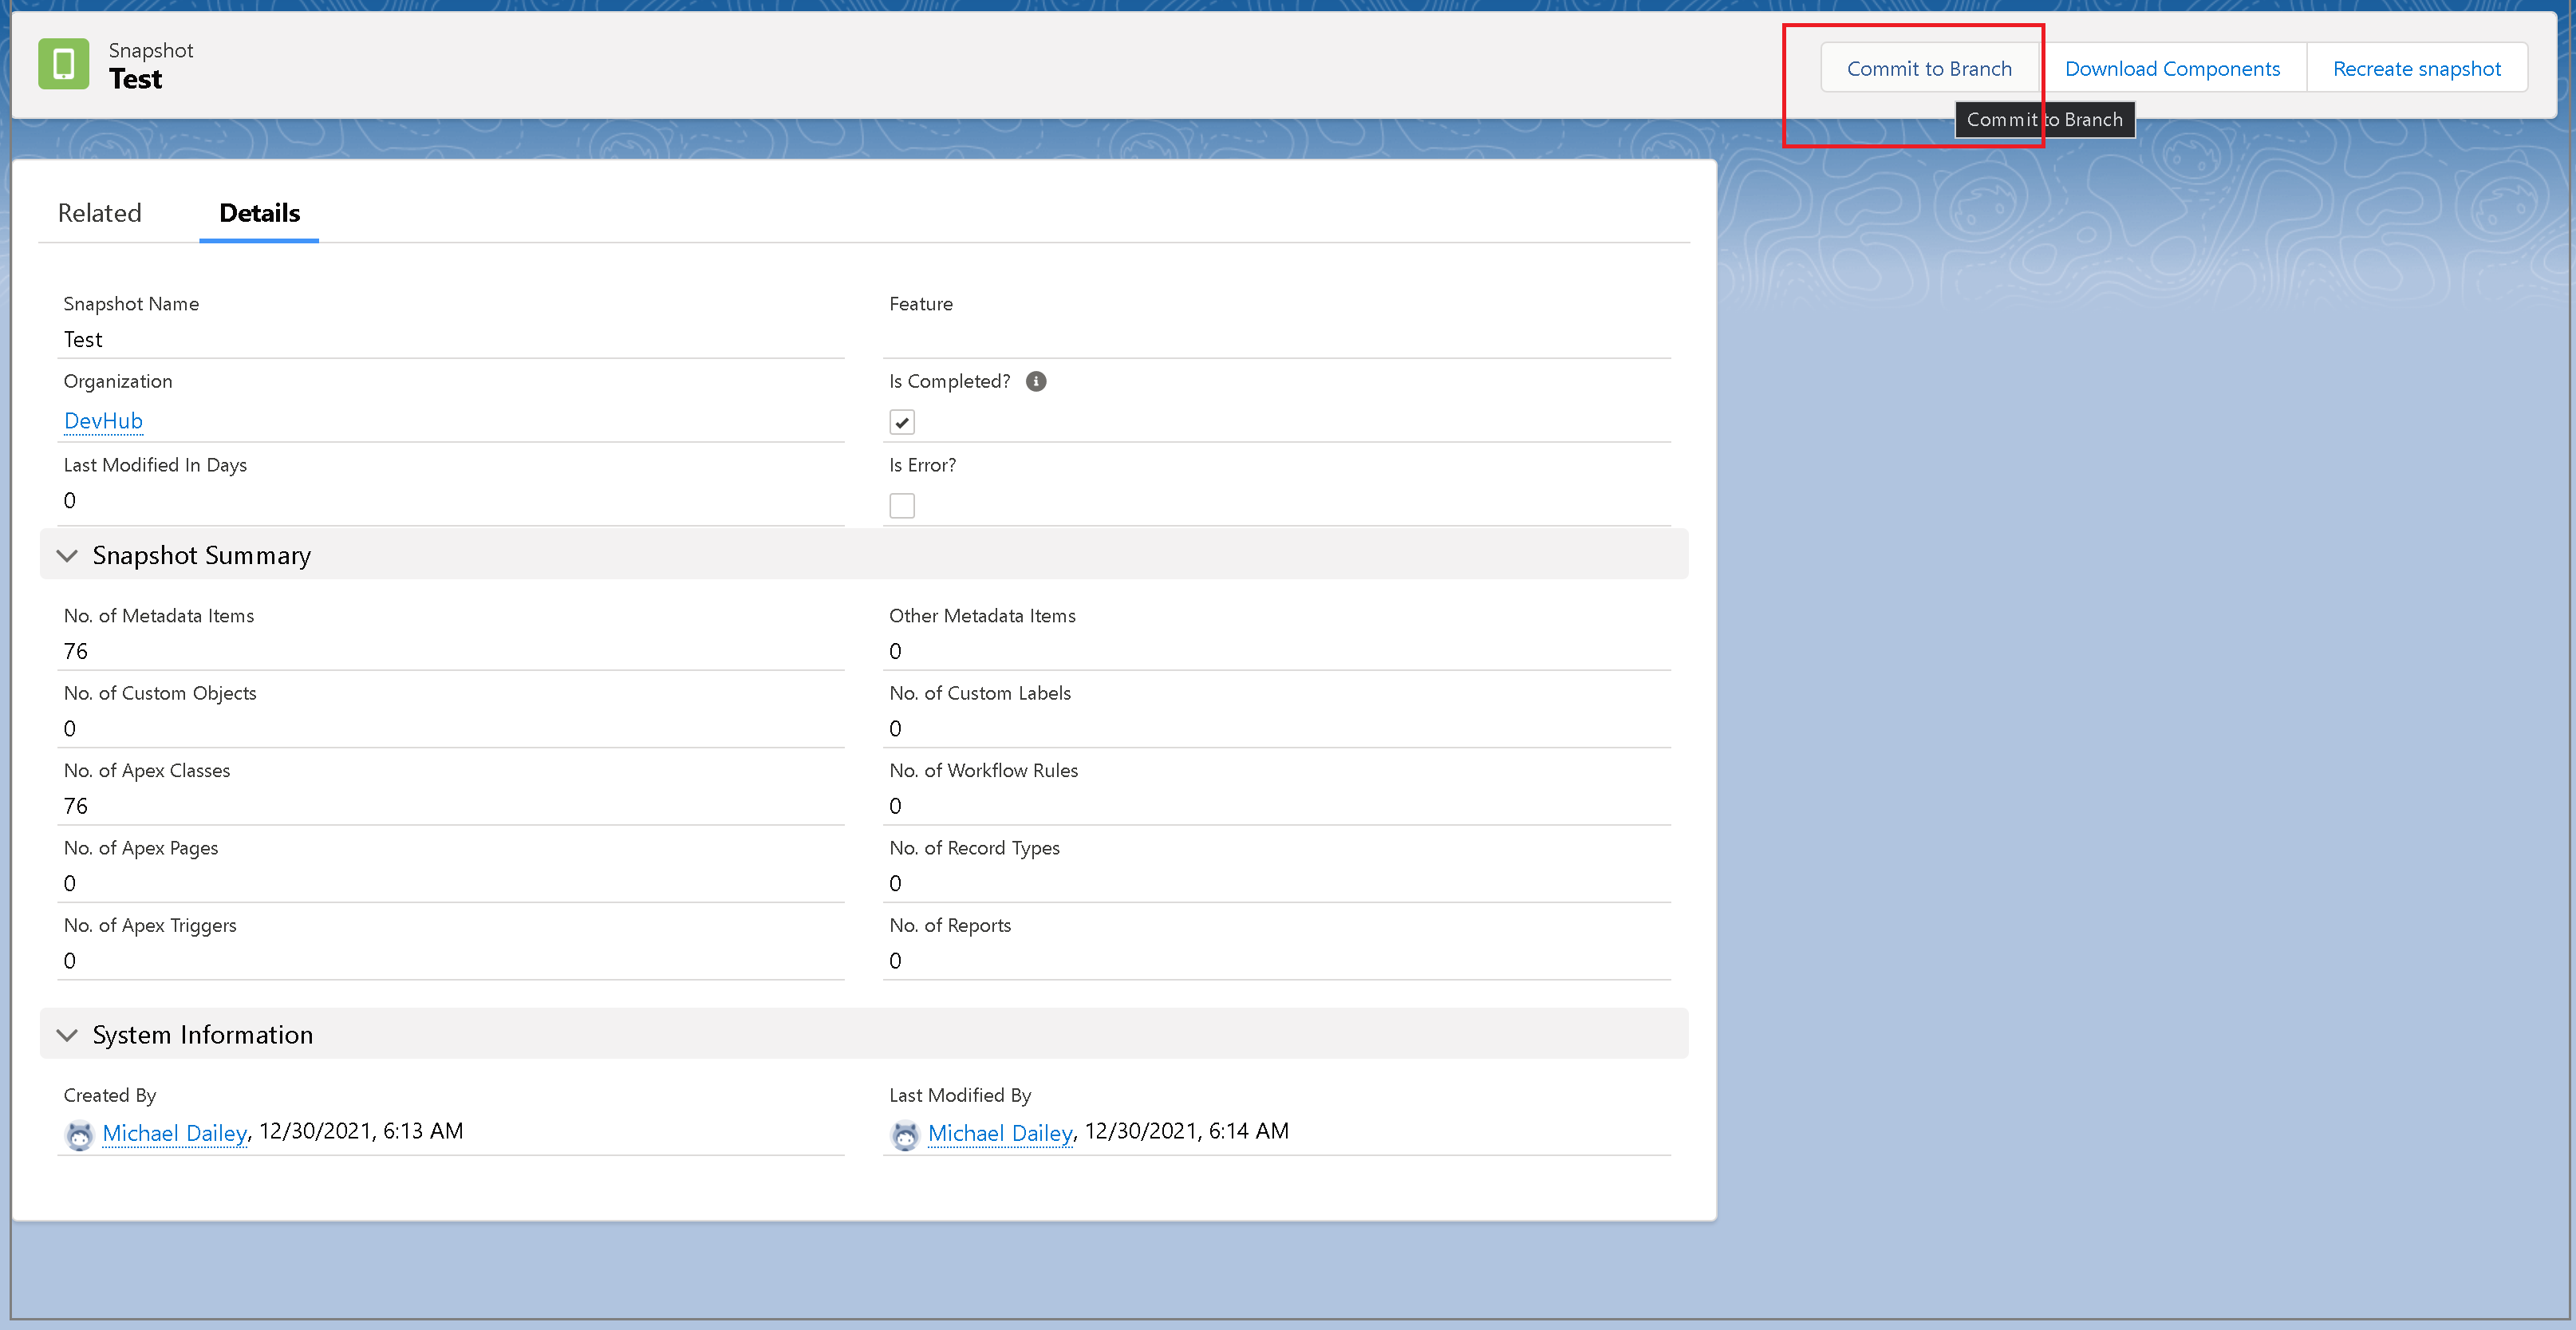
Give Flosum a minute or so to complete the snapshot process. You can track the status by refreshing the snapshot screen and checking the Is Completed? checkbox. Additionally, you’ll want to make sure that the No. of Metadata Items is greater than ‘0’.

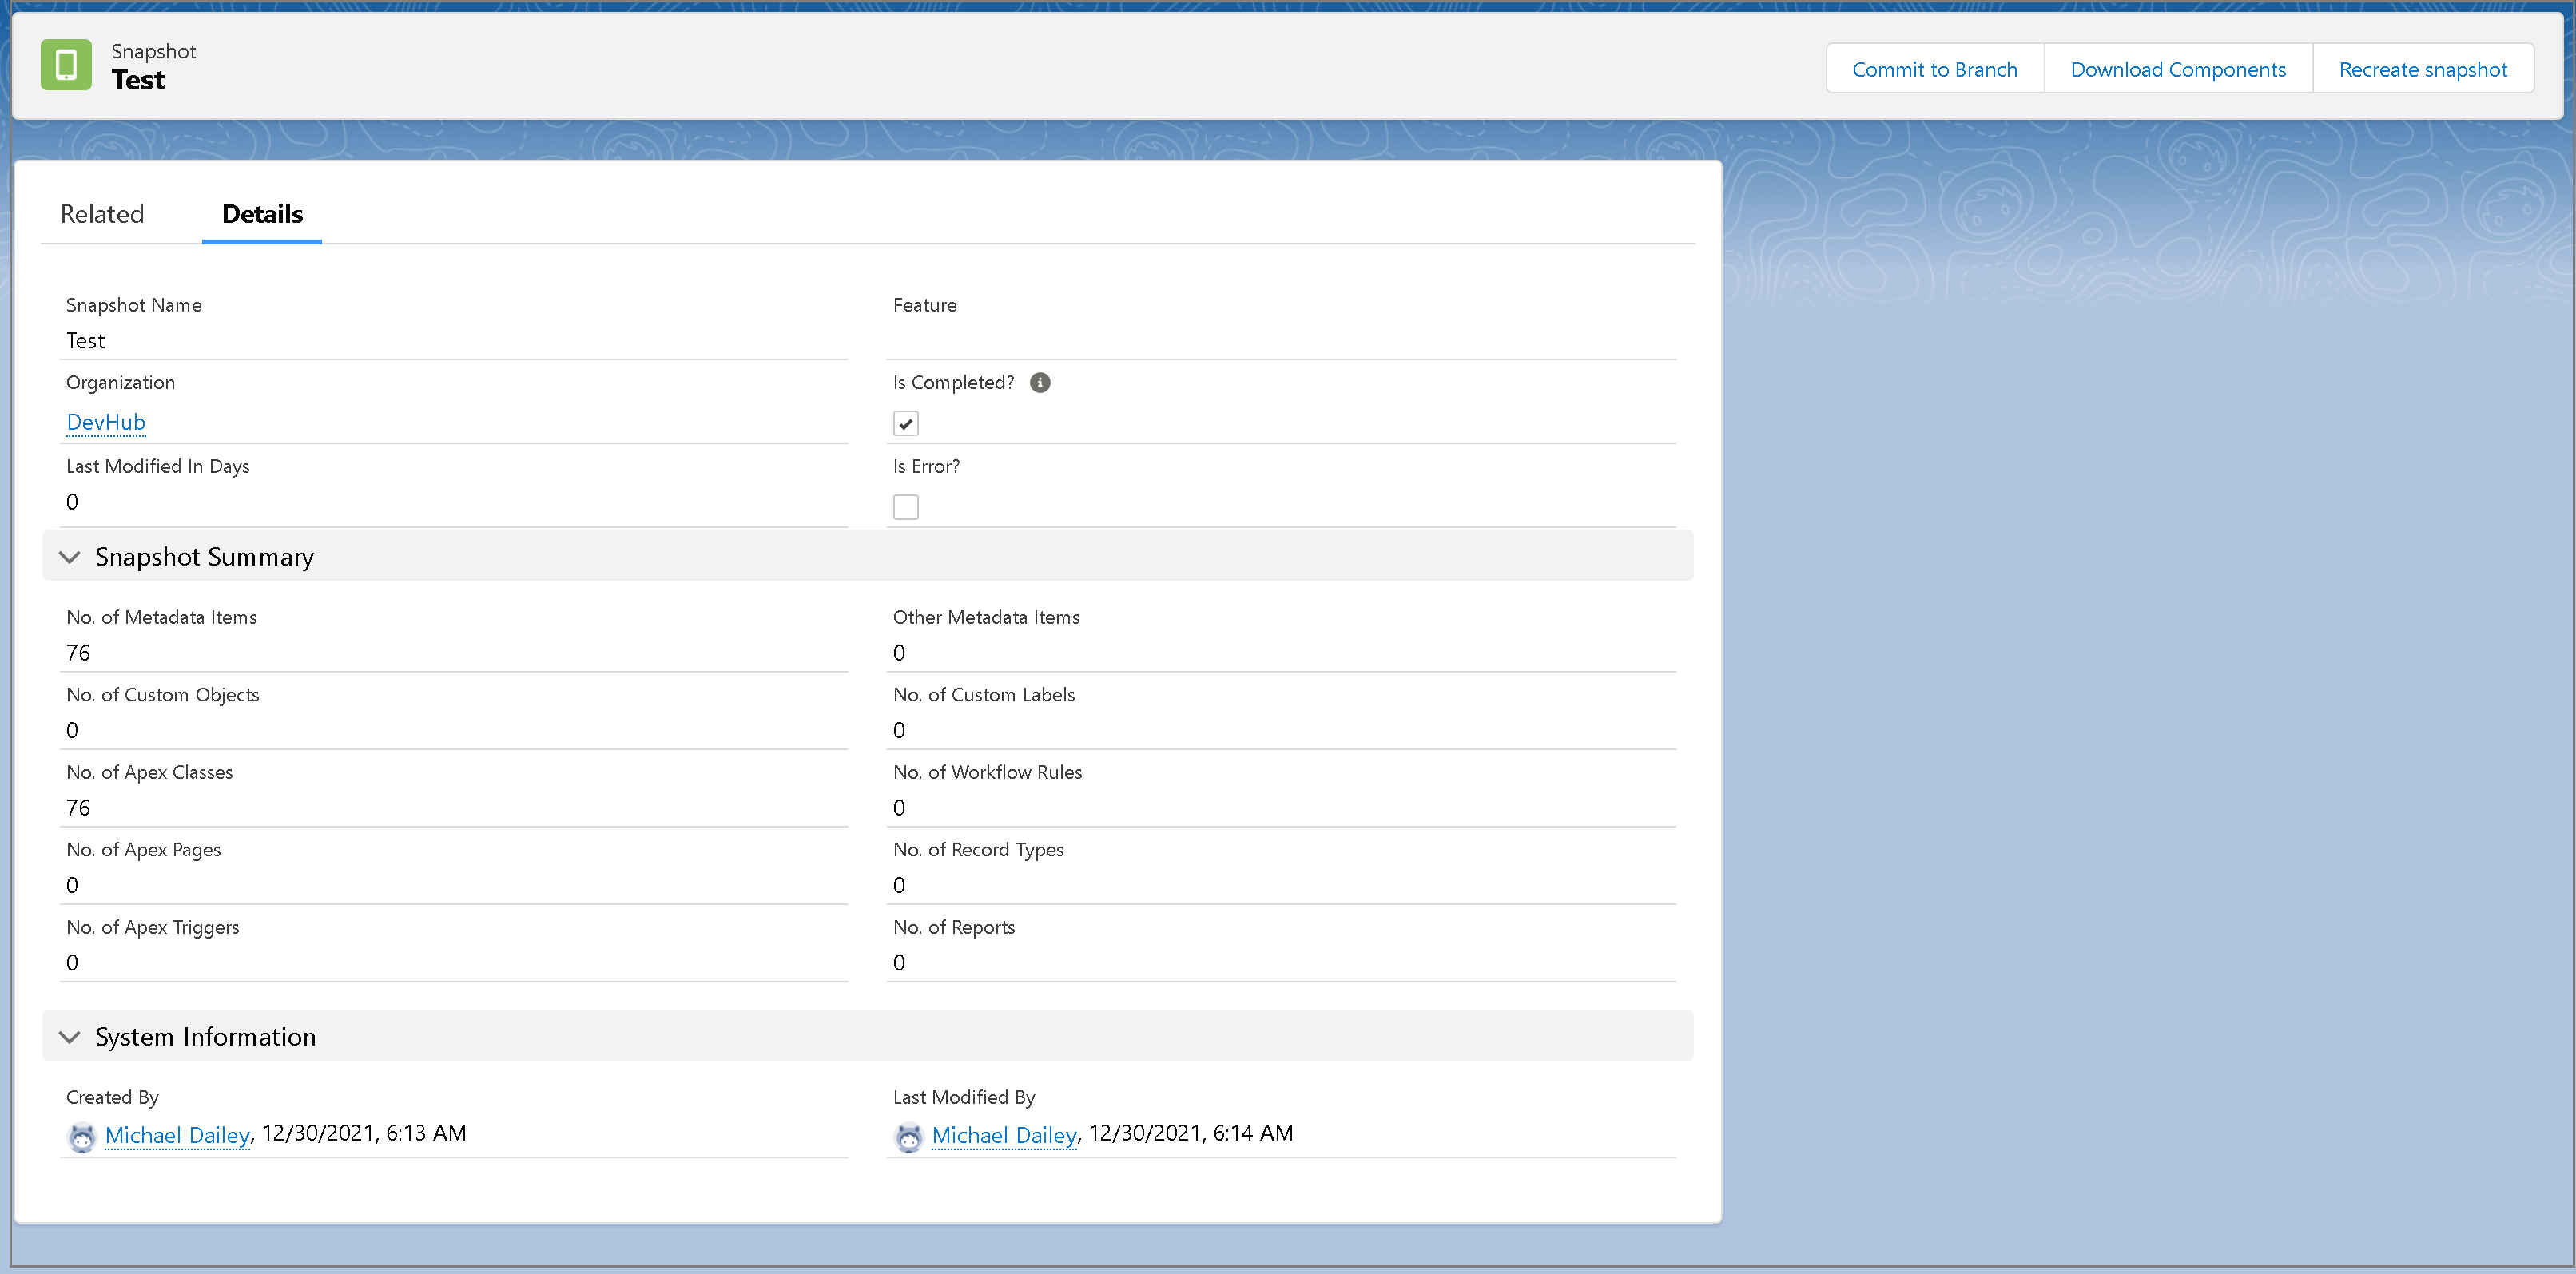
That’s it! Your snapshot is created from the Org we registered previously and we are ready to commit it.
Committing to Branch
Once you are on the snapshot screen, the commit to branch step will open the next screen to select all components you’d like to commit.

A note here that all of this is being committed to the Flosum’s native Version Control System, and not your personal/company’s repository. It’s a great feature for storing all of this metadata information directly in your Flosum org and not having to set up your own Git repository just for this process.

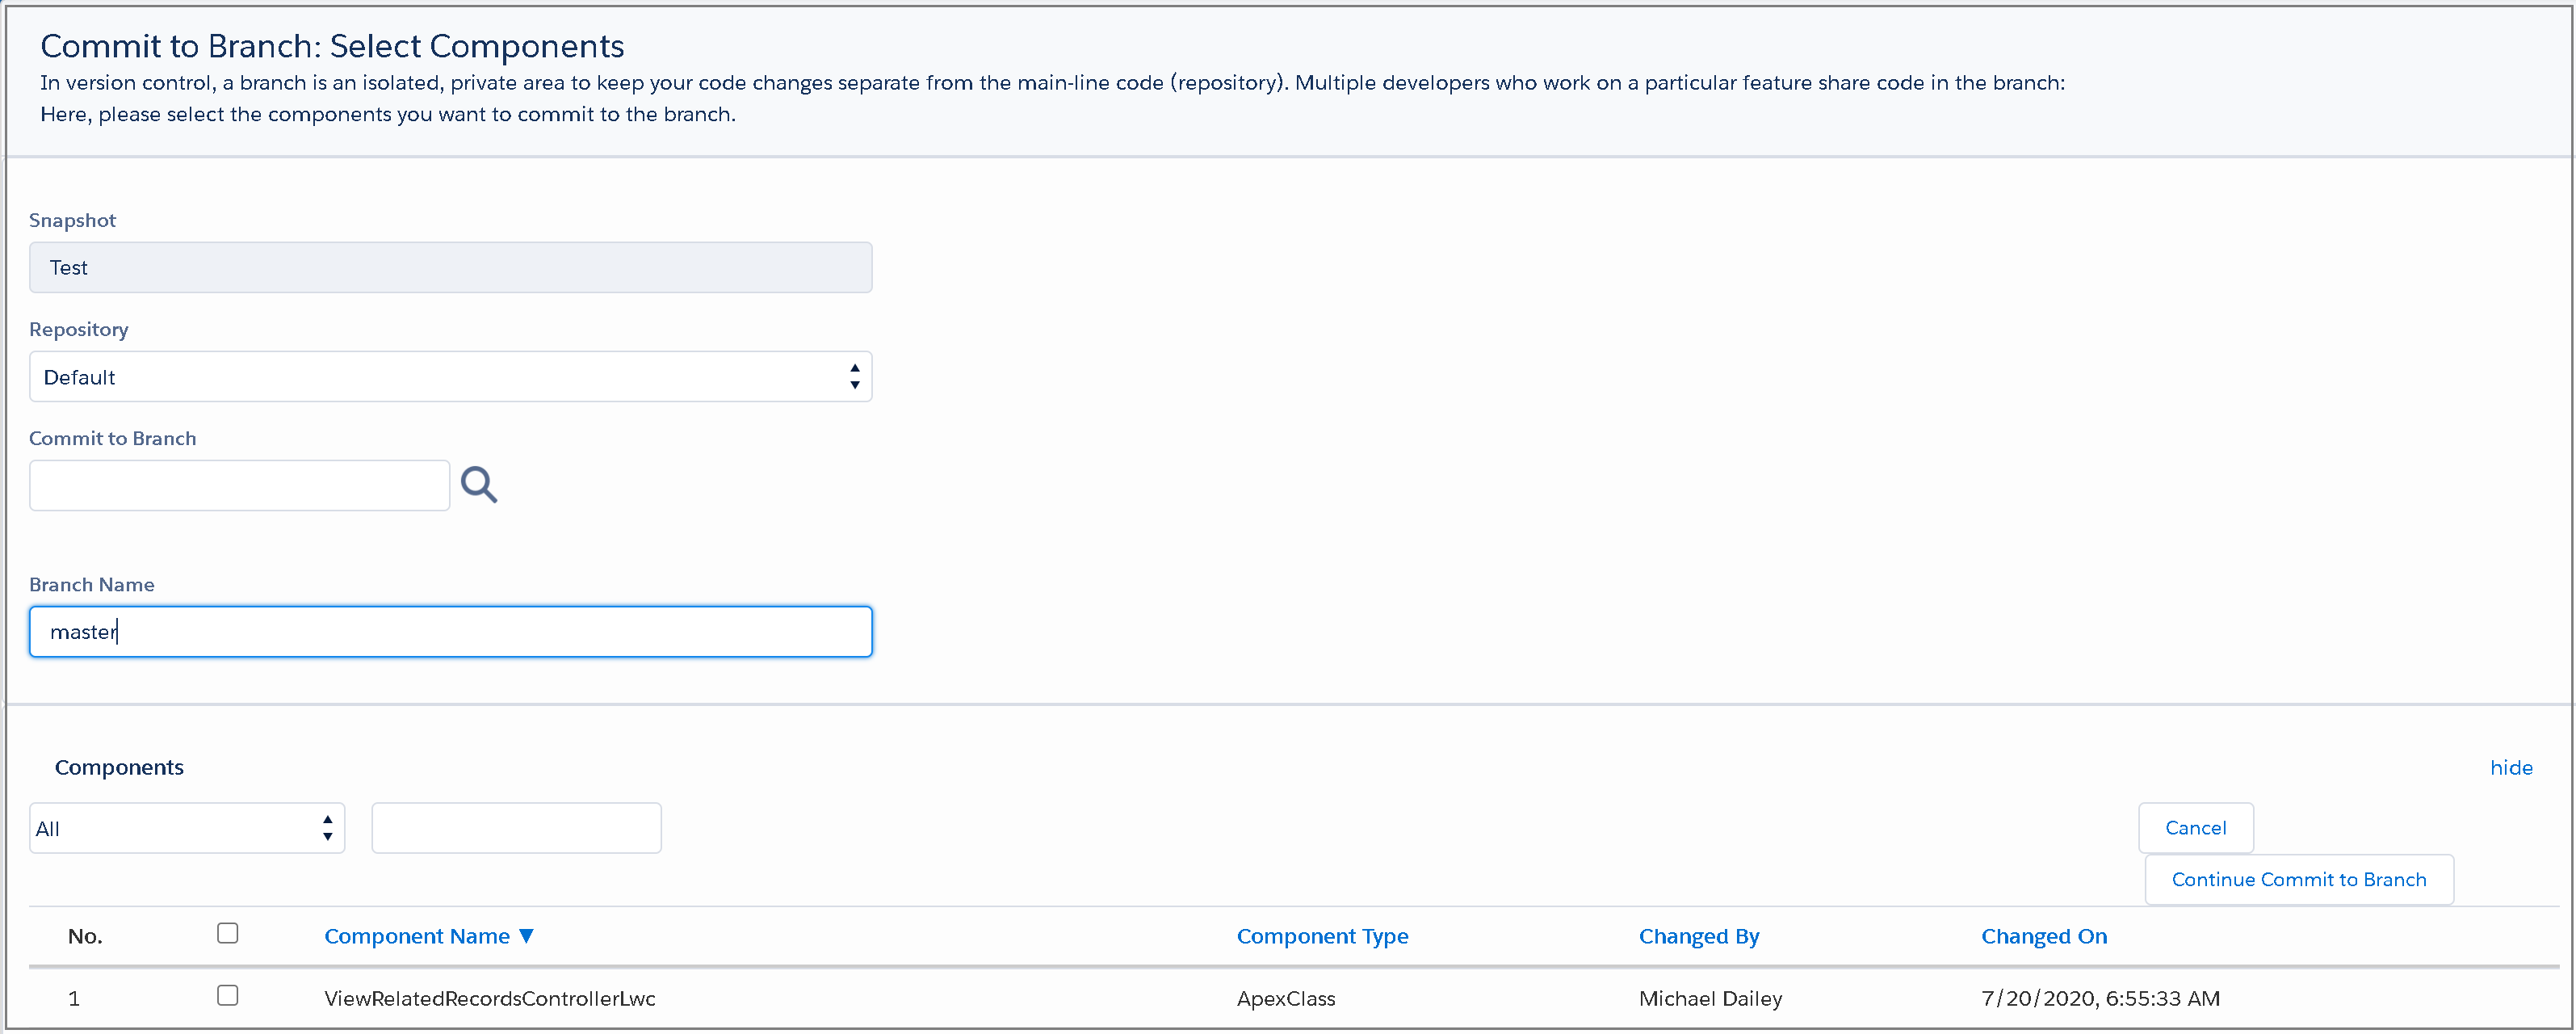
If you do not have an existing branch in Flosum (which you can check by selecting the search icon next to the Commit to Branch field), then you can enter a name in the Branch Name field and Flosum will automatically create that branch for you.
Next, you will select all of the components from the snapshot that you’d like to commit to the branch.

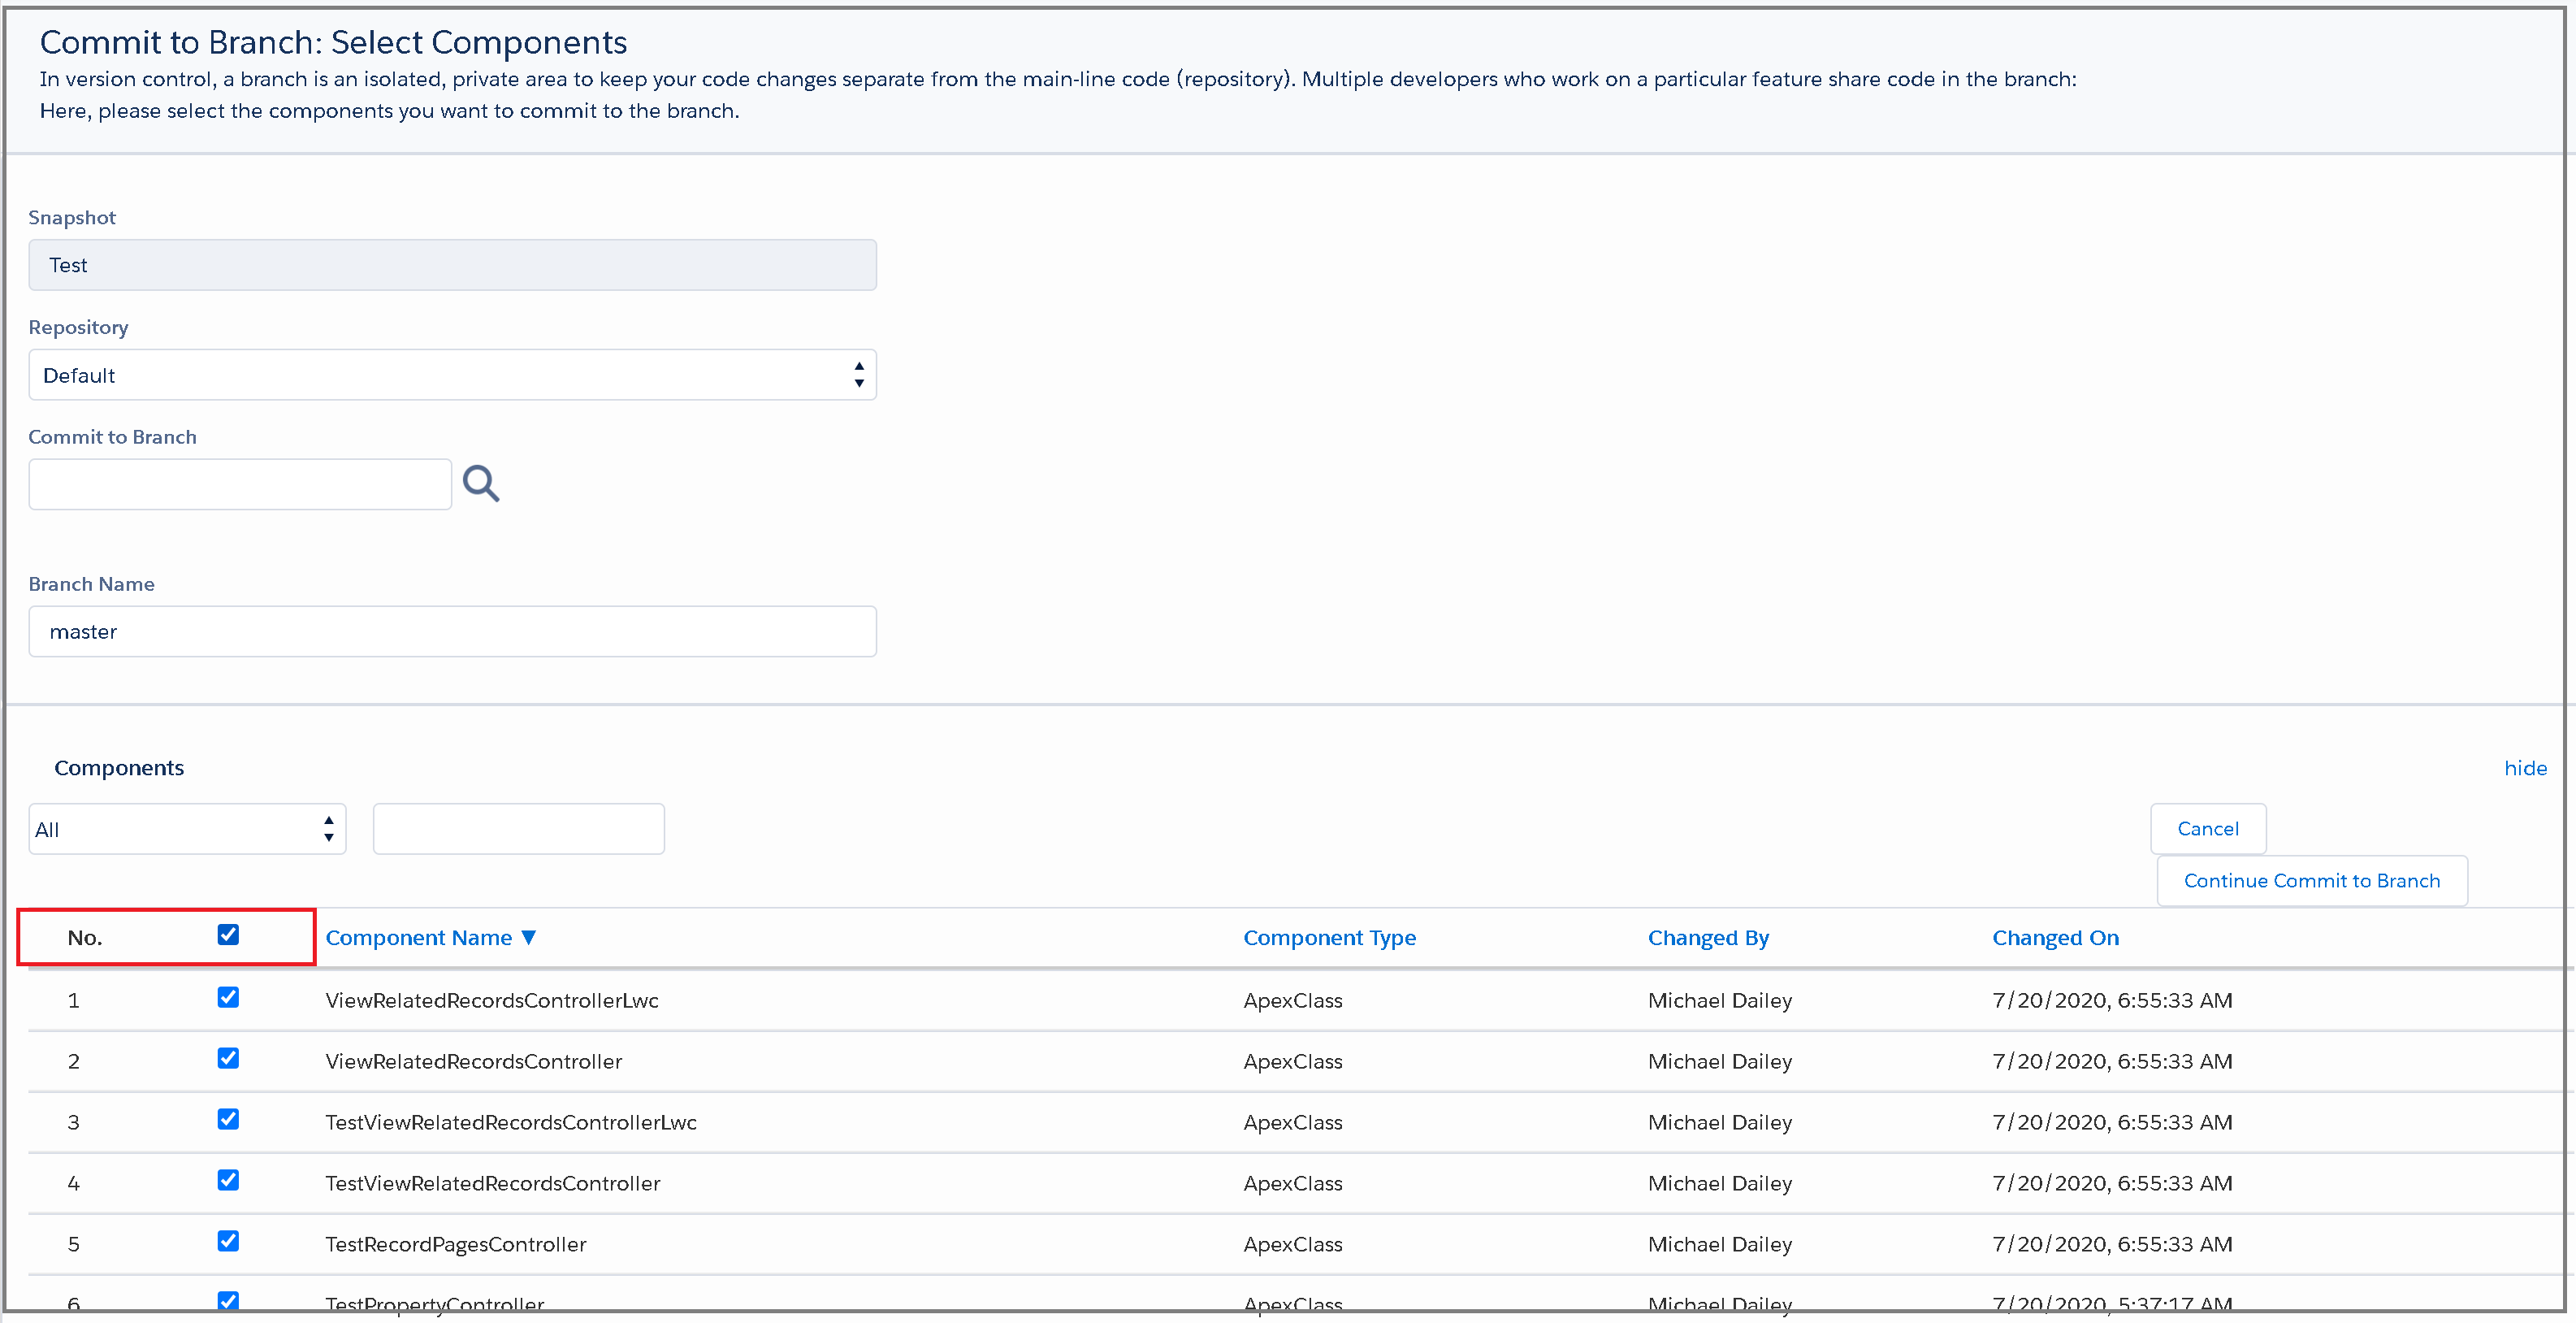
From there, select Continue Commit to Branch.

On the next screen, you need to verify all of the components you’d like to commit based on which components are considered safe to commit.
In this example, we’ve selected everything from our org snapshot. Once you’re happy with it, select Continue Commit to Branch to officially commit these components to the branch in Flosum.

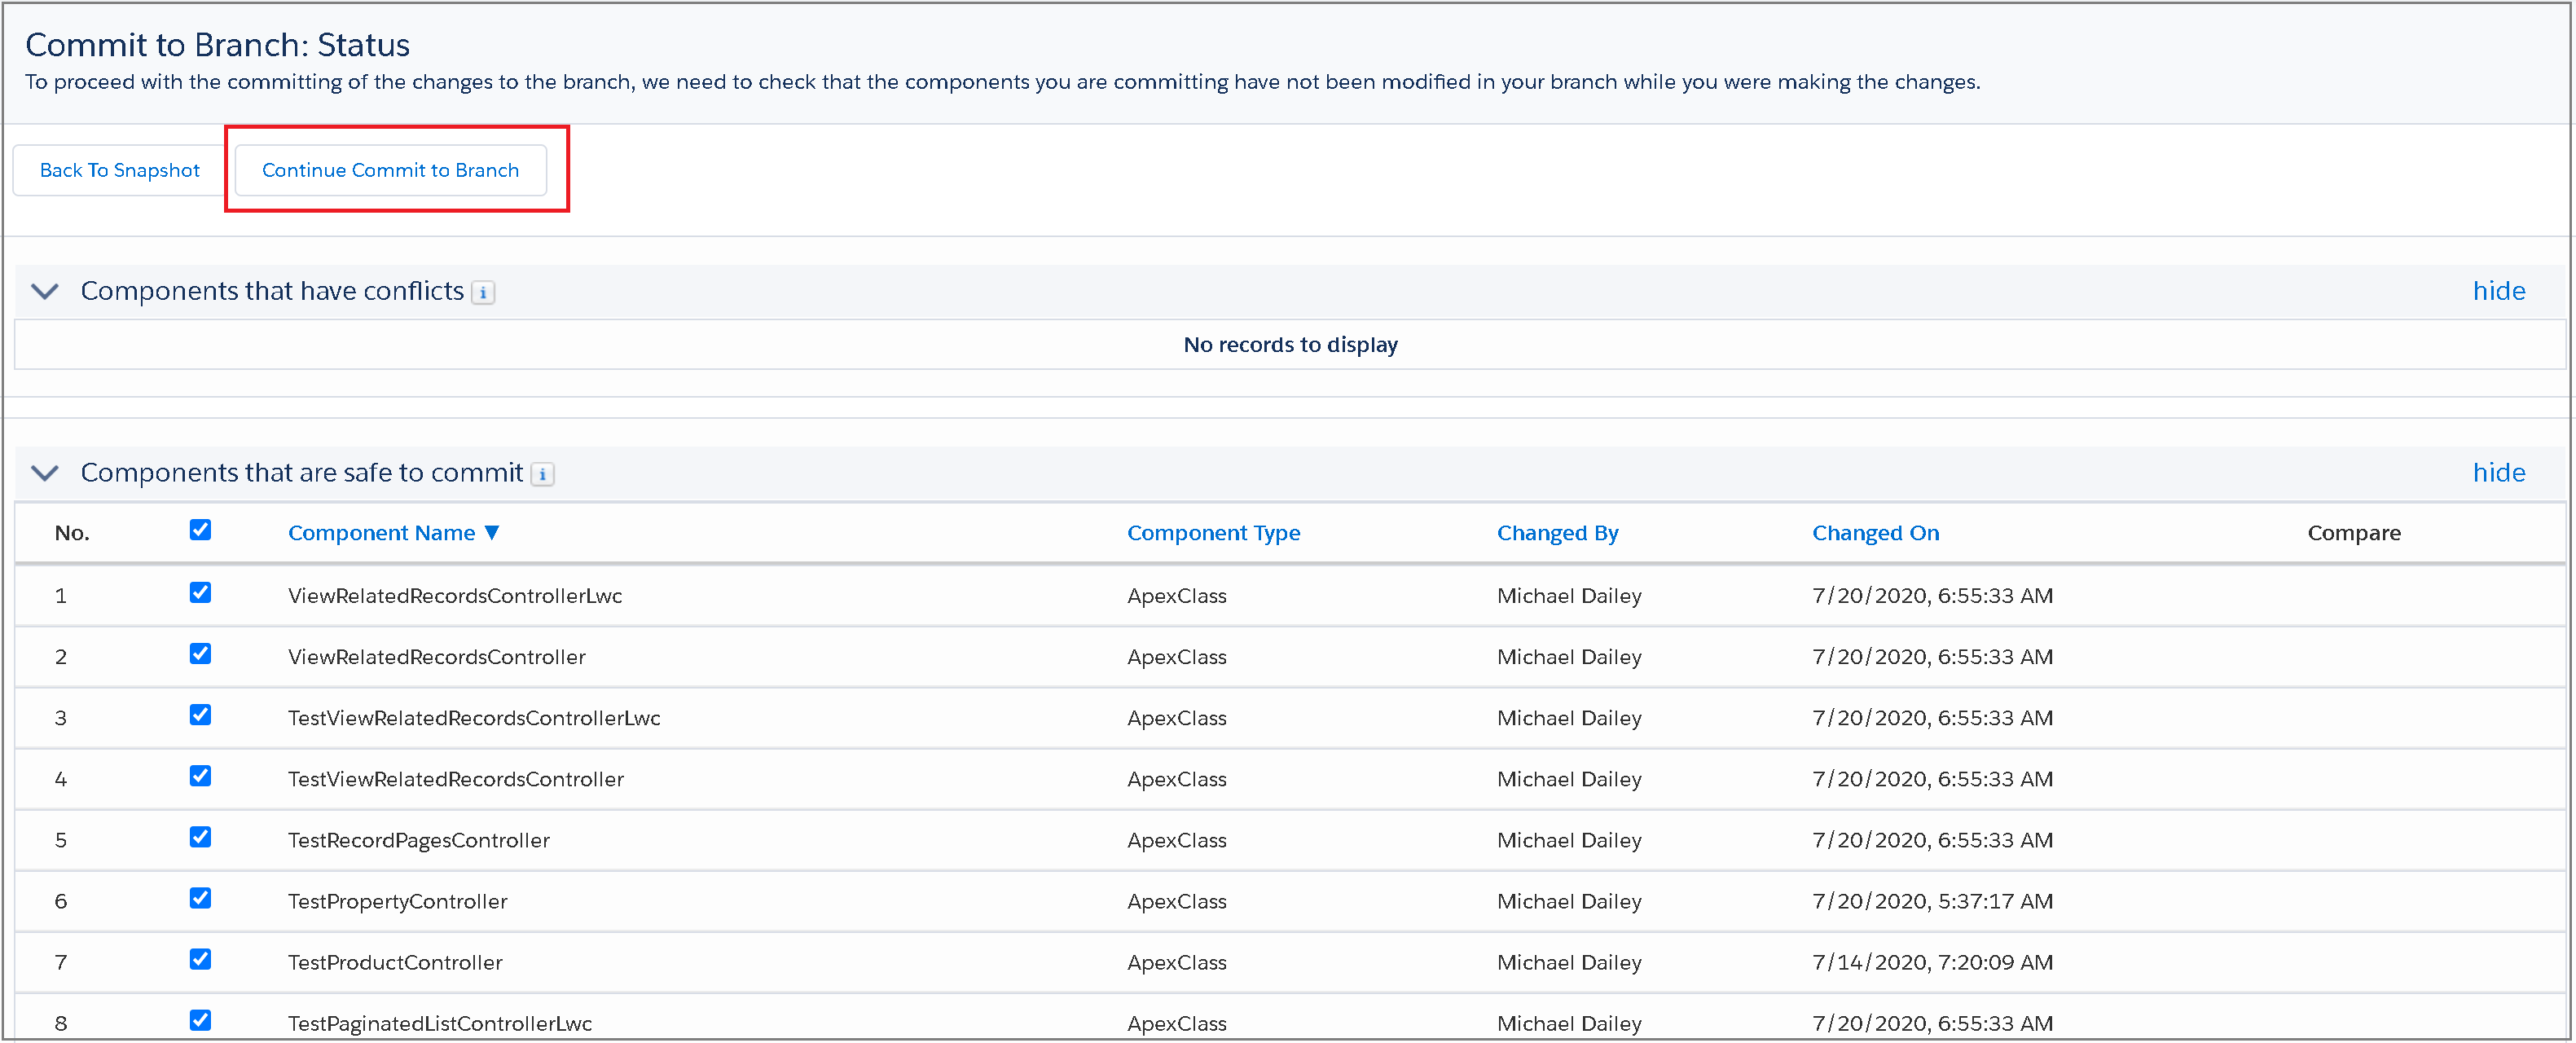
It will take Flosum a minute to process the commit, and then it will navigate you to the Branch view as shown below.

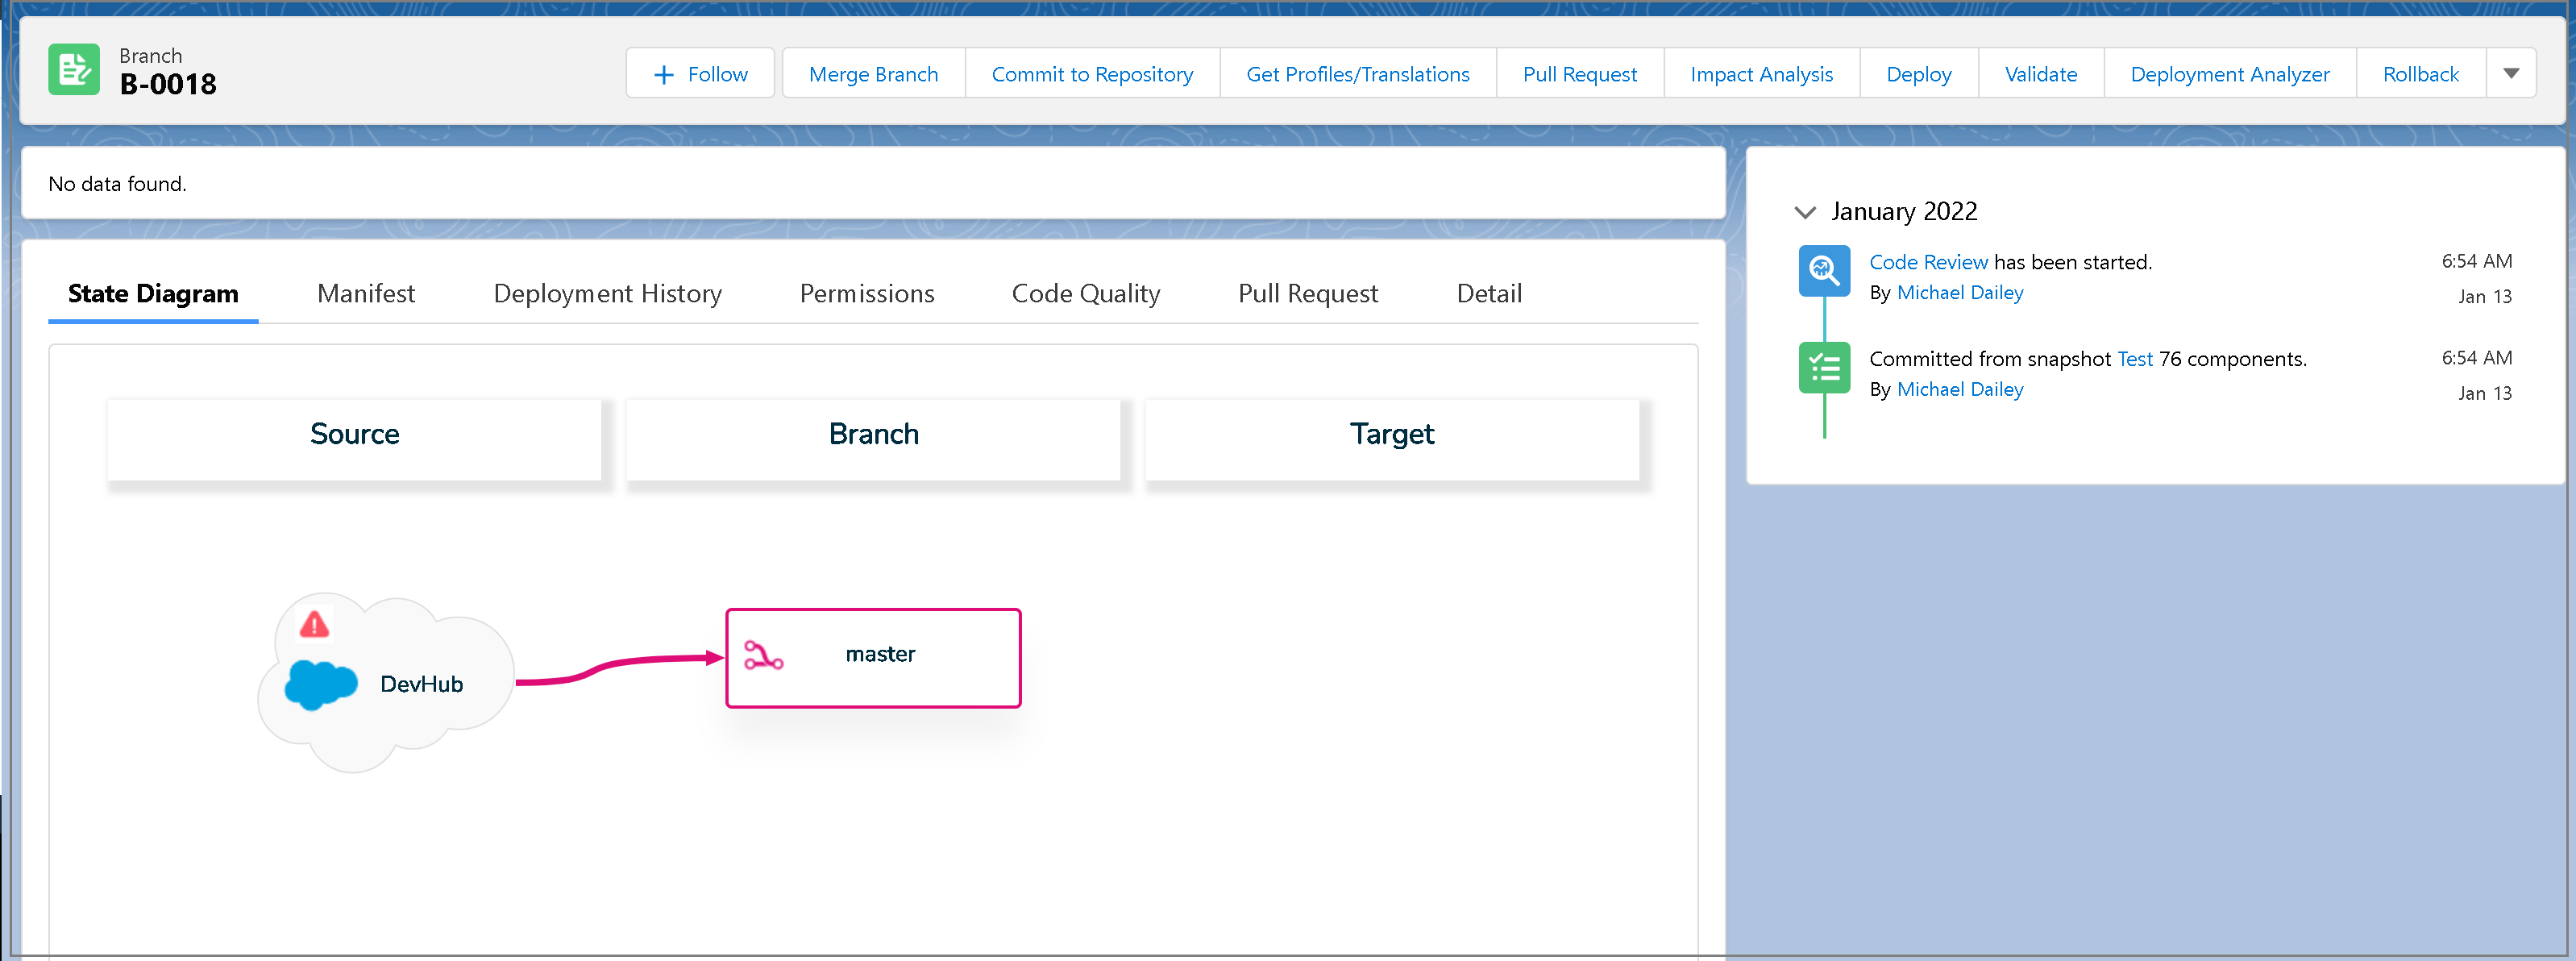
Now that you have a branch, we can begin setting up your Flosum Pipeline.
Creating a Webhook
To create a webhook in Flosum, navigate to the Settings tab and select webhooks.

Click Add Webhook and enter in the Webhook Name, URL, and your Jenkins authentication. For the Jenkins authentication, the password must be replaced with a valid Jenkins API Token generated by the same user you are using to authenticate. This has to be set up properly from the Jenkins server prior to adding the webhook here.
The URL needs to be the build URL pointing to a specific Jenkins job. Please see the example given below.
Jenkins URL: https://demojenkins.com:8080
Job Name: FlosumTrigger
Build Parameters: TEST_PLAN=Regression, BUILD_FILE=build.xml
API Token Name: FlosumToken
Then the webhook URL would be the following:
You can also find this URL underneath the Build Triggers section on your Jenkins job.
A reminder here that the URL of the Jenkins server must be reachable from your Salesforce Org. If your Jenkins server is behind a proxy or firewall, then it needs to be opened up to allow traffic from Salesforce IP ranges.

Also, remember to check the Wait callback response from service to wait for the Jenkins webhook to return successfully before continuing to the next Pipeline step.
Now that the webhook is created, you can continue on to the pipeline creation.
Creating a Pipeline
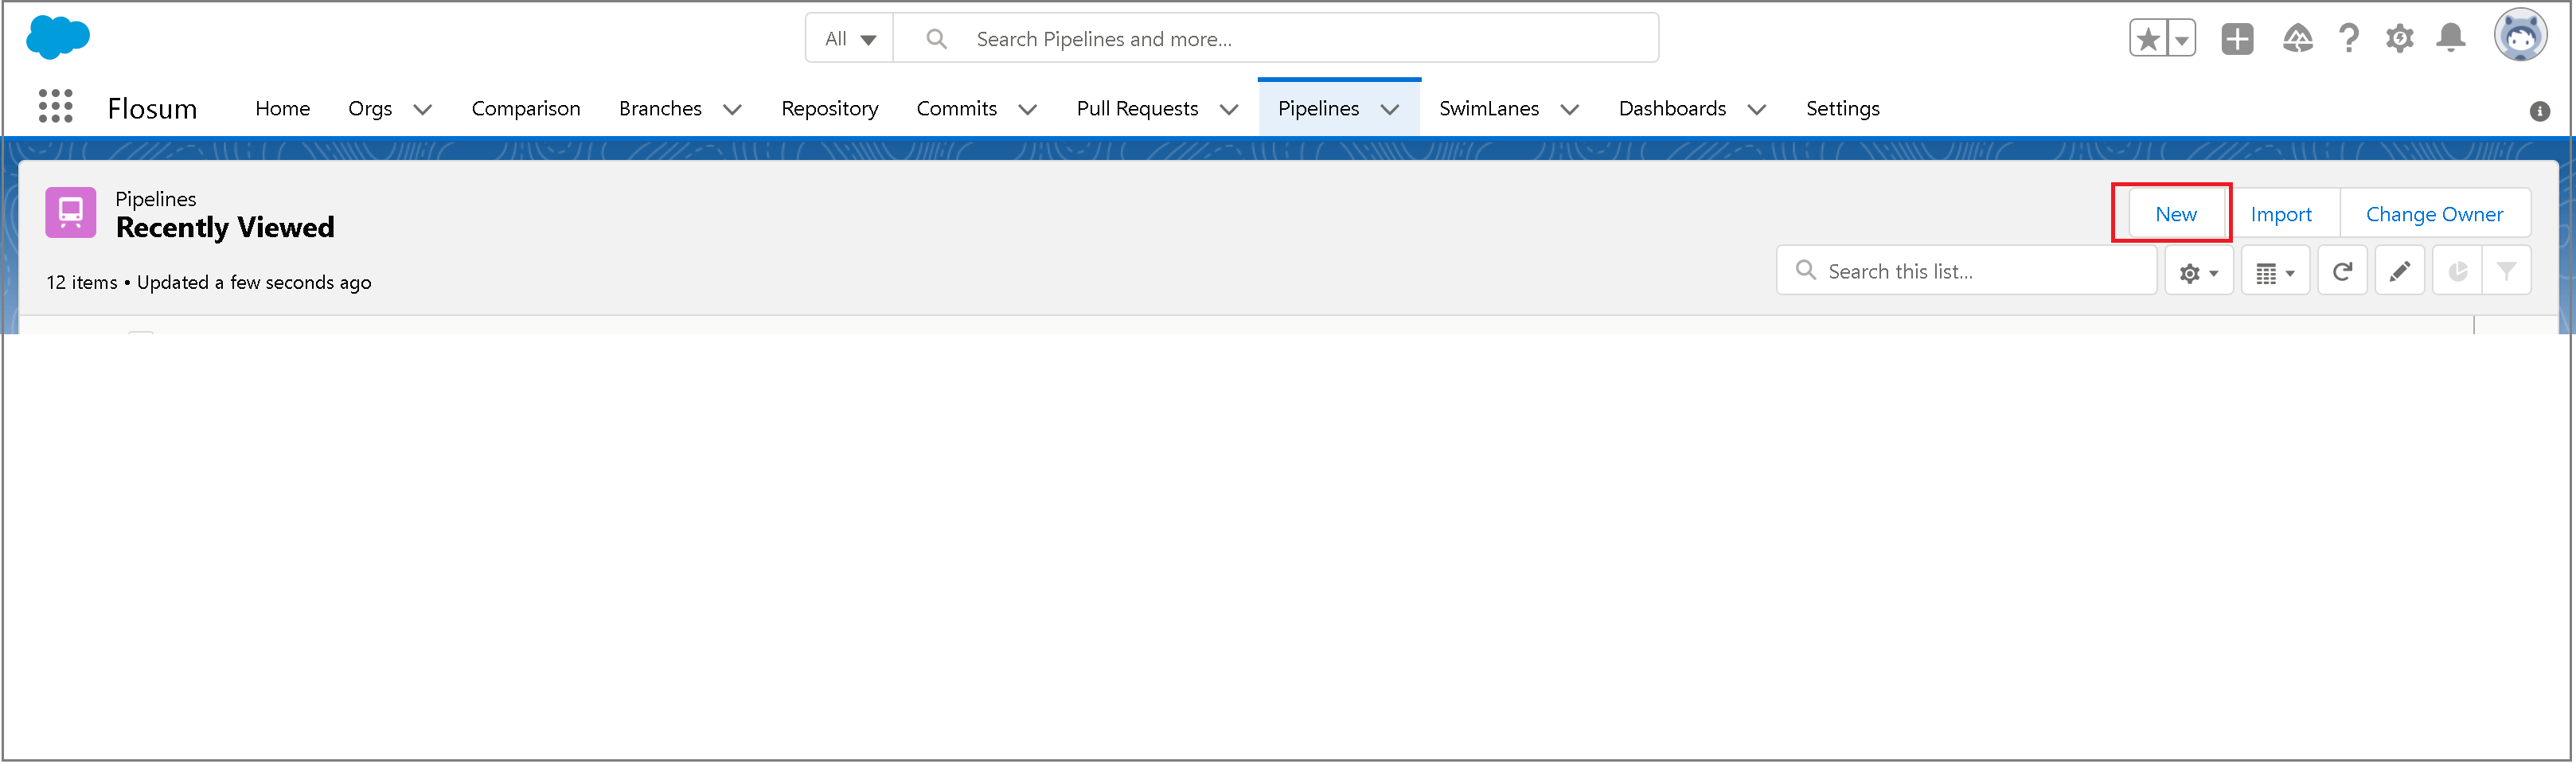
To create a Pipeline in Flosum, navigate to the Pipelines tab and select New.

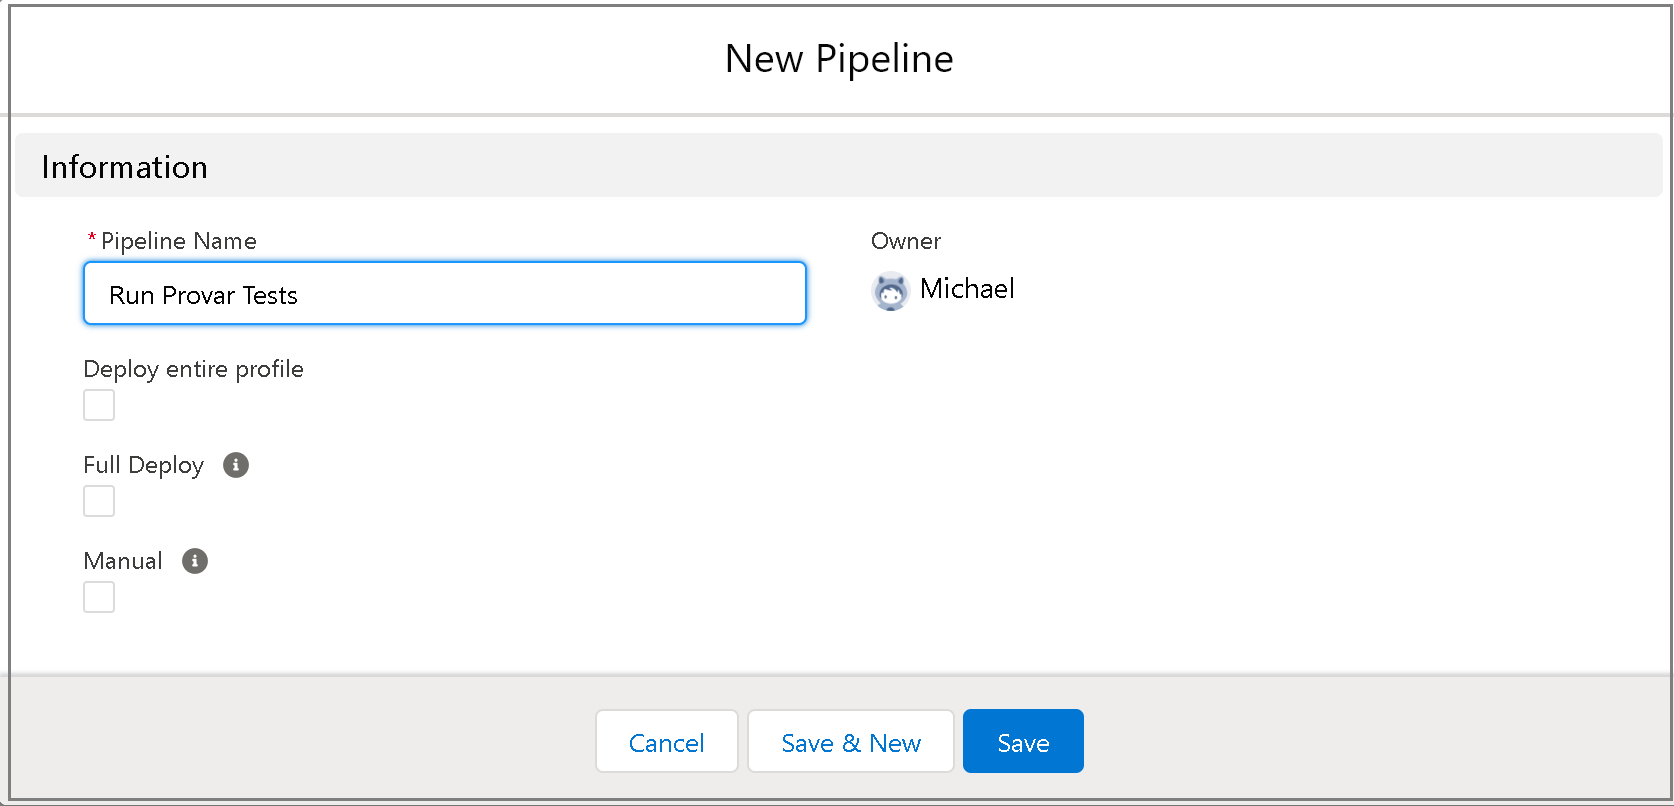
Enter the Pipeline Name, and leave the rest as the default.

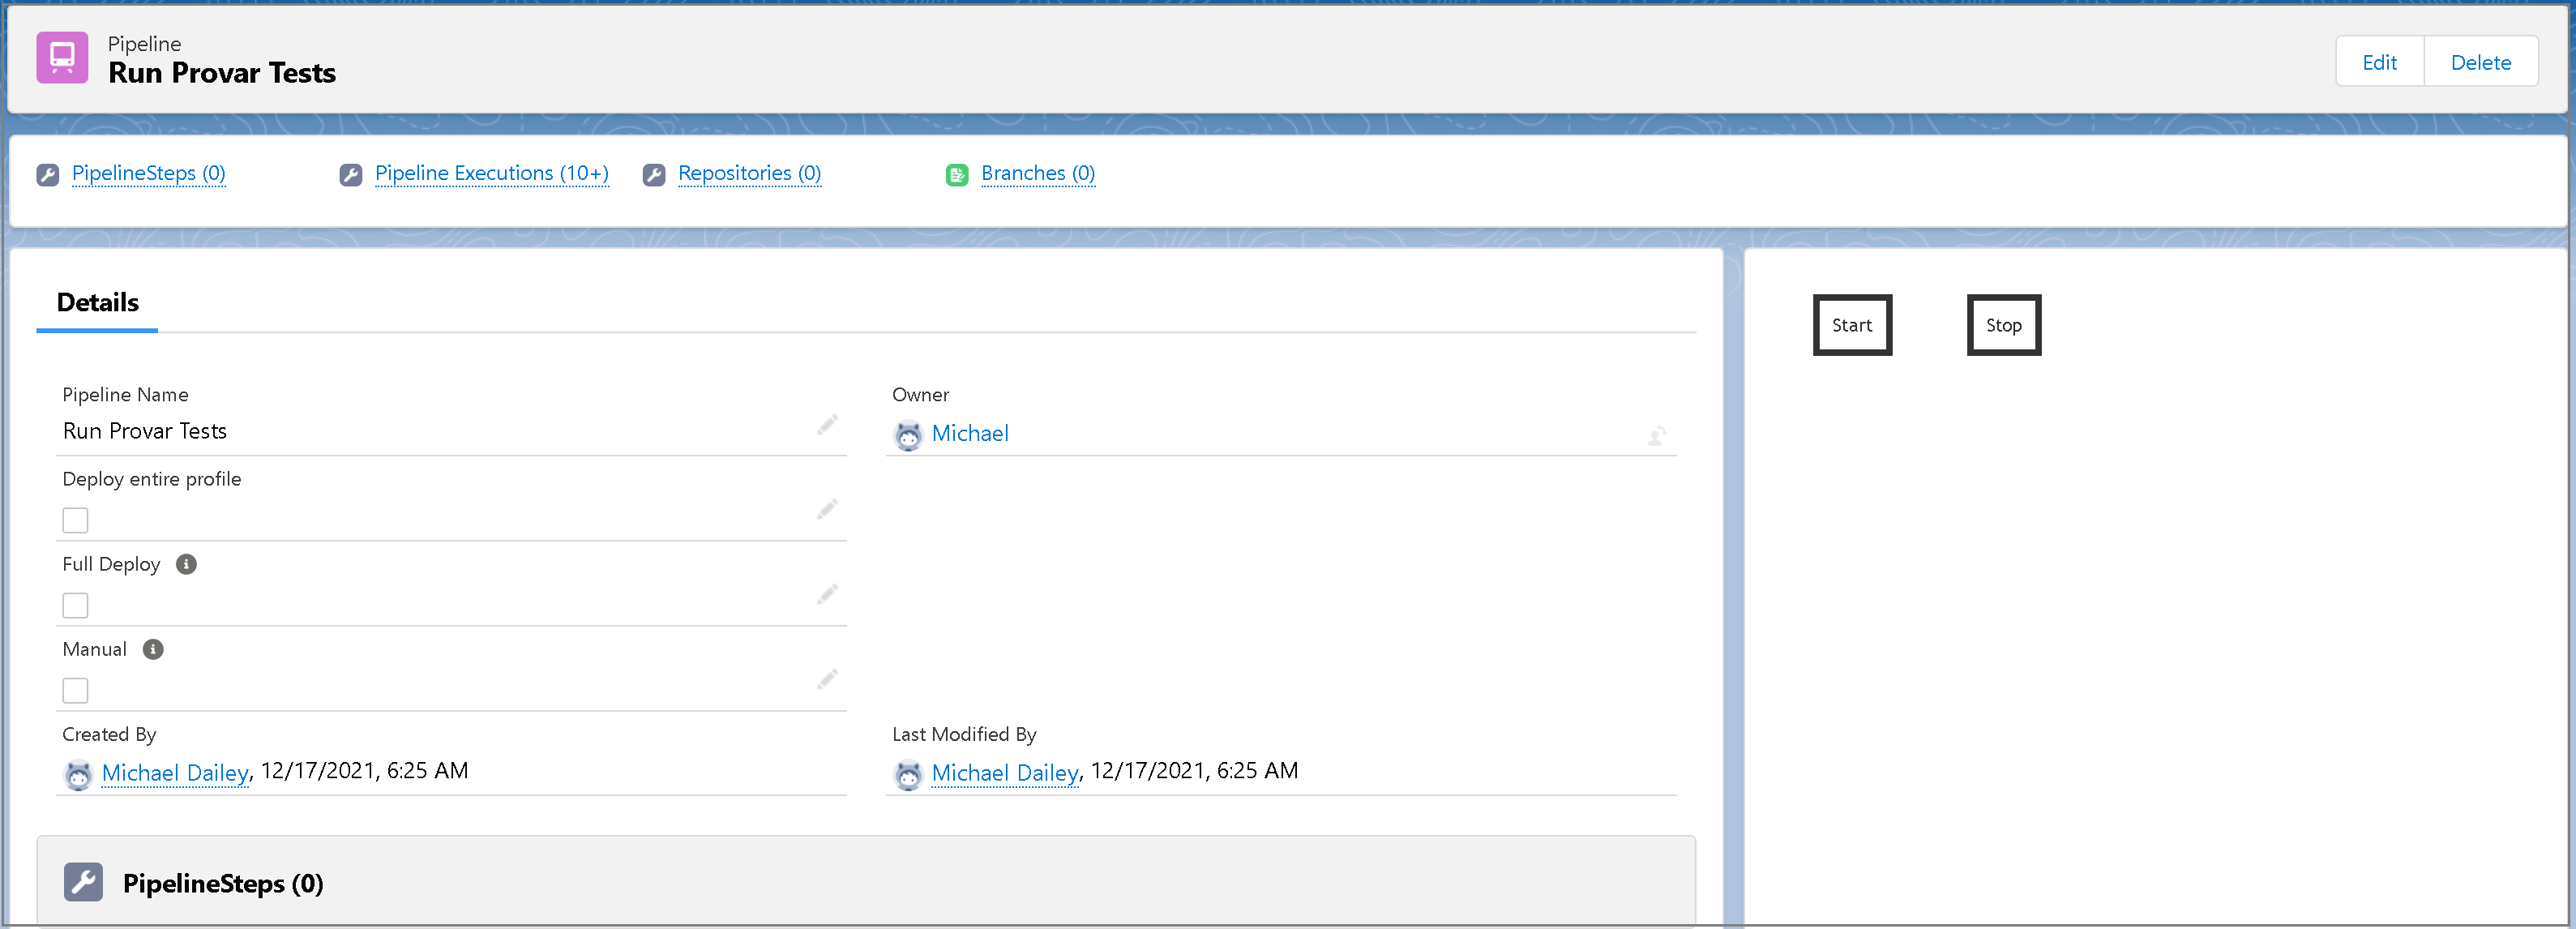
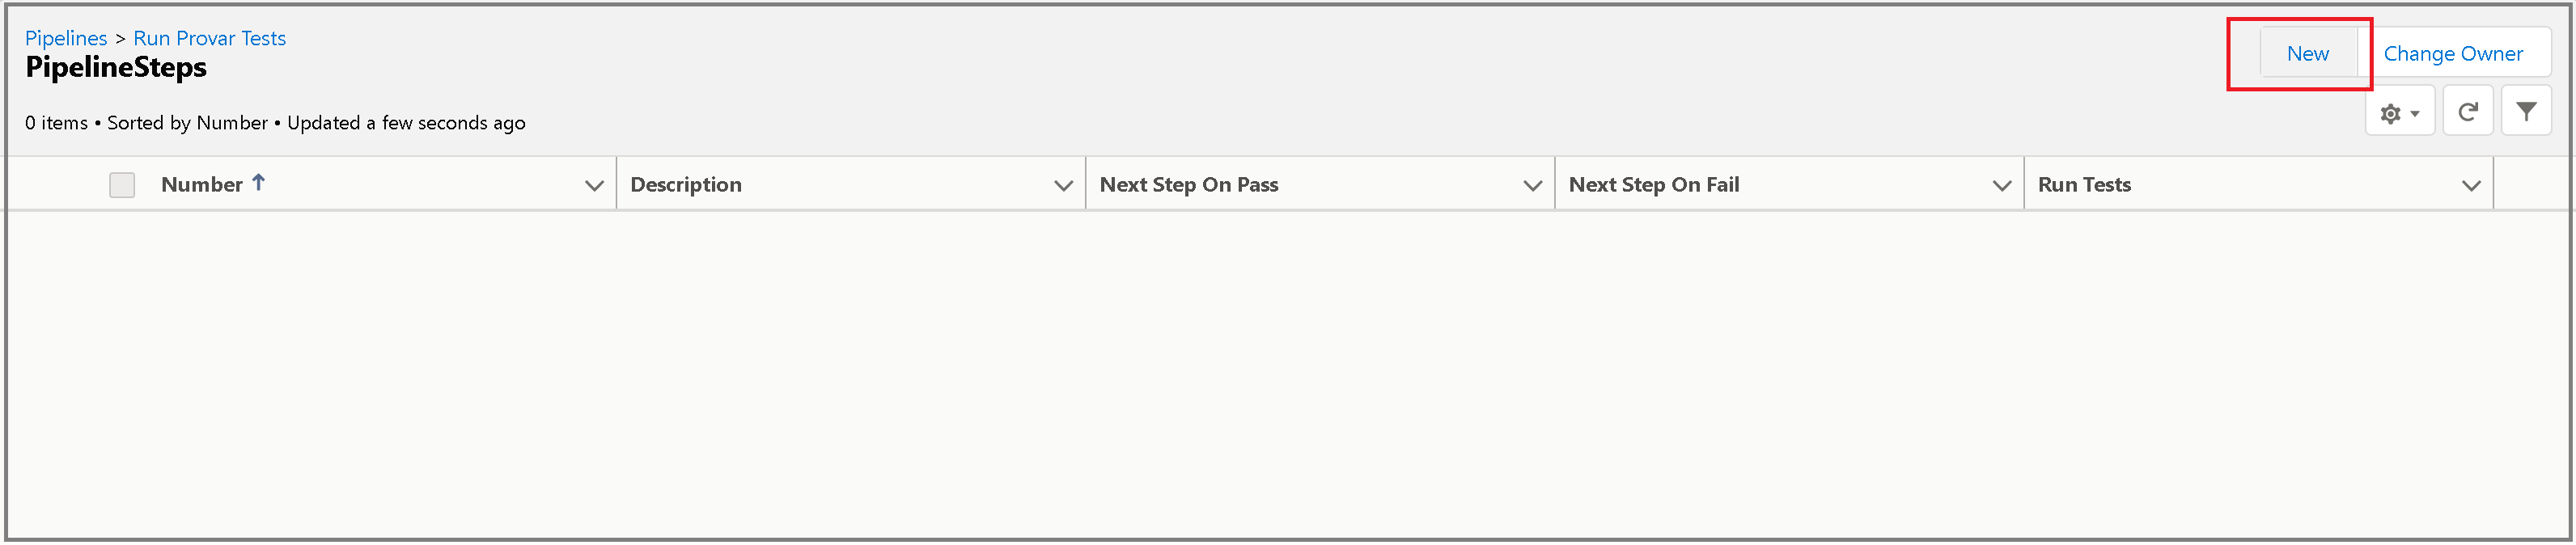
Next, you need to add some Pipeline steps. Select Pipeline Steps and once it loads, click New.


We’ve named our webhook Jenkins, so this is what the step looks like.

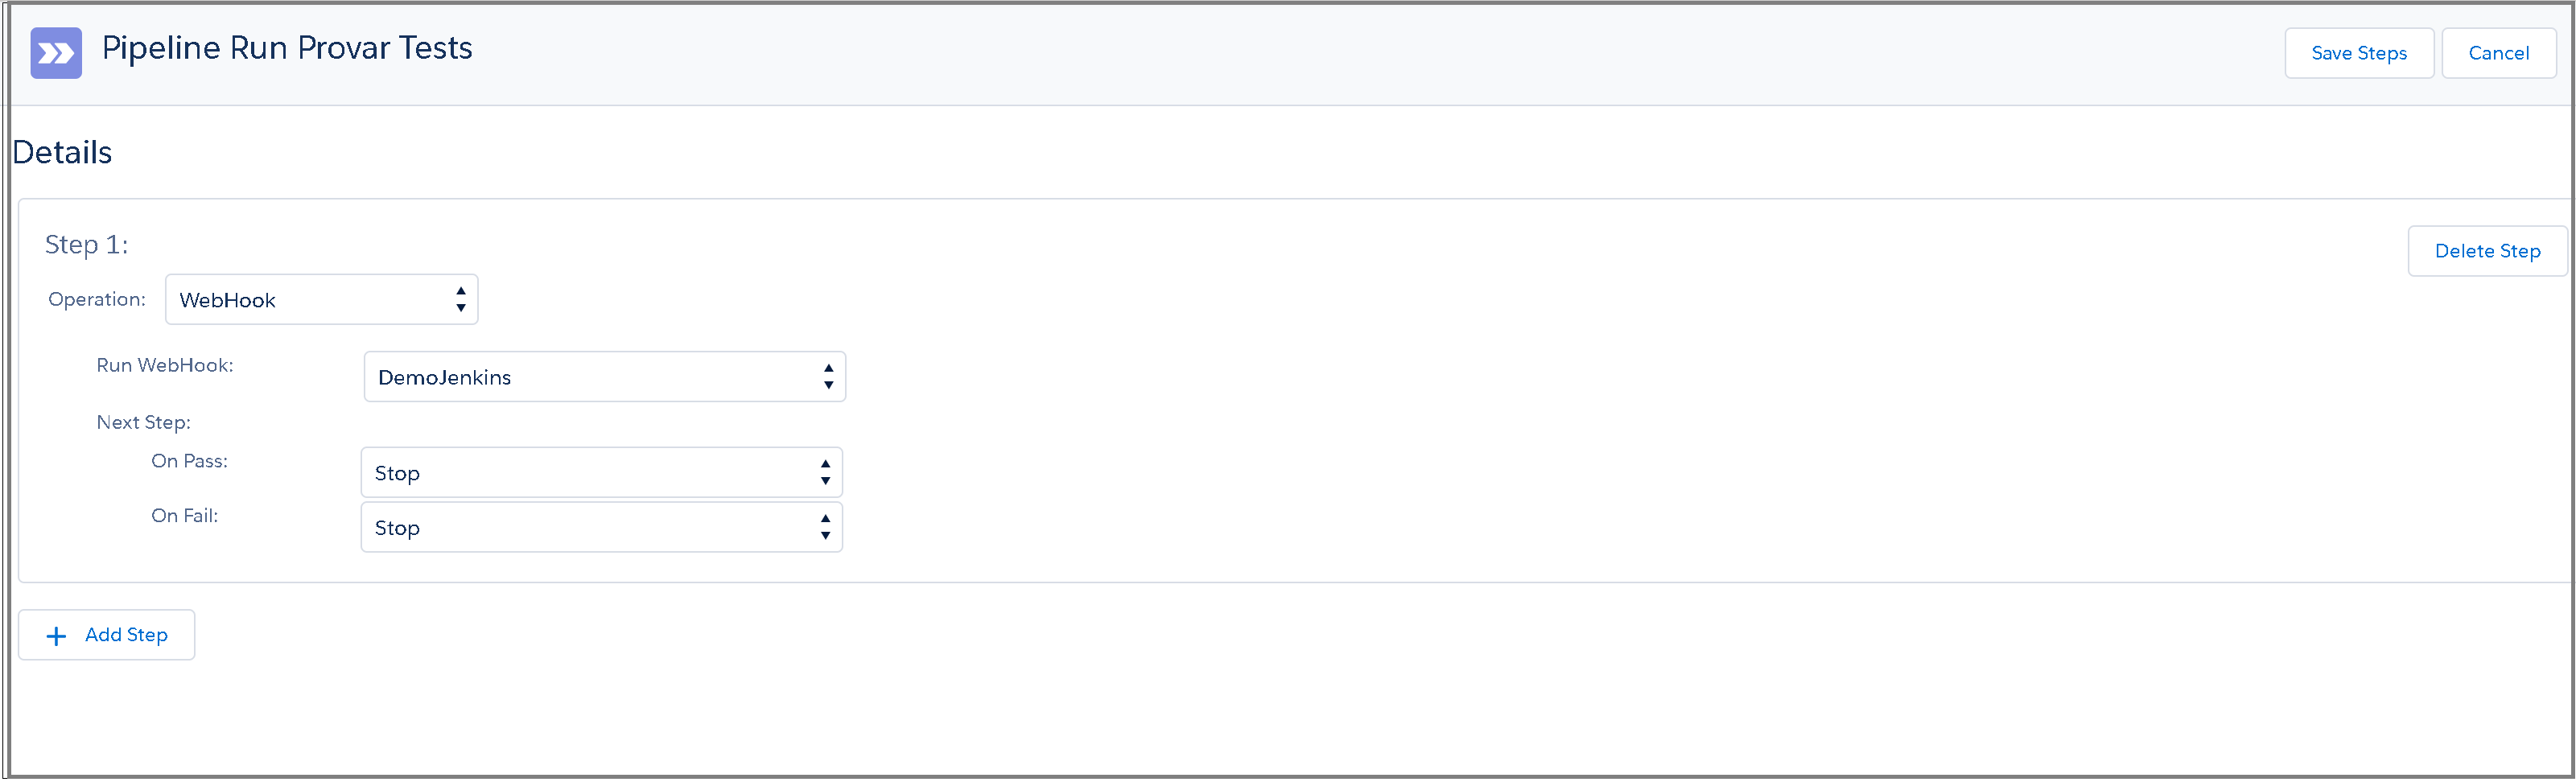
Since there is no next step here, the On Pass and On Fail fields can be left as Stop for now.
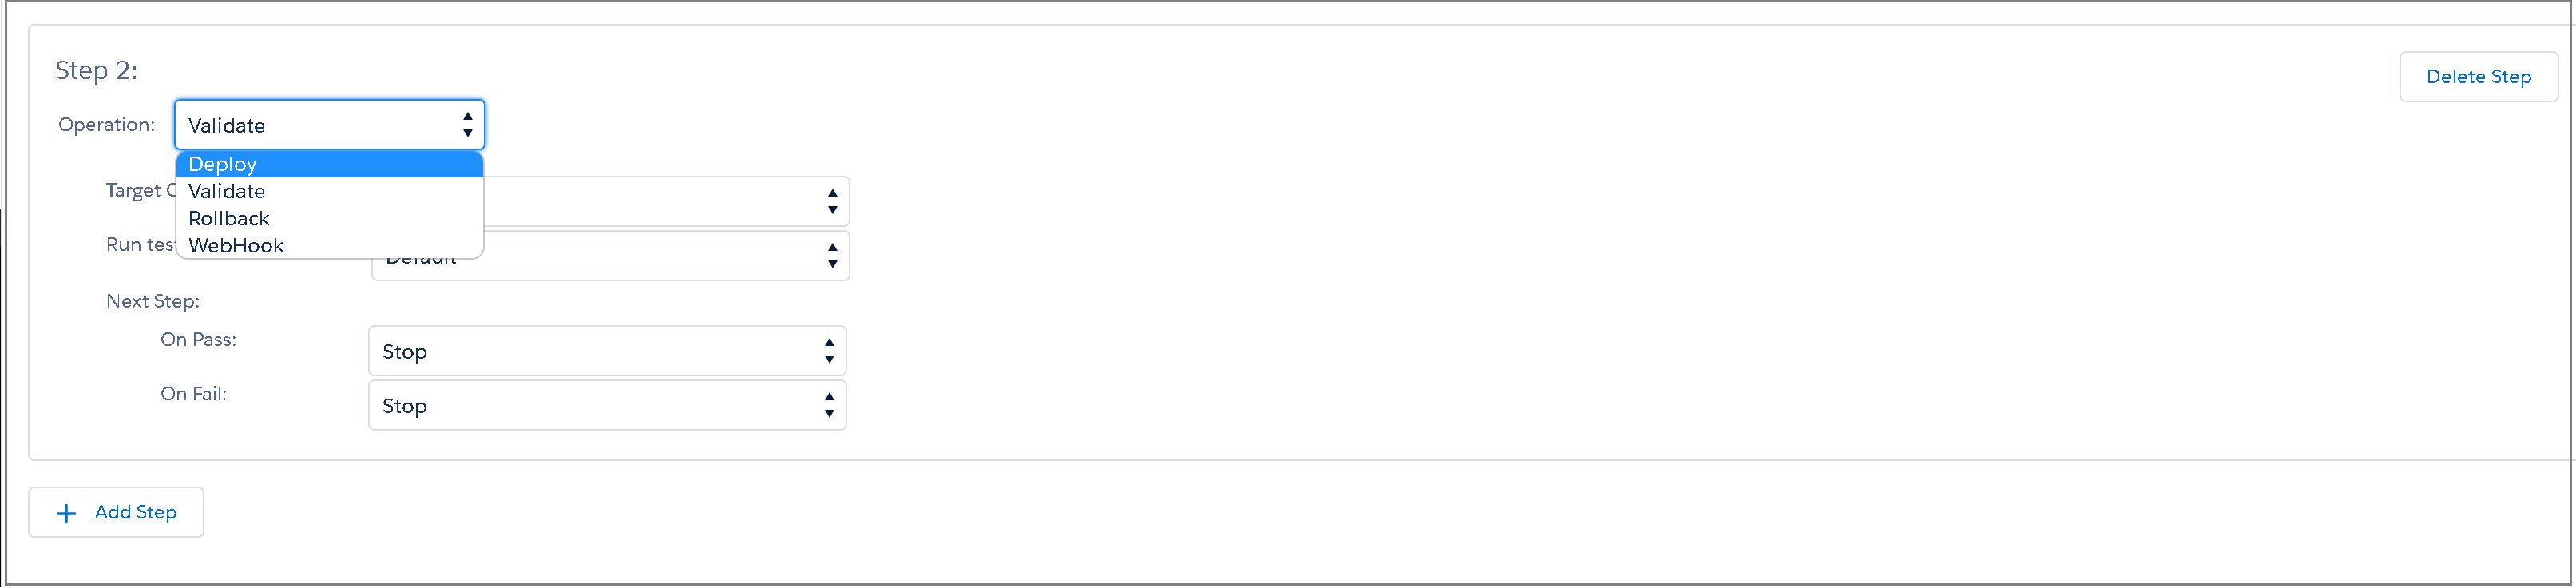
For the purposes of this integration, our pipeline only has a single step that will trigger our webhook to kick off our Automation tests. For a practical pipeline, you would have multiple pipeline steps that include deployment, validation, and rollback.

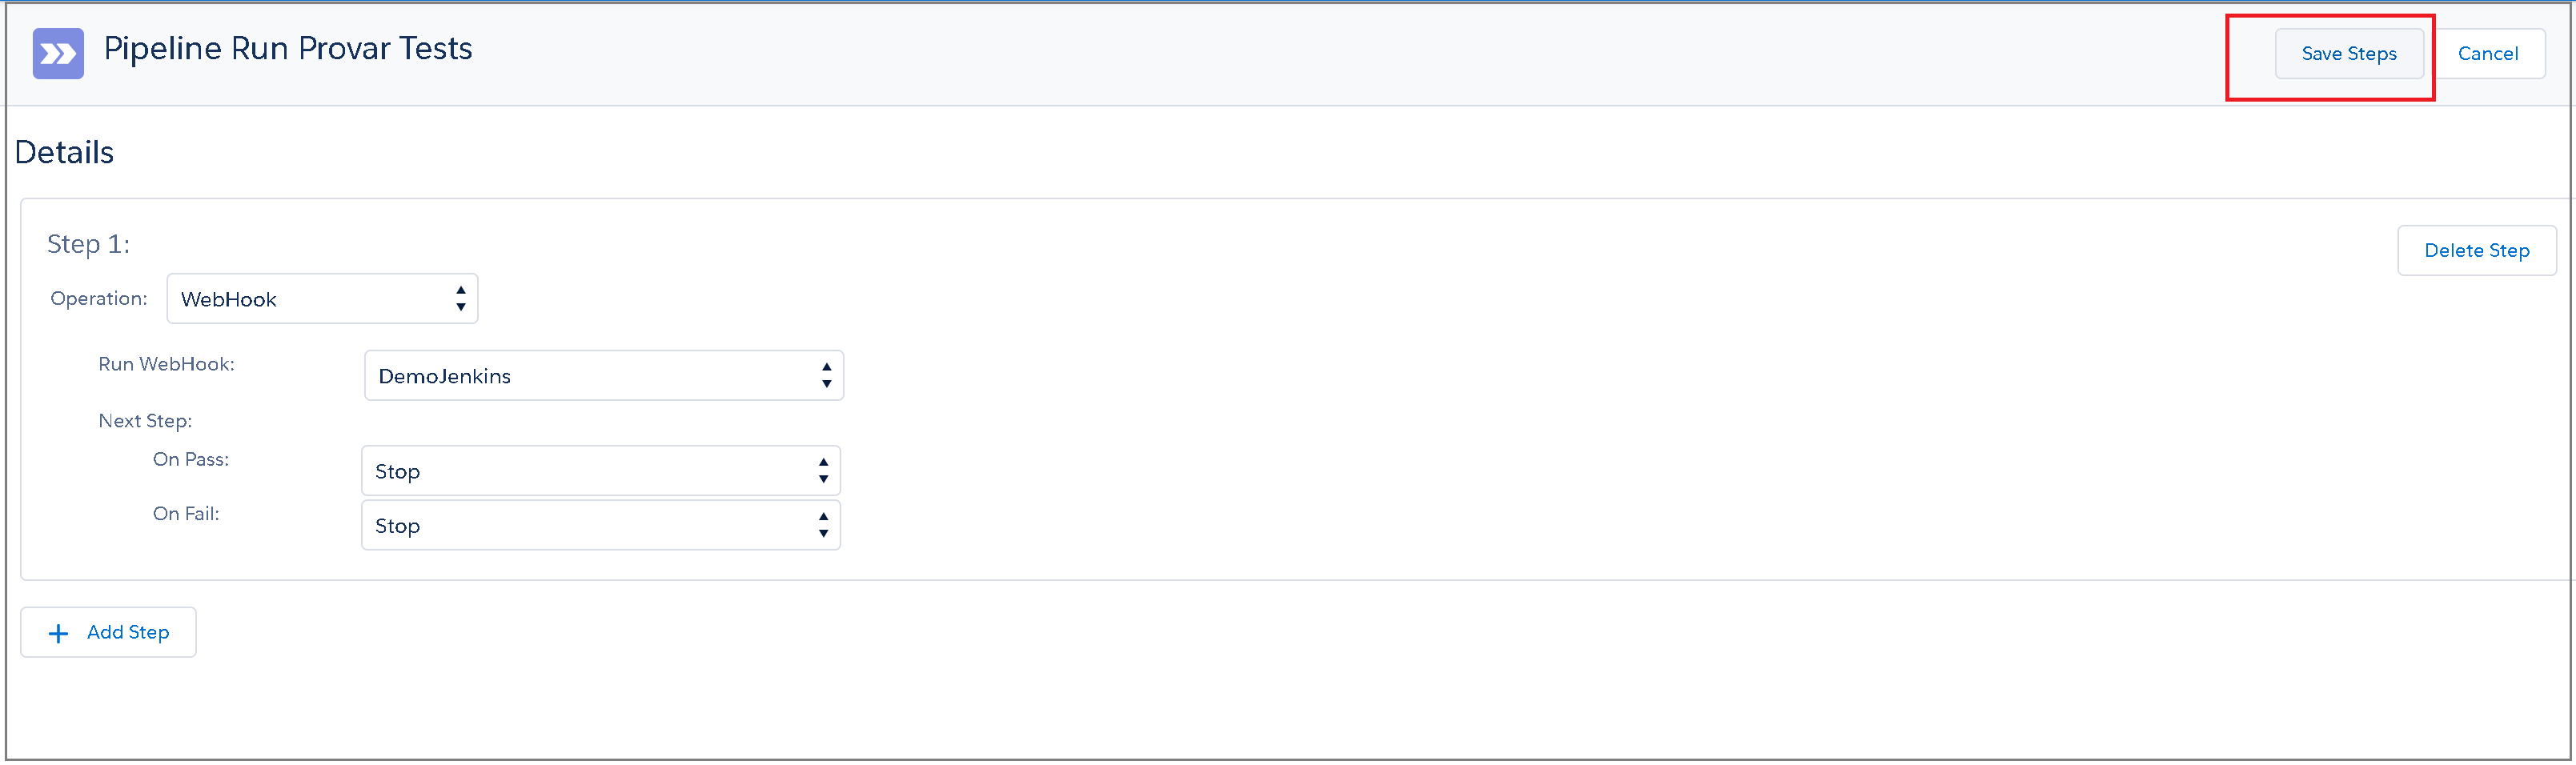
Once you’ve added all of the necessary Pipeline steps, click Save Steps.

The Pipeline is set up and is ready to be queued from the Branch we created earlier. Navigate to the Branch view screen for the branch we committed to earlier. From the branch, we can run the Pipeline directly.

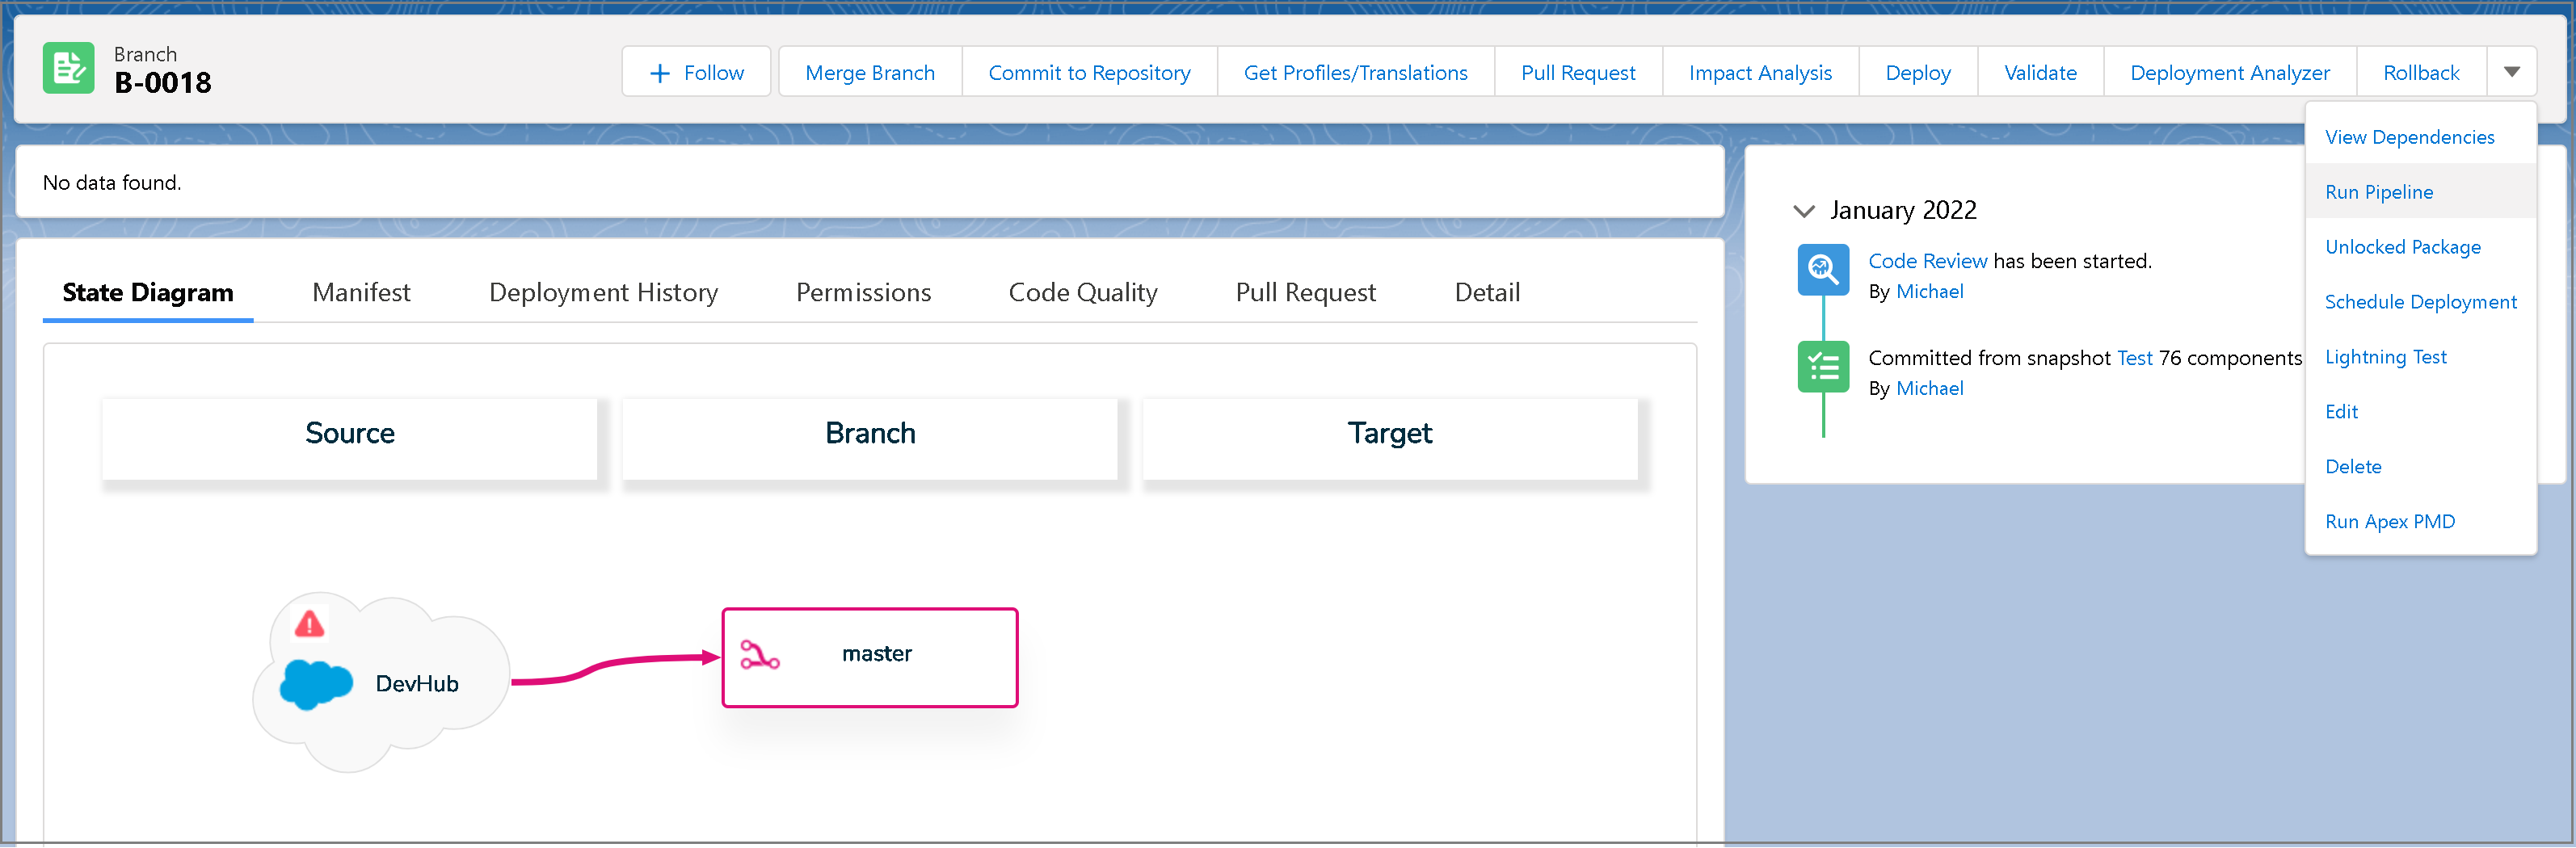
Select the Pipeline you just created.

You can view the Pipeline results from the Pipeline Executions related list from the Pipeline view, or you can view the Deployment History from the branch view.

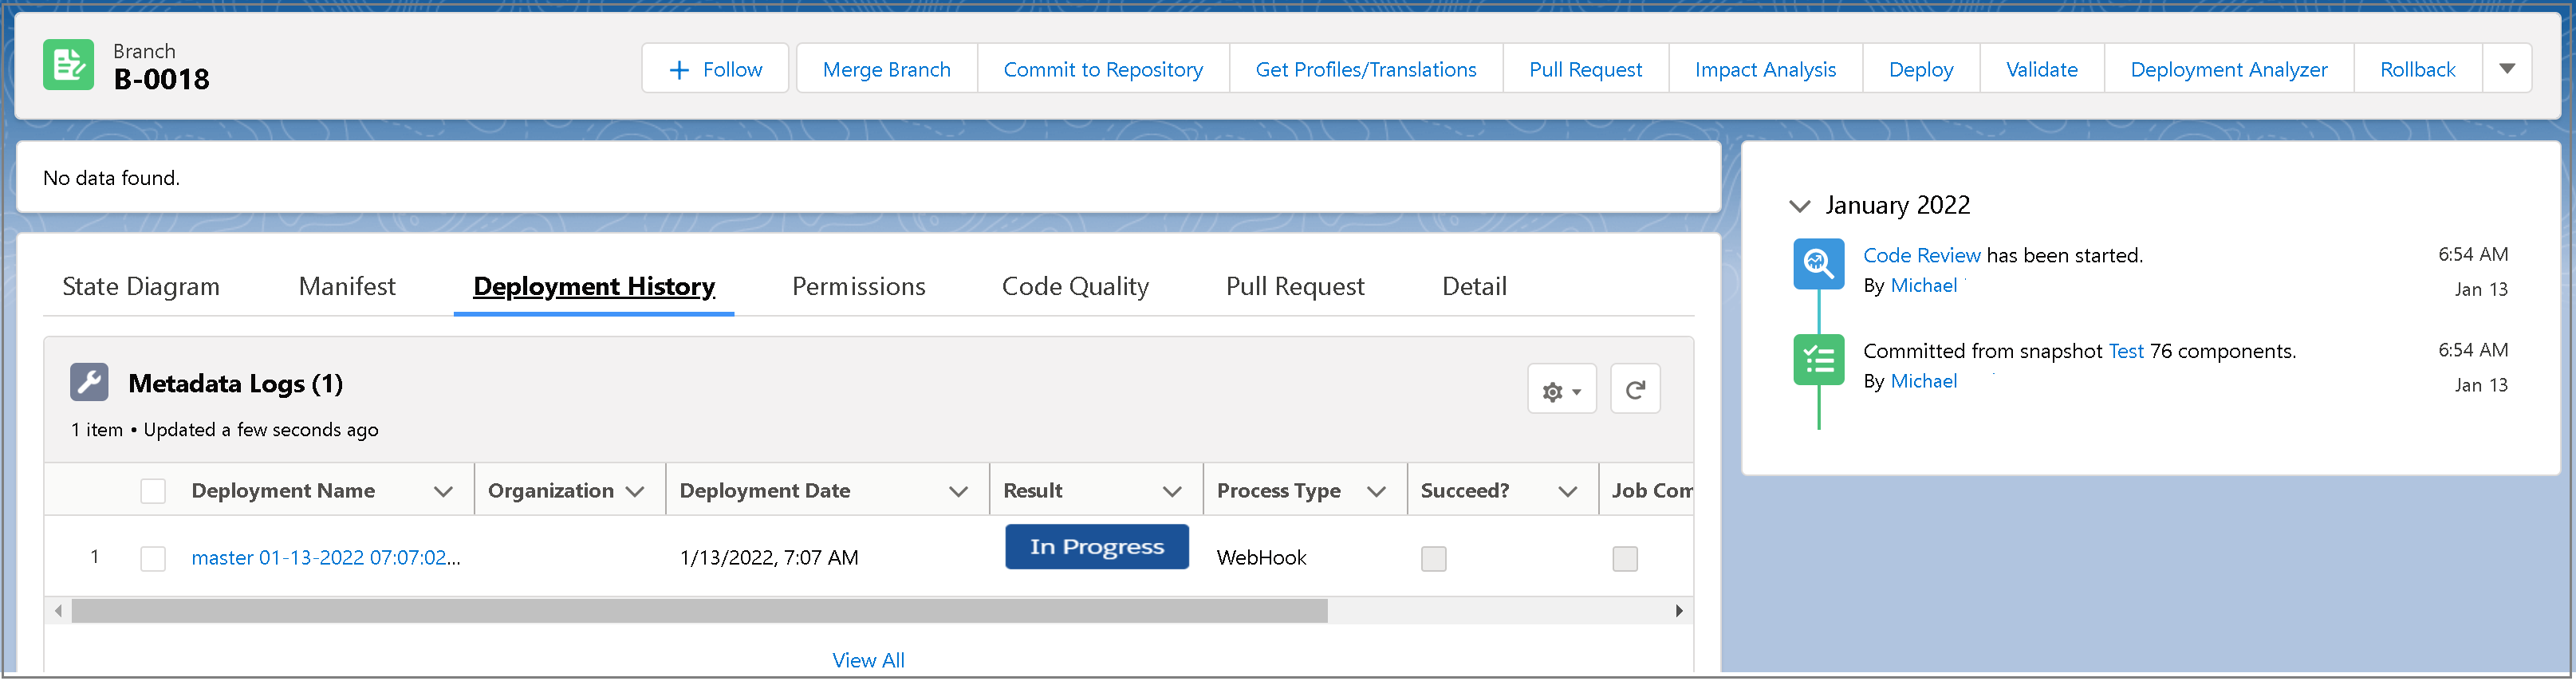
If you navigate to the Deployment History >Metadata Logs you’ll see the result of each Pipeline execution.

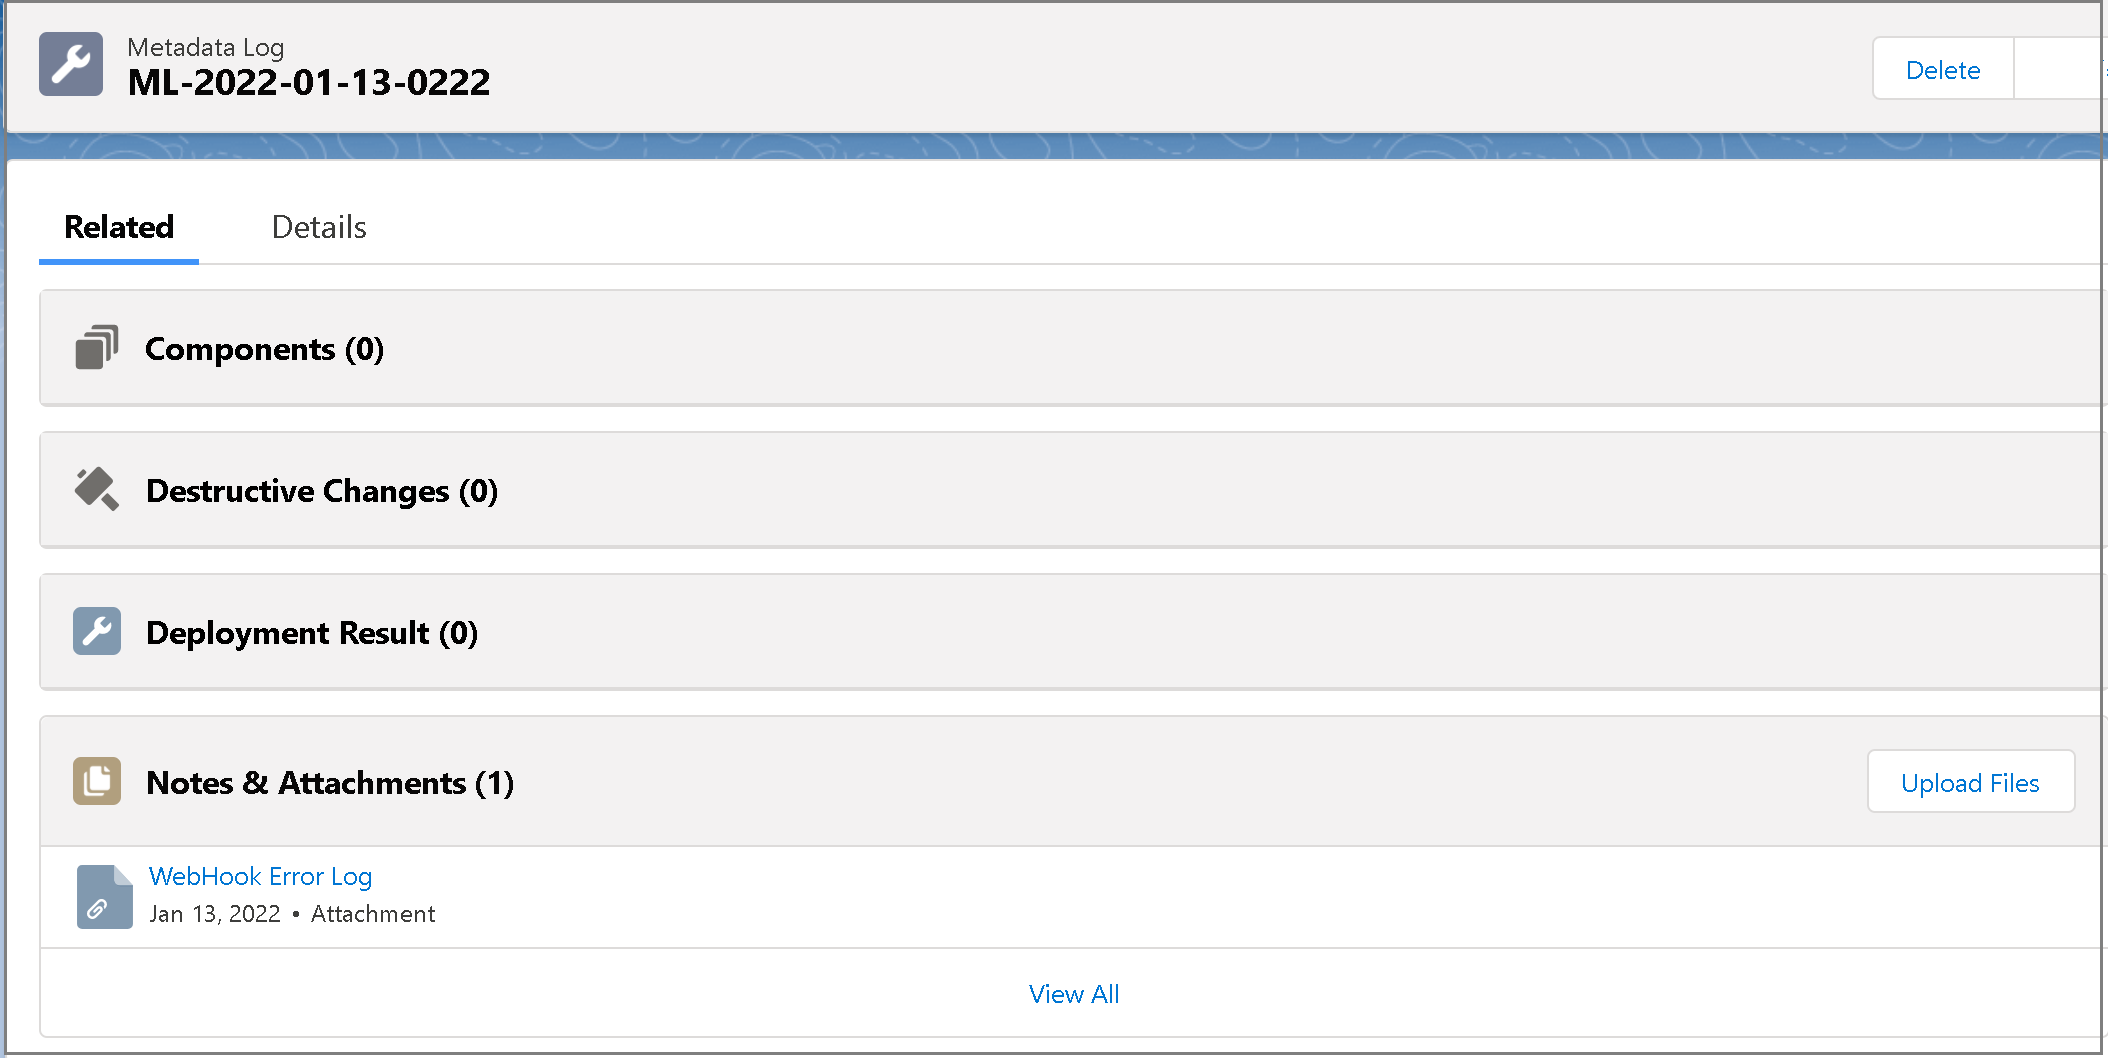
Navigate to one of these Metadata Logs, and the Related tab will show any relevant error logs in the Notes & Attachments related list.

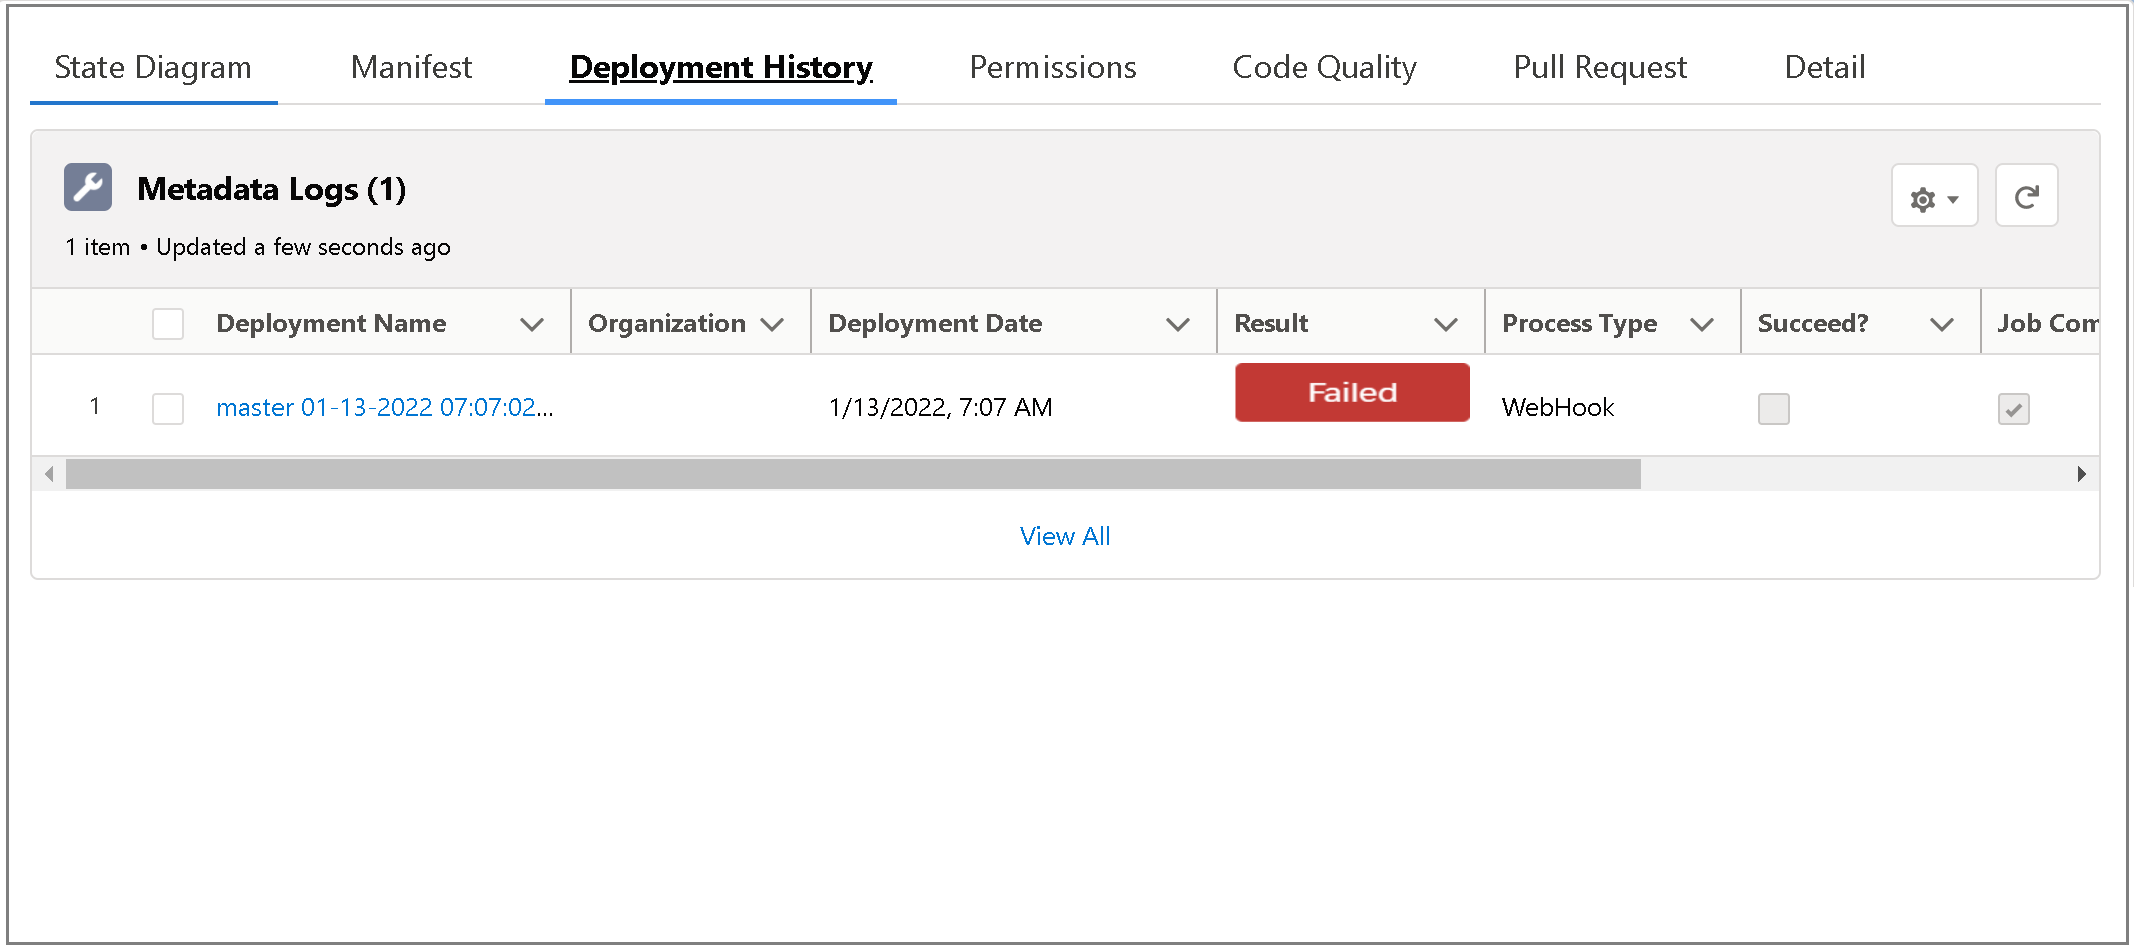
Note: This webhook step does not wait for the Jenkins job itself to complete, but rather just the callback response to return. Currently, there is an error in Flosum that shows the deployment step as failed if the callback response is a 201 (which is what Jenkins returns when successfully triggering a job).

This will be the attached log, and the deployment history and pipeline step execution will both show as failed, even though the call was successful.
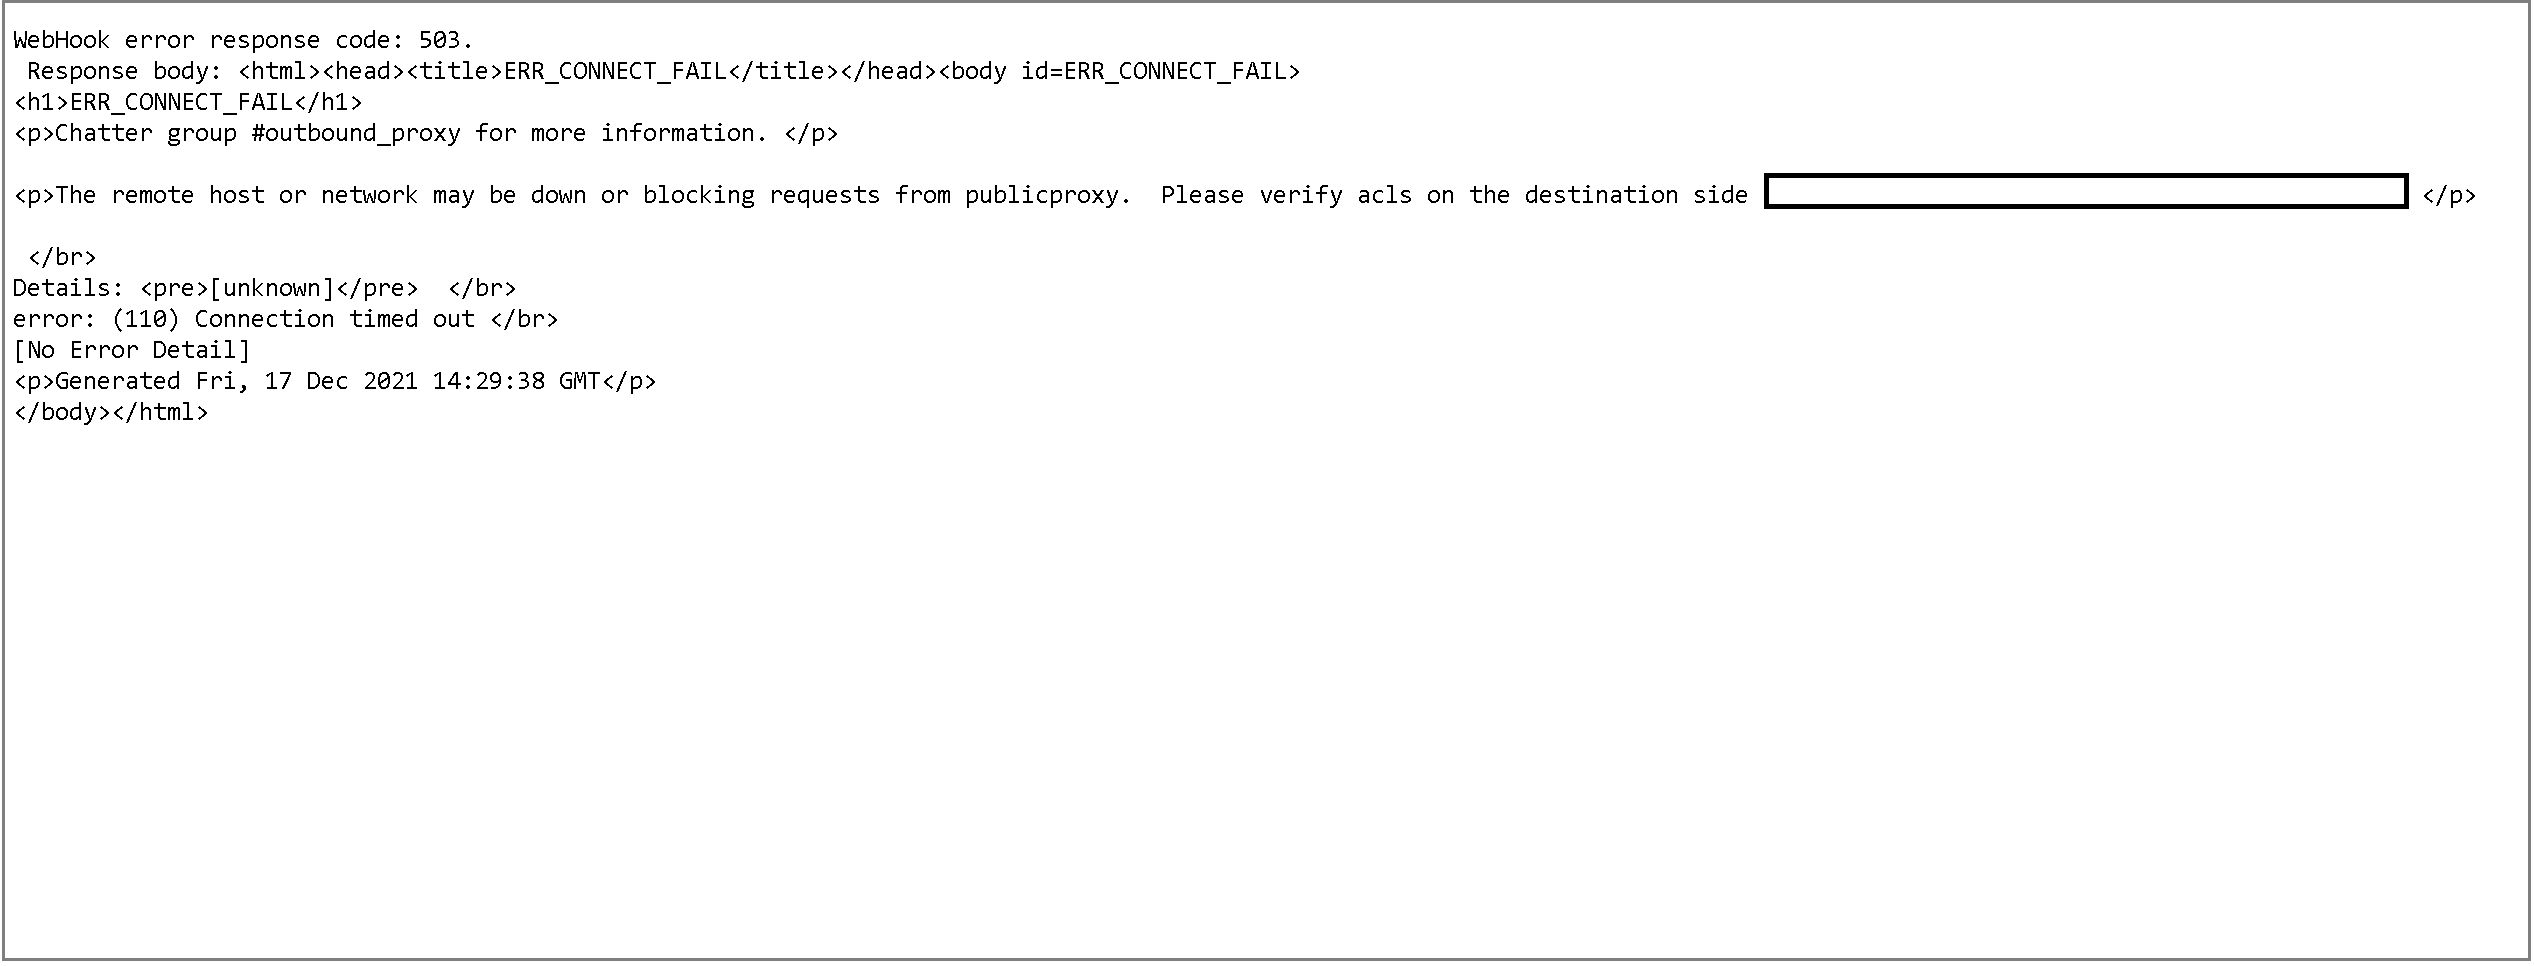
If you are queuing your pipeline and do not see anything occur on the Jenkins side, then you might be getting a timeout due to a network firewall blocking the connection. If it is blocked, you can check the deployment history metadata logs for a similar message.

You may also see the following error if your webhook URL is malformed or not sending properly: webhook error: Read timed out.
For a more detailed view of the results of the tests, you’ll have to navigate to the Jenkins job itself. You can also configure your build.xml in Automation to email test reports once completed.
- Provar Automation V2
- System Requirements
- Browser and Driver Recommendations
- Installing Provar Automation
- Updating Provar Automation
- Licensing Provar
- Granting Org Permissions to Provar Automation
- Optimizing Org and Connection Metadata Processing in Provar
- Using Provar Automation
- Understanding Provar’s Use of AI Service for Test Automation
- Provar Automation
- Creating a New Test Project
- Import Test Project from a File
- Import Test Project from a Remote Repository
- Import Test Project from Local Repository
- Commit a Local Test Project to Source Control
- Salesforce API Testing
- Behavior-Driven Development
- Consolidating Multiple Test Execution Reports
- Creating Test Cases
- Custom Table Mapping
- Functions
- Debugging Tests
- Defining a Namespace Prefix on a Connection
- Defining Proxy Settings
- Environment Management
- Exporting Test Cases into a PDF
- Exporting Test Projects
- Japanese Language Support
- Override Auto-Retry for Test Step
- Customize Browser Driver Location
- Mapping and Executing the Lightning Article Editor in Provar
- Managing Test Steps
- Namespace Org Testing
- NitroX
- Provar Test Builder
- ProvarDX
- Refresh and Recompile
- Reintroduction of CLI License Check
- Reload Org Cache
- Reporting
- Running Tests
- Searching Provar with Find Usages
- Secrets Management and Encryption
- Setup and Teardown Test Cases
- Tags and Service Level Agreements (SLAs)
- Test Cycles
- Test Data Generation
- Test Plans
- Testing Browser – Chrome Headless
- Testing Browser Options
- Tooltip Testing
- Using the Test Palette
- Using Custom APIs
- Callable Tests
- Data-Driven Testing
- Page Objects
- Block Locator Strategies
- Introduction to XPaths
- Creating an XPath
- JavaScript Locator Support
- Label Locator Strategies
- Maintaining Page Objects
- Mapping Non-Salesforce fields
- Page Object Operations
- ProvarX™
- Refresh and Reselect Field Locators in Test Builder
- Using Java Method Annotations for Custom Objects
- Applications Testing
- Database Testing
- Document Testing
- Email Testing
- Email Testing in Automation
- Email Testing Examples
- Gmail Connection in Automation with App Password
- App Configuration for Microsoft Connection in MS Portal for OAuth 2.0
- OAuth 2.0 Microsoft Exchange Email Connection
- Support for Existing MS OAuth Email Connection
- OAuth 2.0 MS Graph Email Connection
- Create a Connection for Office 365 GCC High
- Mobile Testing
- OrchestraCMS Testing
- Salesforce CPQ Testing
- ServiceMax Testing
- Skuid Testing
- Vlocity API Testing
- Webservices Testing
- Provar Manager
- How to Use Provar Manager
- Provar Manager Setup
- Provar Manager Integrations
- Release Management
- Test Management
- Test Operations
- Provar Manager and Provar Automation
- Setting Up a Connection to Provar Manager
- Object Mapping Between Automation and Manager
- How to Upload Test Plans, Test Plan Folders, Test Plan Instances, and Test Cases
- Provar Manager Filters
- Uploading Callable Test Cases in Provar Manager
- Uploading Test Steps in Provar Manager
- How to Know if a File in Automation is Linked in Test Manager
- Test Execution Reporting
- Metadata Coverage with Manager
- Provar Grid
- DevOps
- Introduction to Provar DevOps
- Introduction to Test Scheduling
- Apache Ant
- Configuration for Sending Emails via the Automation Command Line Interface
- Continuous Integration
- AutoRABIT Salesforce DevOps in Provar Test
- Azure DevOps
- Running a Provar CI Task in Azure DevOps Pipelines
- Configuring the Automation secrets password in Microsoft Azure Pipelines
- Parallel Execution in Microsoft Azure Pipelines using Multiple build.xml Files
- Parallel Execution in Microsoft Azure Pipelines using Targets
- Parallel execution in Microsoft Azure Pipelines using Test Plans
- Bitbucket Pipelines
- CircleCI
- Copado
- Docker
- Flosum
- Gearset
- GitHub Actions
- Integrating GitHub Actions CI to Run Automation CI Task
- Remote Trigger in GitHub Actions
- Parameterization using Environment Variables in GitHub Actions
- Parallel Execution in GitHub Actions using Multiple build.xml Files
- Parallel Execution in GitHub Actions using Targets
- Parallel Execution in GitHub Actions using Test Plan
- Parallel Execution in GitHub Actions using Job Matrix
- GitLab Continuous Integration
- Travis CI
- Jenkins
- Execution Environment Security Configuration
- Provar Jenkins Plugin
- Parallel Execution
- Running Provar on Linux
- Reporting
- Salesforce DX
- Git
- Version Control
- Salesforce Testing
- Recommended Practices
- Salesforce Connection Best Practices
- Improve Your Metadata Performance
- Java 21 Upgrade
- Testing Best Practices
- Automation Planning
- Supported Testing Phases
- Provar Naming Standards
- Test Case Design
- Create records via API
- Avoid using static values
- Abort Unused Test Sessions/Runs
- Avoid Metadata performance issues
- Increase auto-retry waits for steps using a global variable
- Create different page objects for different pages
- The Best Ways to Change Callable Test Case Locations
- Working with the .testProject file and .secrets file
- Best practices for the .provarCaches folder
- Best practices for .pageObject files
- Troubleshooting
- How to Use Keytool Command for Importing Certificates
- Installing Provar After Upgrading to macOS Catalina
- Browsers
- Configurations and Permissions
- Add Permissions to Edit Provar.ini File
- Configure Provar UI in High Resolution
- Enable Prompt to Choose Workspace
- Increase System Memory for Provar
- Refresh Org Cache Manually
- Show Hidden Provar Files on Mac
- Java Version Mismatch Error
- Unable to test cases, test suites, etc… from the Test Project Navigation sidebar
- Connections
- DevOps
- Error Messages
- Provar Manager 3.0 Install Error Resolution
- Provar Manager Test Case Upload Resolution
- Administrator has Blocked Access to Client
- JavascriptException: Javascript Error
- Resolving Failed to Create ChromeDriver Error
- Resolving Jenkins License Missing Error
- Resolving Metadata Timeout Errors
- Test Execution Fails – Firefox Not Installed
- Selenium 4 Upgrade
- Licensing, Installation and Firewalls
- Memory
- Test Builder and Test Cases
- Release Notes
- Provar Automation V3
- Automation V3: Setting Java Development Kit (JDK) Environment Variables
- Automation V3: Adding a Salesforce OAuth (Web Flow) Connection
- Automation V3: Docker Runner
- Automation V3: Running Automation Tests on Jenkins
- Automation V3: Remote Trigger in GitHub Actions
- Automation V3: Internationalization Support
- Automation V3: Configuration on Jenkins
- Automation V3: Provar Manager – Test Execution Reporting
- Automation V3: Secrets Management and Encryption
- Automation V3: Updating Automation on Windows
- Automation V3: Updating Automation on Mac
- Automation V3: Installing Automation on Windows
- Automation V3: Installing Automation on Mac
- Automation V3: Commit a Local Test Project to Source Control
- Automation V3: Activating Your License
- Automation V3: Resolving High Memory Usage
- Automation V3: Test Palette Introduction
- Automation V3: Provar Naming Standards
- Automation V3: Refresh Org Cache Manually
- Automation V3: Show Hidden Provar Files on Mac
- Automation V3: NitroX Supported Components
- Automation V3: Salesforce Lightning Web Component (LWC) Locator Support
- Automation V3: Enabling and Disabling NitroX
- Automation V3: Introducing NitroX
- Automation V3: Salesforce Connection Best Practices
- Automation V3: Version Control and DevOps
- Automation V3: Test Case Design
- Automation V3: Salesforce DX Integration
- Automation V3: Running Provar on Linux
- Automation V3: Variable Set Syntax
- Automation V3: Provar Jenkins Plugin
- Automation V3: Introduction to Test Scheduling
- Automation V3: Execution Environment Security Configuration
- Automation V3: GitHub Desktop – Creating a Git Repository for Automation Projects
- Automation V3: Amazon Web Service (AWS) & Jenkins Configuration
- Automation V3: Setting up Continuous Integration
- Automation V3: Integrating GitHub Actions CI to Run Automation CI Task
- Automation V3: GitLab Continuous Integration
- Automation V3: Gearset DevOps CI/CD via Jenkins
- Automation V3: Parallel Execution in GitHub Actions using Test Plan
- Automation V3: Parallel Execution in GitHub Actions using Job Matrix
- Automation V3: Parallel Execution in GitHub Actions using Targets
- Automation V3: Parallel Execution in GitHub Actions using Multiple build.xml Files
- Automation V3: Flosum Integration Introduction
- Automation V3: Flosum Configuration
- Automation V3: Setting up Continuous Integration with Jenkins for Docker
- Automation V3: Flosum Architecture Overview
- Automation V3: Docker Continuous Integration
- Automation V3: Generating the build.xml File for Docker
- Automation V3: Running Provar Tests on Docker using Docker File
- Automation V3: Copado Integration Introduction
- Automation V3: Provar Test Results Package
- Automation V3: Copado Architecture Overview
- Automation V3: Copado Configuration
- Automation V3: CircleCI Common Build Errors
- Automation V3: CircleCI Orbs
- Automation V3: Running a Provar CI Task in Azure DevOps Pipelines
- Automation V3: CircleCI via Docker
- Automation V3: Parallel Execution in Microsoft Azure Pipelines using Multiple build.xml Files
- Automation V3: Parallel Execution in Microsoft Azure Pipelines using Targets
- Automation V3: Parallel Execution in Microsoft Azure Pipelines using Test Plans
- Automation V3: Configuring the Automation Secrets Password in Microsoft Azure Pipelines
- Automation V3: System Requirements
- Installing Provar Automation V3
- Updating Provar Automation V3
- Licensing Provar Automation V3
- Automation V3: Optimizing Org and Connection Metadata Processing in Provar
- Automation V3: Granting Org Permissions to Provar Automation
- Using Provar Automation V3
- Automation V3: Provar Automation
- Automation V3: Test Data Generation
- Automation V3: Creating a New Test Project
- Automation V3: Creating Custom Test Steps
- Automation V3: Provar Test Builder
- Automation V3: Reintroduction of CLI license Check
- Automation V3: Creating Test Cases
- Automation V3: Debugging Tests
- Automation V3: Environment Management
- Automation V3: Managing Test Steps
- Automation V3: Reporting
- Automation V3: Import Test Project from a File
- Automation V3: Import Test Project from Local Repository
- Automation V3: Import Test Project from a Remote Repository
- Automation V3: Running Tests
- Automation V3: Testing Browser Options
- Automation V3: Testing Browser – Chrome Headless
- Automation V3: Provar Feature Flags and Properties Configuration
- Automation V3: Defining Proxy Settings
- Automation V3: Behavior-Driven Development
- Automation V3: Customize Browser Driver Location
- Automation V3: Setup and Teardown Test Cases
- Automation V3: Japanese Language Support
- Automation V3: Reload Org Cache
- Automation V3: Using Java Method Annotations for Custom Objects
- Automation V3: Salesforce API Testing
- Automation V3: Consolidating Multiple Test Execution Reports
- Automation V3: Tags and Service Level Agreements (SLAs)
- Automation V3: Test Plans
- Automation V3: Searching Provar with Find Usages
- Automation V3: Exporting Test Projects
- Automation V3: Tooltip Testing
- Automation V3: Refresh and Recompile
- Custom Table Mapping in V3
- NitroX in V3
- ProvarDX in V3
- Test Cycles in V3
- Using Custom APIs in V3
- Page Objects in V3
- Automation V3: ProvarX™
- Automation V3: Creating an XPath
- Automation V3: Mapping Non-Salesforce Fields
- Automation V3: Introduction to XPaths
- Automation V3: JavaScript Locator Support
- Automation V3: Create different page objects for different pages
- Automation V3: Maintaining Page Objects
- Automation V3: Refresh and Reselect Field Locators in Test Builder
- Callable Tests in V3
- Functions in V3
- Automation V3: TestCaseErrors
- Automation V3: TestRunErrors
- Automation V3: TestCaseSuccessful
- Automation V3: TestCaseOutCome
- Automation V3: TestCasePath
- Automation V3: StringTrim
- Automation V3: TestCaseName
- Automation V3: DateFormat
- Automation V3: Not
- Automation V3: IsSorted
- Automation V3: StringReplace
- Automation V3: StringNormalize
- Automation V3: DateParse
- Automation V3: DateAdd
- Automation V3: GetEnvironmentVariable
- Automation V3: GetSelectedEnvironment
- Automation V3: NumberFormat
- Automation V3: Using Functions
- Automation V3: UniqueId
- Automation V3: Count
- Automation V3: Round
- Using the Test Palette in V3
- Automation V3: Read Test Step
- Automation V3: String Test Steps
- Automation V3: Generate Test Case
- Automation V3: For Each Test Step
- Automation V3: Page Object Cleaner
- Automation V3: Assert Salesforce Layout
- Automation V3: Break Test Step
- Automation V3: UI On Screen
- Automation V3: UI Handle Alert
- Automation V3: UI Assert
- Automation V3: Set Values
- Automation V3: UI With Row
- Automation V3: UI Action
- Automation V3: UI Connect
- Automation V3: Fail Test Step
- Automation V3: While Test Step
- Automation V3: Apex Execute
- Automation V3: List Compare
- Automation V3: UI Navigate
- Automation V3: UI Fill
- Automation V3: If Test Step
- Automation V3: Group Steps Test Step
- Automation V3: Set Values Test Step
- Automation V3: Apex Bulk
- Automation V3: Sleep Test Step
- Automation V3: Switch Test Step
- Automation V3: Finally Test Step
- Automation V3: Wait For Test Step
- Automation V3: Extract Salesforce Layout
- Automation V3: Assert Test Step
- Applications Testing in V3
- Automation V3: Mobile Emulation (Salesforce Mobile)
- Automation V3: Using Provar with Amazon Web Services (AWS) Device Farm
- Automation V3: PDF Testing
- Automation V3: App Configuration for Microsoft Connection in MS Portal for OAuth 2.0
- Automation V3: OAuth 2.0 Microsoft Exchange Email Connection
- Automation V3: Create a Connection for Office 365 GCC High
- Automation V3: Support for Existing MS OAuth Email Connection
- Automation V3: Gmail Connection in Automation with App Password
- Automation V3: Email Testing in Automation
- Automation V3: OAuth 2.0 MS Graph Email Connection
- Automation V3: Email Testing Examples
- Automation V3: Database Connections
- Automation V3: Web Services
- Data-Driven Testing in V3
- DevOps with V3
- Automation V3: Introduction to Provar DevOps
- Automation V3: Bitbucket Pipelines
- Automation V3: Perfecto Mobile
- Automation V3: ANT Task Parameters
- Automation V3: ANT: Generating ANT Build File
- Automation V3: ANT Licensing
- Automation V3: Reading Data from Excel
- Automation V3: Configuration on other CI tools
- Automation V3: Setting Apache Ant Environment Variables
- Automation V3: BrowserStack Desktop
- Automation V3: Integrating with LambdaTest
- Automation V3: Sauce Labs Desktop
- Automation V3: AutoRABIT Salesforce DevOps in Provar Test
- Automation V3: Selenium Grid
- Automation V3: Working with Git
- Automation V3: Configuration for Sending Emails via the Automation Command Line Interface
- Automation V3: Parameterization using Environment Variables in GitHub Actions
- Automation V3: Slack Integration with Automation
- Automation V3: Zephyr Cloud and Server
- Automation V3: Adding a Salesforce Communities Connection
- Automation V3: Integrating with Sauce Labs Real Device
- Automation V3: Travis CI
- Salesforce Testing with V3
- Automation V3: Salesforce Release Updates
- Automation V3: Adding a Salesforce Connection
- Automation V3: Adding a Log-on As Connection
- Automation V3: Adding a Salesforce OAuth (JWT Flow) Connection
- Automation V3: Salesforce Console Testing
- Automation V3: Adding a Salesforce Portal Connection
- Automation V3: Visualforce Testing
- Automation V3: List and Table Testing
- Provar Manager and Provar Automation V3
- Automation V3: Setting Up a Connection to Provar Manager
- Automation V3: Provar Manager Filters
- Automation V3: Importing 3rd-Party Test Projects
- Automation V3: Uploading Test Steps in Provar Manager
- Automation V3: Test Management
- Automation V3: Provar Manager Test Operations
- Automation V3: Provar Manager Test Execution
- Automation V3: Release Management
- Automation V3: Provar Manager Plugins
- Automation V3: Provar Manager Test Coverage
- Automation V3: Provar Manager Setup and User Guide
- Automation V3: Uploading 3rd-Party Test Results
- Automation V3: Uploading Existing Manual Test Cases to Provar Manager with DataLoader.Io
- Automation V3: Quality Journey, Quality Center, and Dashboards
- Automation V3: Object Mapping Between Provar Automation and Provar Manager
- Automation V3: Uploading Callable Test Cases in Provar Manager
- Automation V3: Metadata Coverage with Manager
- Recommended Practices with V3
- Automation V3: Automation Planning
- Automation V3: Supported Testing Phases
- Automation V3: Best practices for the .provarCaches folder
- Automation V3: Best practices for .pageObject files
- Automation V3: Avoid Metadata performance issues
- Automation V3: The Best Ways to Change Callable Test Case Locations
- Automation V3: Improve Your Metadata Performance
- Automation V3: Abort Unused Test Sessions/Runs
- Automation V3: Create Records via API
- Automation V3: Increase auto-retry waits for steps using a global variable
- Troubleshooting with V3
- Automation V3: Add Permissions to Edit Provar.ini File
- Automation V3: Test Builder Does Not Launch
- Automation V3: Provar License Issue Solution
- Automation V3: How to Configure a Single Sign-On Connection
- Automation V3: Out of Memory Error During CI Execution
- Automation V3: Add Gmail Firewall Exception
- Automation V3: Add a License Firewall Exception
- Automation V3: Resolving Jenkins License Missing Error
- Automation V3: Increase System Memory for Provar
- Automation V3: Resolving Metadata Timeout Errors
- Automation V3: How to Use Keytool Command for Importing Certificates
- Automation V3: Java Version Mismatch Error
- Automation V3: Provar Manager 3.0 Install Error Resolution
- Automation V3: Test Case Does Not Run on IE Browser
- Automation V3: Test Builder Not Working Correctly
- Provar Grid and Provar Automation V3
- AI with Provar Automation V3